
Google Tag Manager (GTM) is a powerful tool that makes it easy to manage all your tracking and marketing tags (Facebook Pixel, Google Analytics, Microsoft Clarity…) from one place without needing to edit your site every time you want to add a new tag or remove/edit an existing one. However, adding GTM the wrong way can seriously slow down your site. So how can we add it correctly, without sacrificing performance?
What we’re about to do
In this article, we’ll show you exactly how to add Google Tag Manager manually to your WordPress site using the functions.php file, and how to delay the GTM JavaScript loading so it doesn’t block the rendering of the page or ruin your Core Web Vitals. No unnecessary plugins. No render-blocking JavaScript bloat.
In addition, we’ll show you a few tricks to improve the performance of Google Tag Manager itself.
To start, two JavaScript code snippets will need to be added to every page of your WordPress site:
- One snippet will be placed in the
<head> - The other snippet will go after the opening
<body>tag
Both code snippets can be added to every single page of your site by adding them to your functions.php file. This might sound simple – and it is – but there are right and wrong ways to do it if you care about performance.
The functions.php file is a file inside your WordPress theme that lets you add custom PHP code to extend or modify your site’s behavior. If you’re not familiar with it, we recommend checking out our guide on how to access and safely edit the functions.php file.
Step-by-step guide to adding GTM via functions.php
Before you start
- Always back up your
functions.phpfile before editing it. - If you’re using a child theme, make the edits there instead of the parent theme.
1. Copy your GTM code snippets
First, you’ll need to get your unique Google Tag Manager (GTM) code snippets and have them ready to paste into your site’s functions.php.
Here’s how to find them:
- Go to https://tagmanager.google.com and log in.
- Select your account and container.
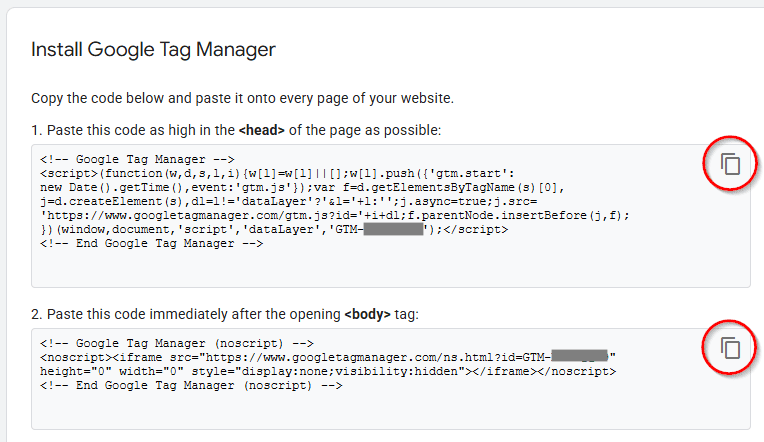
- Click on Install Google Tag Manager (top right), or go to Admin > Install Google Tag Manager.
- A popup will display two code snippets.
- Have both codes available and ready – you’ll need them in the next steps.
2. Add the GTM <head> code using the wp_head hook
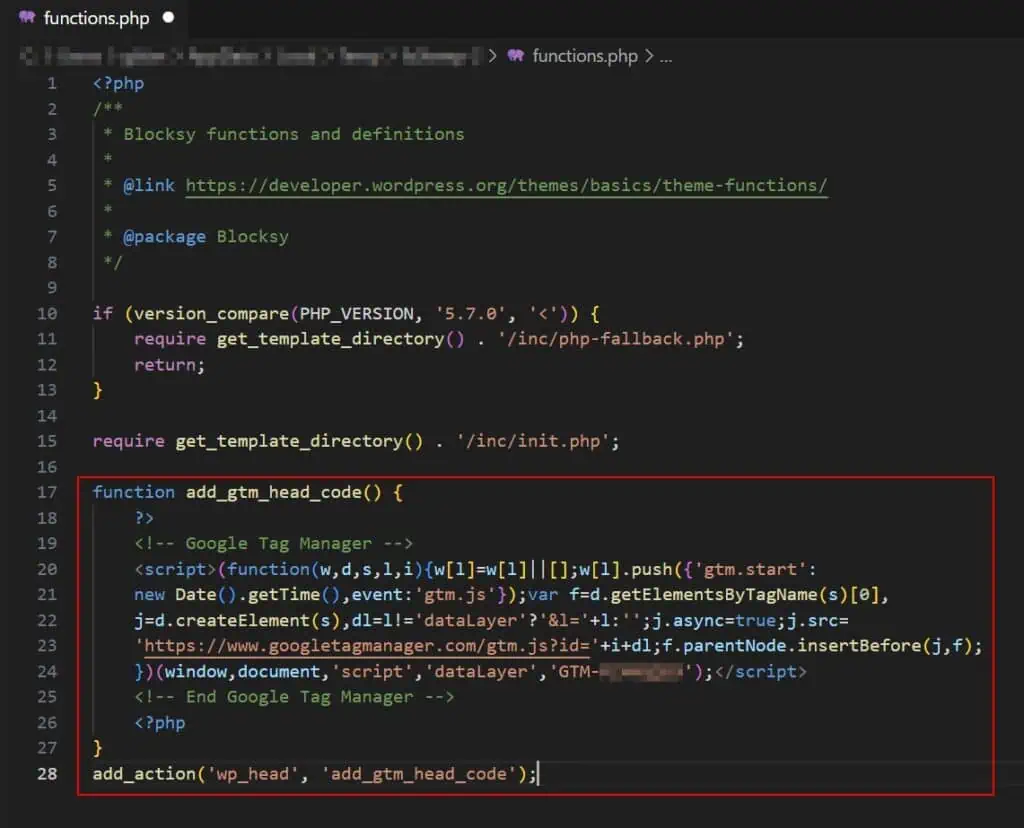
Open your theme’s functions.php file and add the following at the end of the file
function add_gtm_head_code() {
    ?>
    [Paste your GTM head snippet here — the one with the <script> tag]
    <?php
}
add_action('wp_head', 'add_gtm_head_code');
Now replace the line that says [Paste your GTM head snippet here — the one with the <script> tag] with the first snippet you got from Google Tag Manager. For example:
3. Add the GTM <body> code using wp_body_open hook (WordPress 5.2+)
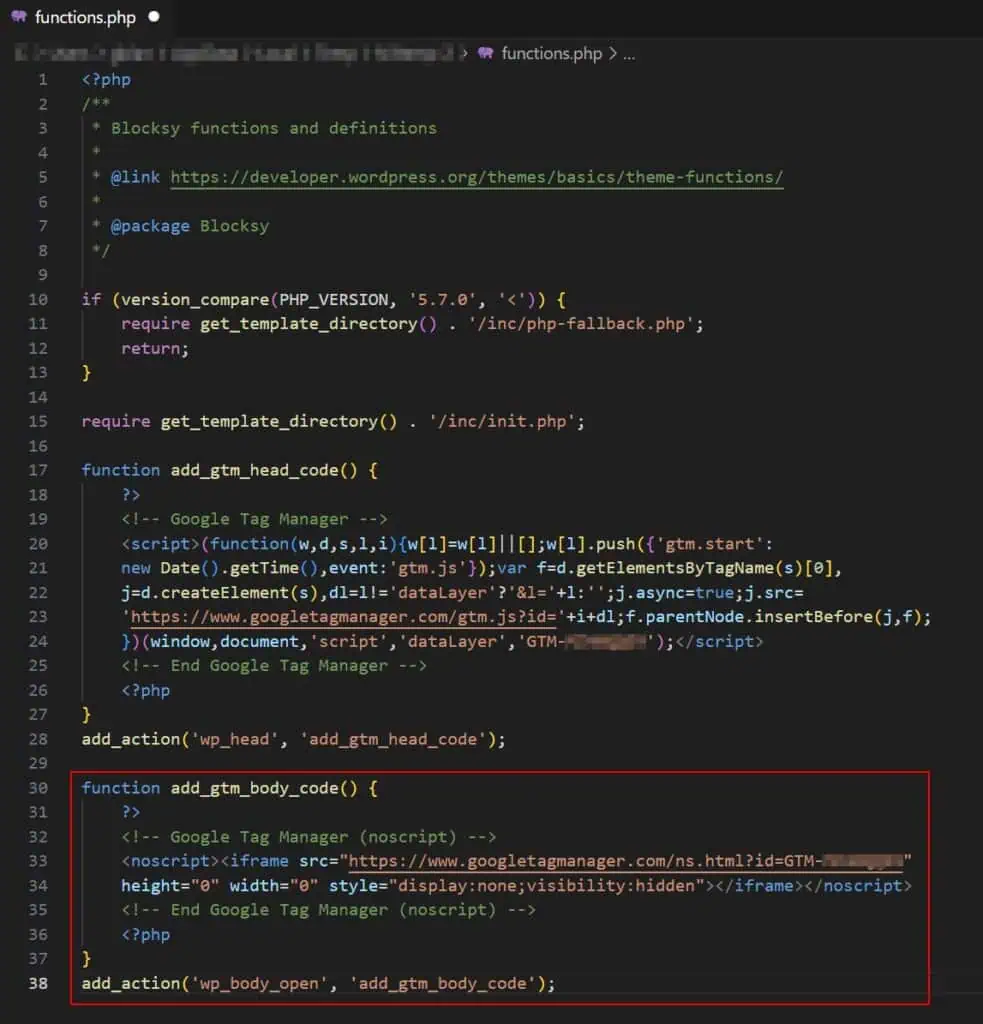
In the same functions.php file, add this code right after the previous one:
function add_gtm_body_code() {
    ?>
    [Paste your GTM body snippet here — the one with the <noscript>]
    <?php
}
add_action('wp_body_open', 'add_gtm_body_code');
Now replace the line that says [Paste your GTM body snippet here — the one with the <noscript>] with the second snippet you got from Google Tag Manager. For example:
If you’re using an older version of WordPress, which does not support the wp_body_open action, you might need to modify your theme’s header.php file manually, which is not recommended unless you’re maintaining a child theme.
Delay the script with an optimization plugin
Once the GTM code is in place, you’ll want to delay its execution using a performance optimization plugin like Perfmatters, WP Rocket, LiteSpeed Cache or Autoptimize Pro. Why? Because loading GTM as early as possible (which is what Google recommends) often clashes with performance best practices like eliminating render-blocking resources and deferring non-critical scripts such as Google Tag Manager.
Delaying GTM makes sure that it doesn’t load before the page is visible to users, which helps maintain fast load times and get better Core Web Vitals scores.
Click here to learn how to delay JavaScript on WordPress sites.
But why not just use a plugin to add GTM to WordPress?
Yes, there are dozens of plugins that promise “easy” GTM integration, but the truth is, most of them are overkill. They often include features you don’t need, run on every page load, and introduce additional JavaScript that slows down your site.
If all you need is to insert two small snippets of code, there’s no reason to install and run a plugin just for that. A manual solution is leaner, faster, and gives you full control, especially when paired with a delay mechanism like Perfmatters, which is one of our favourite tools to optimize your site, and what we use here at Accelera.
How to optimize Google Tag Manager for performance
Adding GTM the right way is only part of the job; optimizing your GTM container is equally important. A bloated or misconfigured container can still hurt your Core Web Vitals and overall site performance.
Here’s a summary of what you can do to keep the GTM setup clean and fast. We recommend you referring to Dumky for a more elaborate explanation on this.
1. Reduce clutter in your container
- Remove unused tags, triggers, and variables regularly. For this, you can use the GTM Export Tools to first export the container and then to find and remove unused elements in bulk.
- Create a documented process for adding and removing tags, and use expiration dates or custom firing schedules for campaign tags.
2. Avoid custom HTML tags and JavaScript variables
- Custom HTML tags slow down your page and increase the risk of performance issues.
- Instead, use built-in tag templates or create custom templates. Templates are parsed once when the GTM container loads, whereas HTML tags are parsed again and again.
3. Use lookup tables to simplify logic
- Lookup tables are powerful tools to replace complex logic in variables.
- Instead of creating multiple tags or variables for different conditions, use a single lookup table to simplify the setup.
4. Don’t inject everything through GTM just because you can
- Avoid using GTM to load heavy third-party tools like chat widgets, heatmaps, or video embeds unless absolutely necessary.
- These tools are best added manually or conditionally, not by default on every page.
5. Delay tag execution
- Don’t fire all tags on page view. Delay non-essential tags to
DOM Readyor evenWindow Loaded. - With this we make sure that tags only run when the user can actually see the page.
6. Fire tags conditionally
- Not every tag needs to fire on every page.
- For example, only fire affiliate tags if a
clickIdis present in the URL, or only fire conversion tags on specific thank-you pages. The fewer tags you fire, the faster your site runs.
7. Reduce the use of variables (especially custom JavaScript)
- Variables run on every page, even if not used.
- Minimize the number of variables, and optimize any custom JavaScript for performance. Where possible, use
sessionStorageorlocalStorageto store calculated values and avoid re-processing them.
8. Use asynchronous scripts only
- Google Tag Manager itself loads asynchronously, but custom HTML tags may introduce synchronous (blocking) scripts.
- Avoid these at all costs. Make sure all third-party requests are async, and cache results when possible.
9. Use server-side tagging
- With GTM Server-side, you can offload tracking scripts from the browser to your own server.
- This reduces the number of third-party scripts in the browser and improves privacy, control, and performance.
- Tools like Segment or a self-hosted tagging server help with this approach.
10. Use a CDN to cache the GTM container
- You can cache the GTM container on your CDN (e.g. Cloudflare) using Cloudflare Workers or similar tools.
- This avoids a fresh GTM container request every time and speeds up load times slightly, especially on repeat visits.


Is there a way to optimize Google Tag Manager using the new script?
Thank you.
Hey Chi, could you clarify what exactly you mean by the new script?