The performance of your website is essential to attracting visitors and maintaining them interested in what you have to offer. If your website is hosted on a low-performing and/or cheap hosting provider such as: Bluehost, SiteGround, Hostgator or many others, you may be experiencing slowness and speed issues that negatively affect the user experience and ultimately, your business objectives. Or you have probably wondered how other websites (this one included) do it to work so fast.
The problem with hosting services that you always see advertised with great fanfare, and which are sometimes very cheap, is that they are usually shared hosting, where the same server resources are shared between hundreds of websites. Normally you will share a server with heavy websites made with heavy themes and bad plugins that will consume a lot of resources. Result: your website is very slow.
The option that immediately comes to mind if you want to have better performance is to go for Managed WordPress Hosting (Kinsta, Rocket.net, Cloudways…), but they are much more expensive and there are many cases in which companies spend a lot more money on marketing than in improving the performance of your servers.
In this article, we will show you how to greatly improve the speed of your hosting, and at the same time reduce your expenses or at least not pay as much as you expected by migrating your WordPress website to a Hetzner VPS managed with the cloud panel of RunCloud. Why this option? Because by choosing the VPS or server yourself and how to manage it, you will get more performance for a better price. The same thing happens when you buy an already assembled computer from any brand (HP, Dell, IBM…) instead of buying the parts one by one (processor, RAM, hard drive…) and assembling the computer yourself; It will be cheaper and you will get better performance, at the cost of being a little more complicated to start up. But don’t worry, we will guide you step by step with this migration. Both Hetzner and RunCloud are our preferred options for price, quality and performance.
In addition, you will learn how to migrate your domain to MrDomain and your emails, in order to free yourself from the not very legitimate marketing tactics of many hosting companies.
Beware! Before you get started, you need to consider all the pros and cons of switching to a managed VPS with a “cloud panel”.
– Pro: Much better performance and loading speed of the website
– Pro: Best price
– Con: Less technical support available
Knowing this, let’s get to it!
Step 1: Initial preparation
Before starting the migration, it is important that you make some initial preparations.
Backup your website
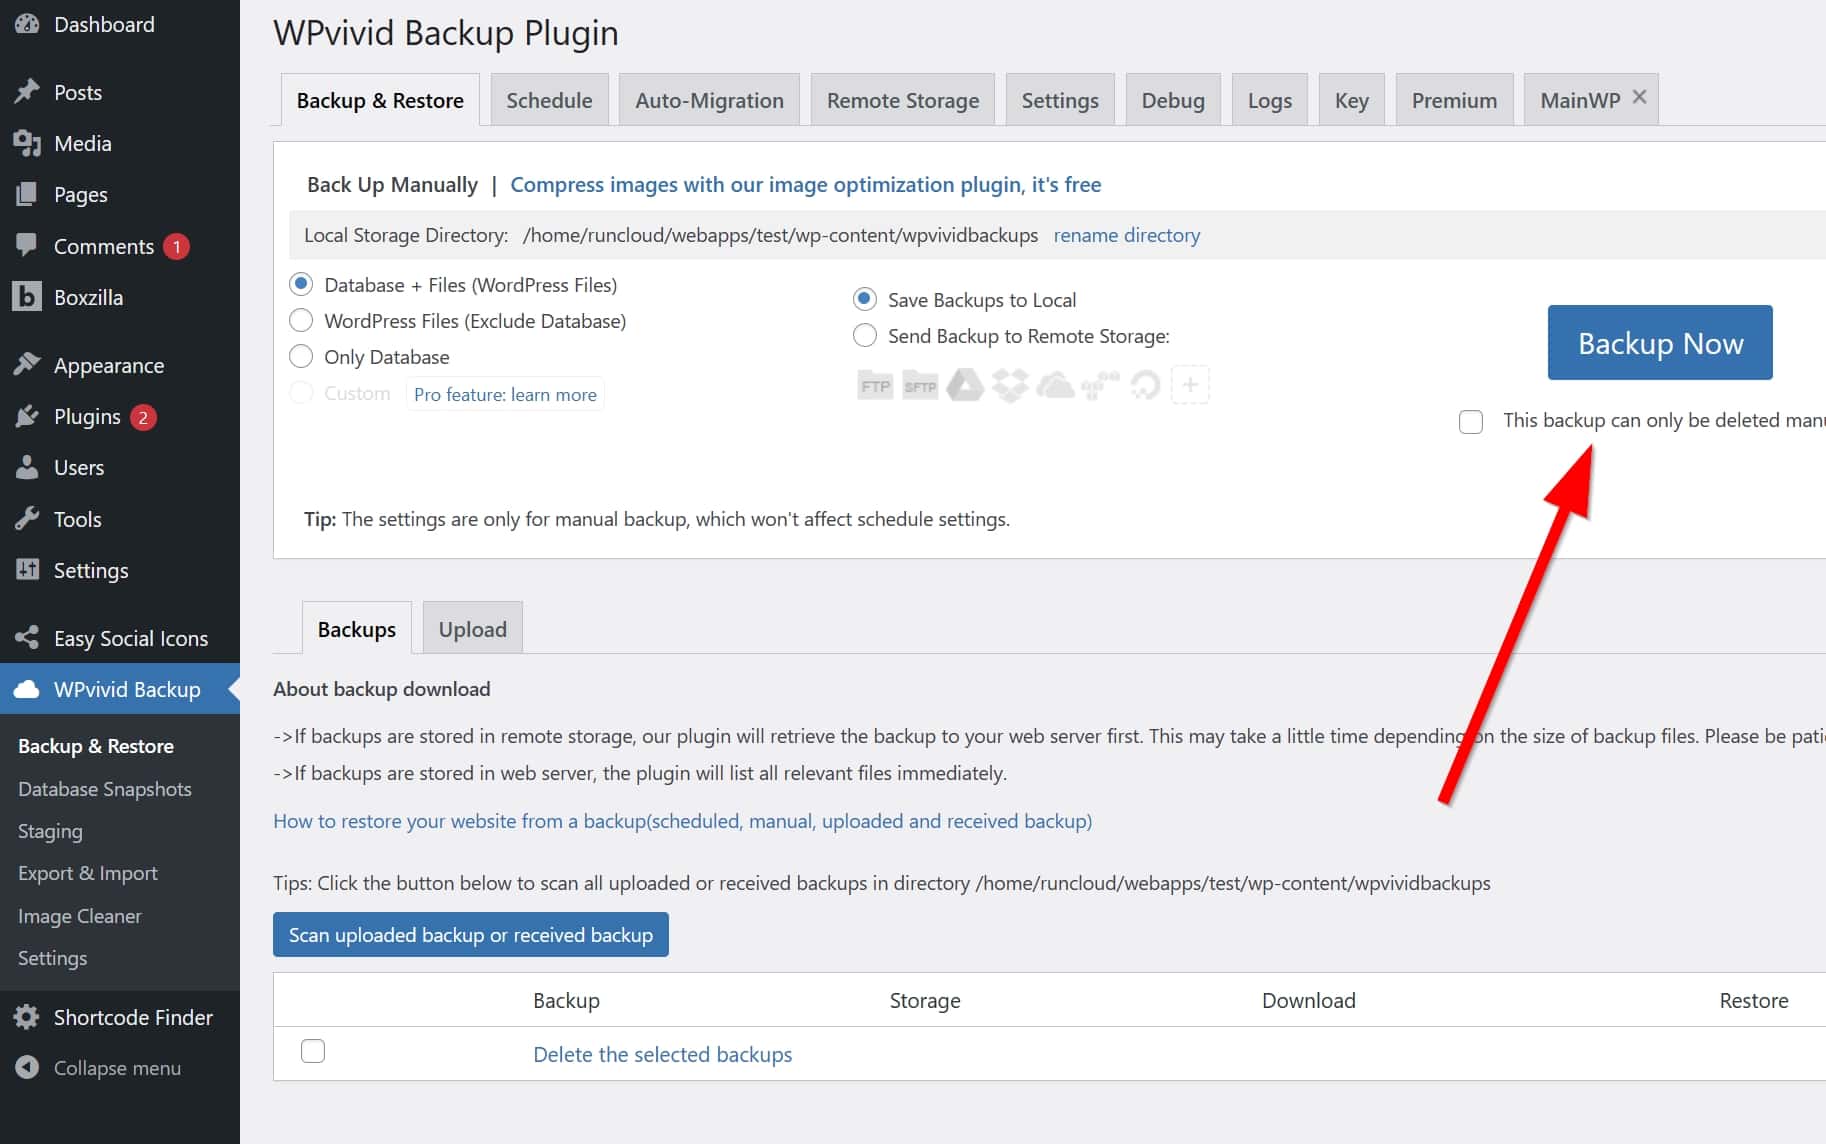
Make sure you have a full backup of your current website, so you can do a “copy and paste” to the new Hetzner server. Use a WordPress backup plugin, such as WPvivid (recommended). The instructions below will assume that you are using WPvivid. We do not recommend that you use the backup tool provided by your current hosting provider, because you will not be able to easily restore your website to another site; They are only useful if the restore is done to the same account from the same provider.
When you have installed the WPvivid plugin on your website, in the same WordPress administration panel, it is as easy as going to WPvivid Backup > Backup and restore and directly clicking on the big “Backup Now” button.
Once done, download it to your computer. It will be in ZIP format, and depending on the size of your website, there will be one or multiple files.
Register for an account in Hetzner
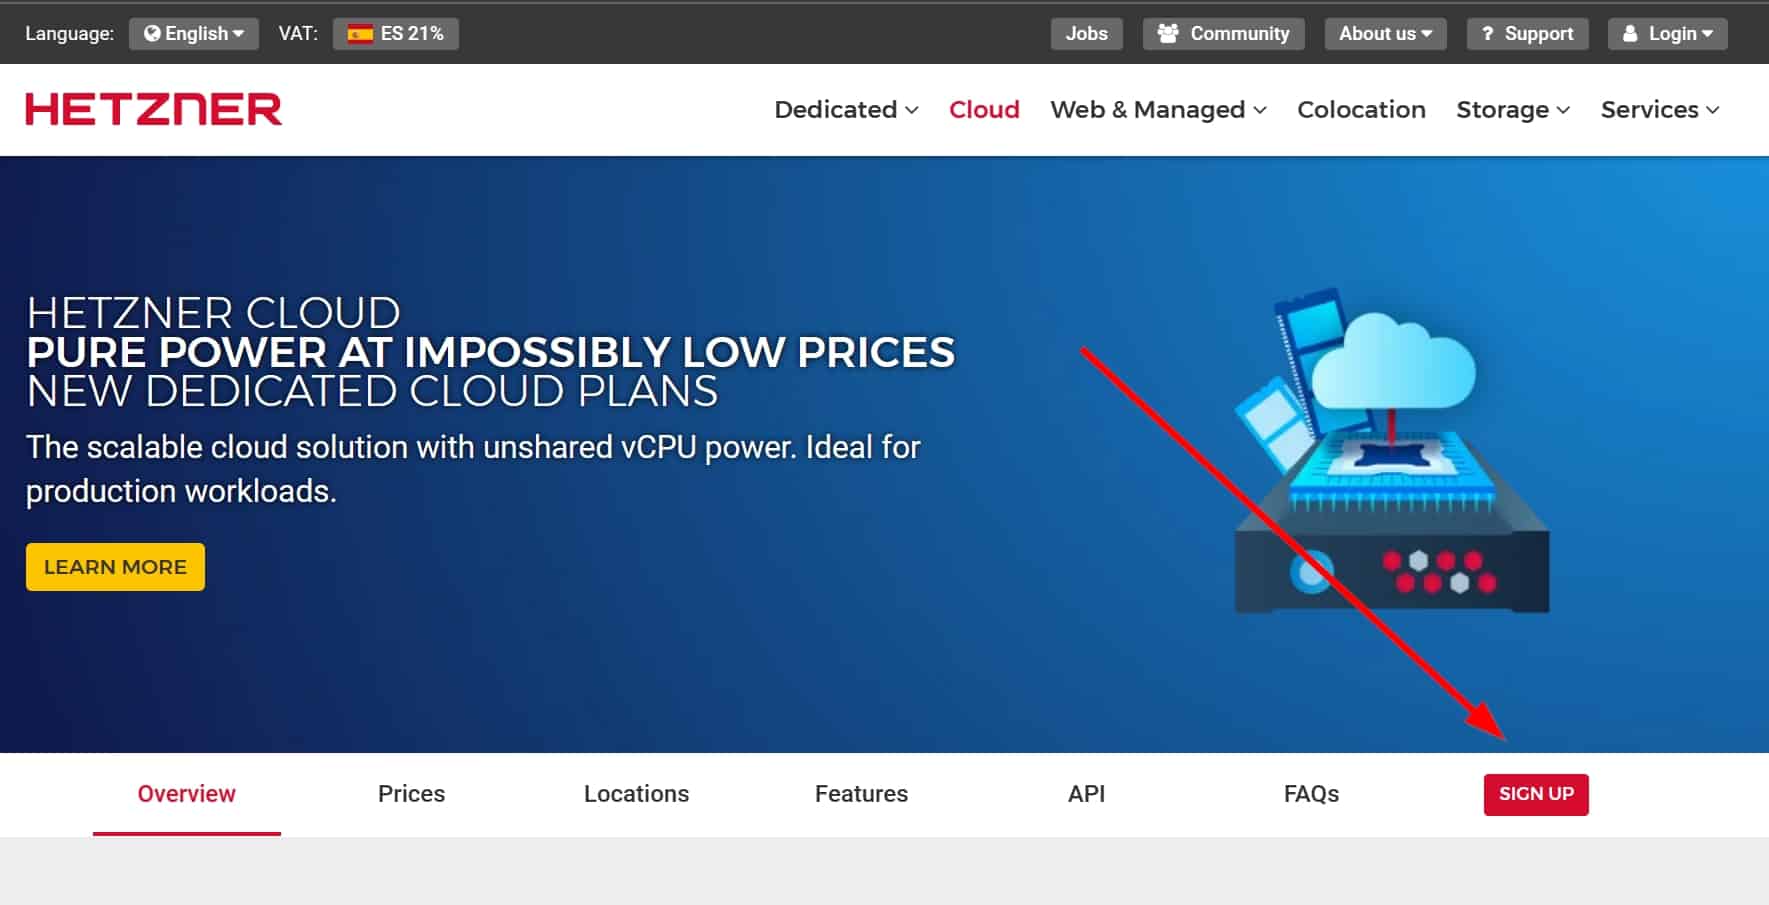
- Go to the Hetzner website and register for an account. Look for the “SIGN UP” button.

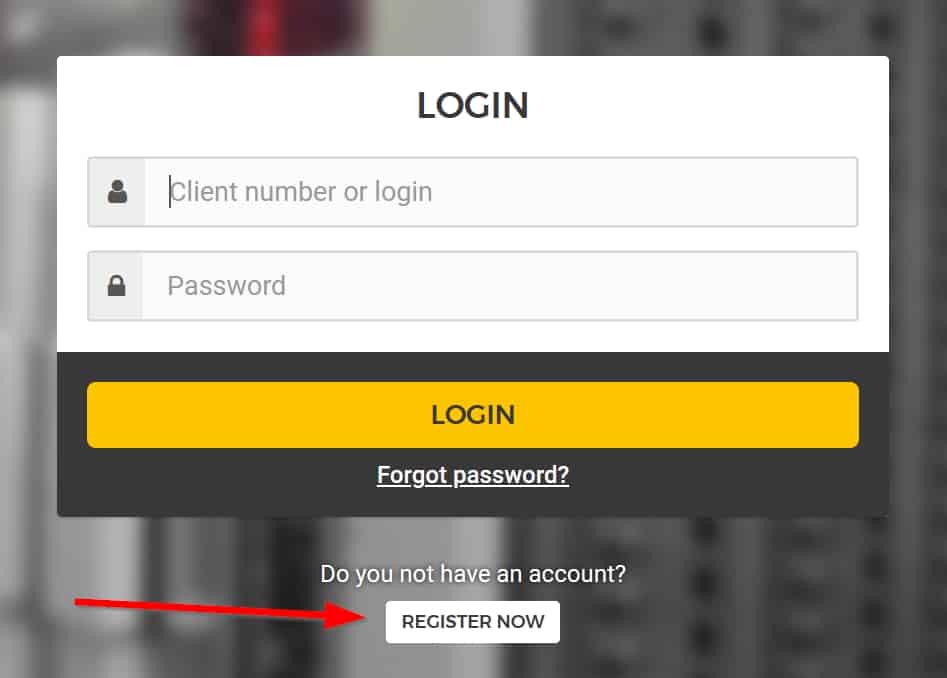
- Now click on the “REGISTER NOW” button.

- Type your email, password, and follow the steps indicated by the system, some among which you will have to enter your personal information and the payment method.

- Once your account is created you will have to choose a server according to your needs. Later we will see how and which one to choose.
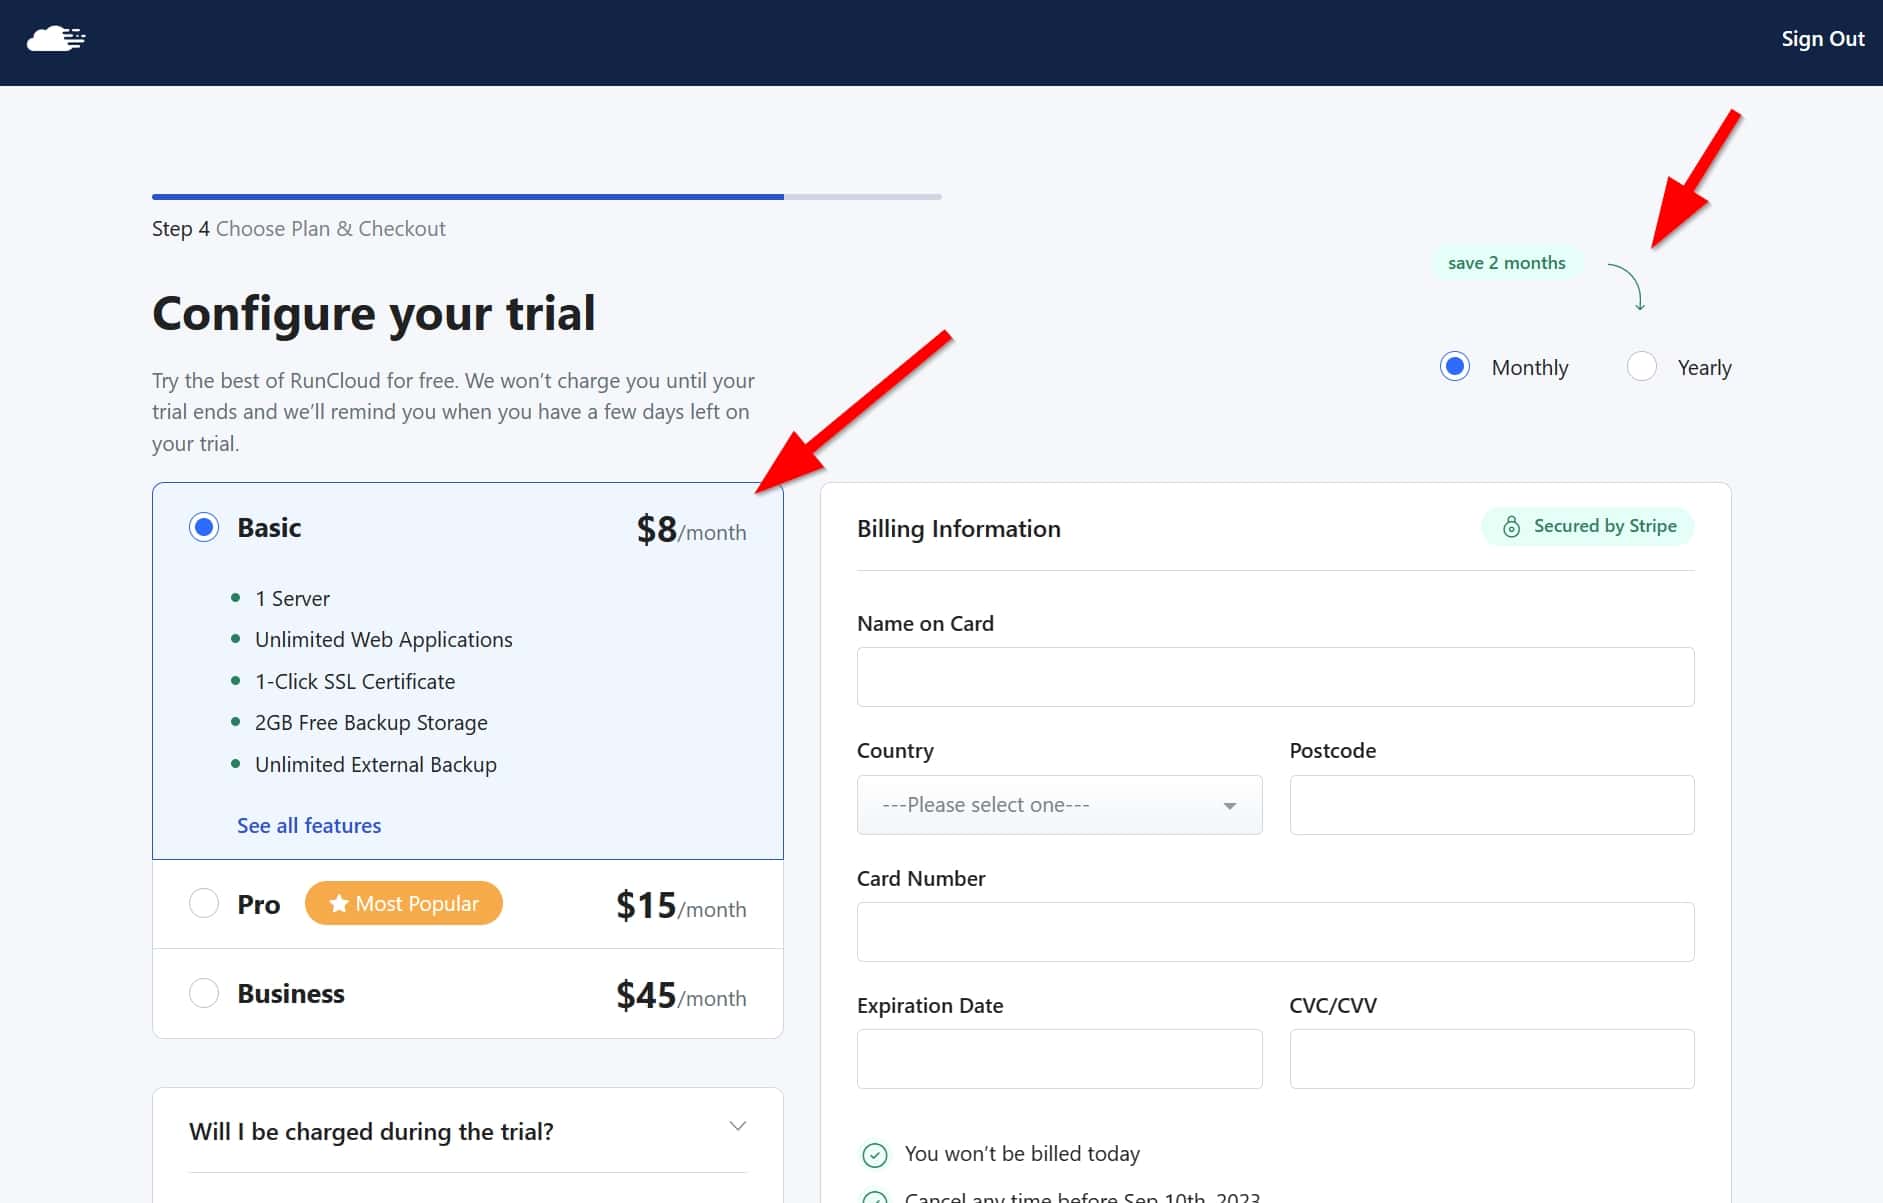
Register for an account in RunCloud
Likewise, sign up for RunCloud, which is a platform that will make it easier to manage your server at Hetzner.
- Inside RunCloud, look for the “Sign Up” button. If you can’t find it, this is the link: https://manage.runcloud.io/auth/onboard
- Follow the instructions to register, where you will have to enter your details and credit card again. When you have to enter your credit card information, you have to keep two things in mind:
- Select the «Essentials» plan (RunCloud’s entry plan; previously called “Basic”). The other plans are for users with more advanced needs.
- Choose if you want to pay monthly (“Monthly”) or save two months and pay annually (“Yearly”).

- Later in the article we’ll talk more about how to connect RunCloud to Hetzner.
Transfer your domain to MrDomain
We are going to transfer your domain to MrDomain. Contrary to what any hosting company will recommend, it is advisable to have the website in one company and the domain in another, not both together. This is for security: if there is a problem on the website, at least the domain will be safe and vice versa; If the two elements are together, when there is a problem in one, you will have it in the other.
Since the transfer process changes a lot depending on what domain you have and what company it was initially purchased from, it is best to take a look at MrDomain’s official help and ask them for help if you need it. If you prefer, we can also help you and guide you.
We always recommend MrDomain because for €1 a year they give you 5 email accounts (which we will need later). You will not find a better price, and if you still have to pay for the domain, at least they give you (almost) free email accounts.
Step 2: VPS setup on Hetzner with RunCloud
Once you have your Hetzner and RunCloud account, follow these steps:
Create an API Token in Hetzner
Let’s first create an “API Token” in Hetzner that we will put in RunCloud to be able to connect both. The API token is nothing more than a kind of special username and password for these occasions.
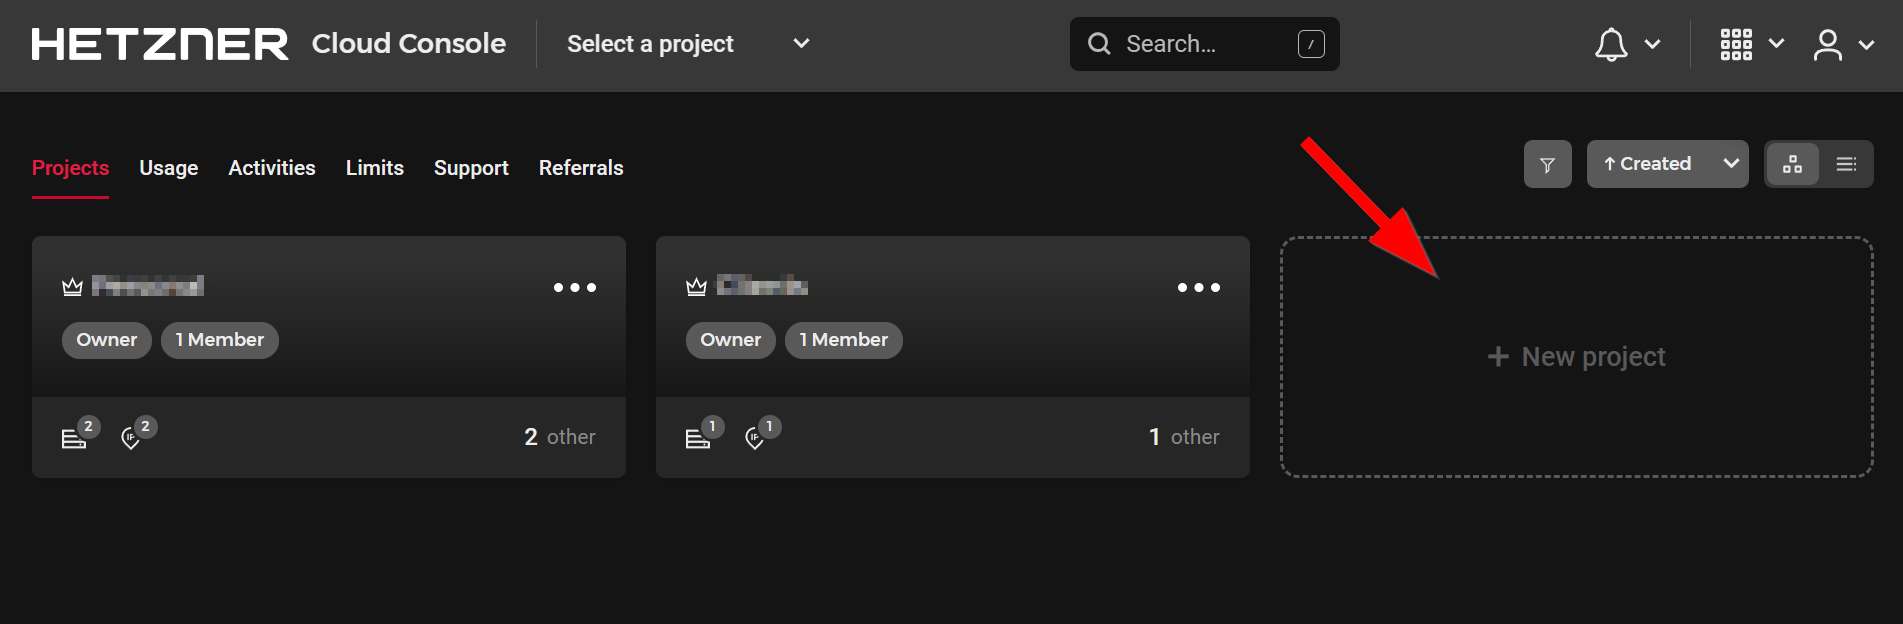
- Log in to your Hetzner account and create a new project, to which you will have to give an identifying name.

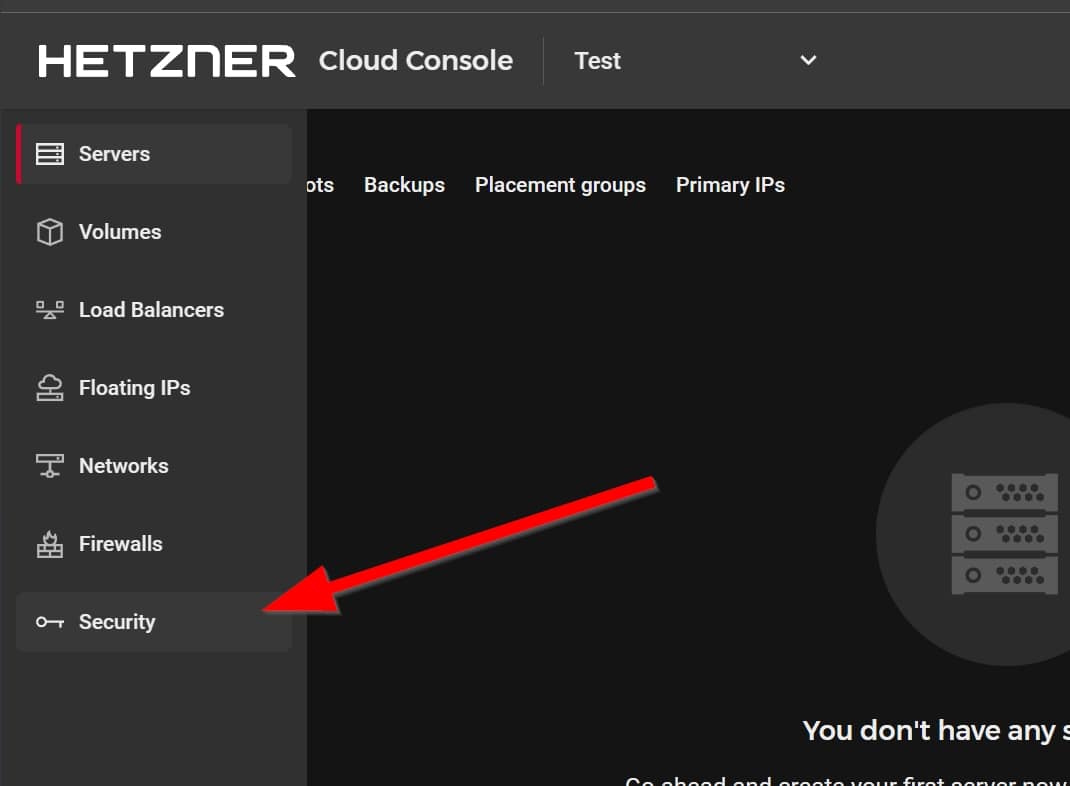
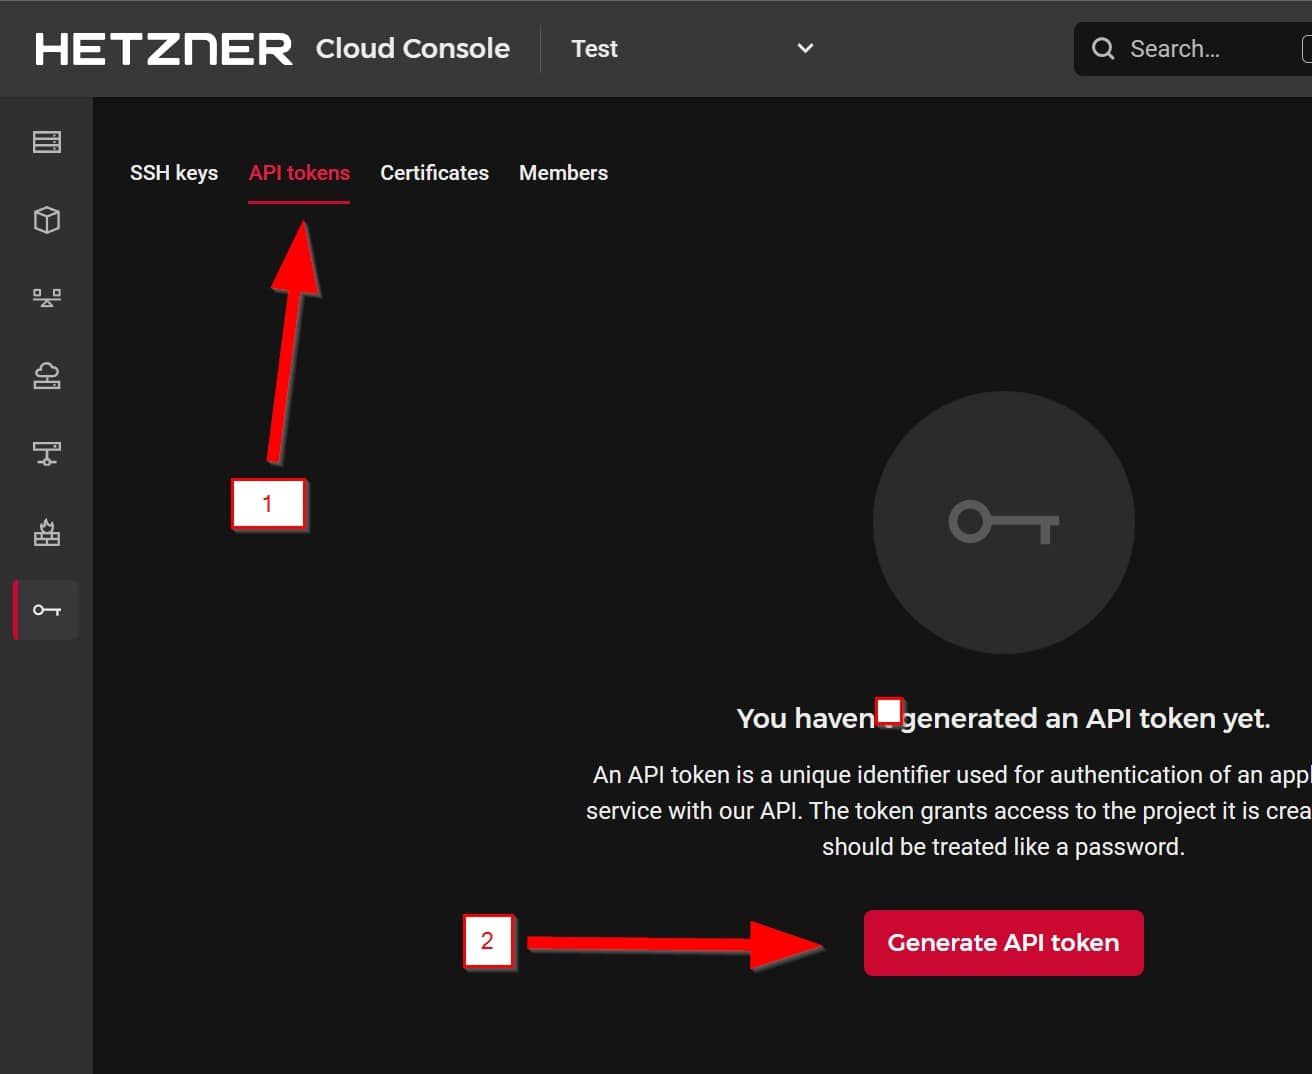
- Once the project is created, in the left sidebar, click on “Security“.

- There, click on “API tokens” and then on “Generate API token“.

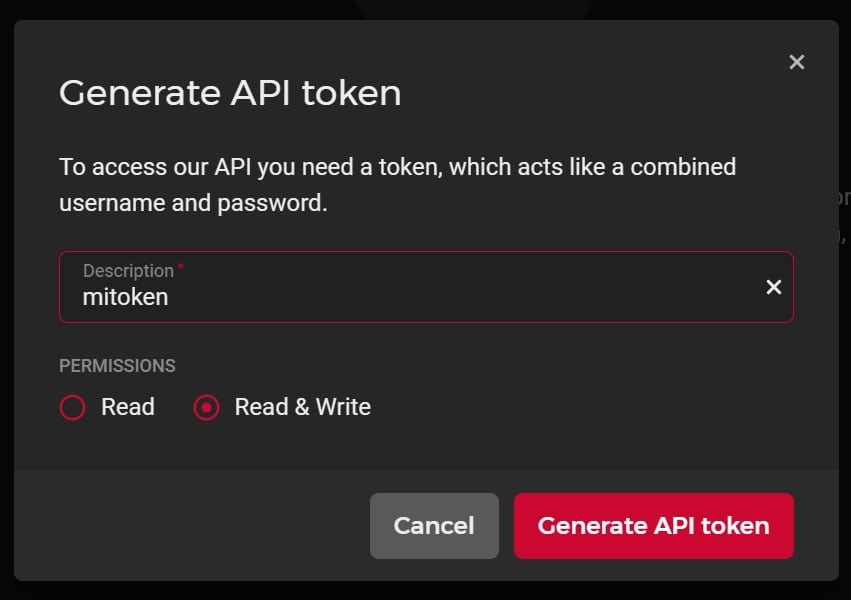
- In the pop-up window that opens, type the name for your API token and select “Read & Write” as permissions.

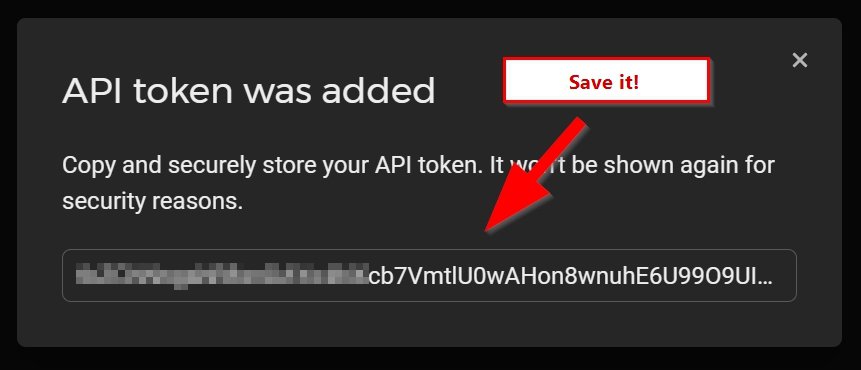
- When you click the “Generate API token” button, you will be shown the API token, which you will have to copy and save in a safe place, since you will not be able to see it again!

Connecting Hetzner and RunCloud
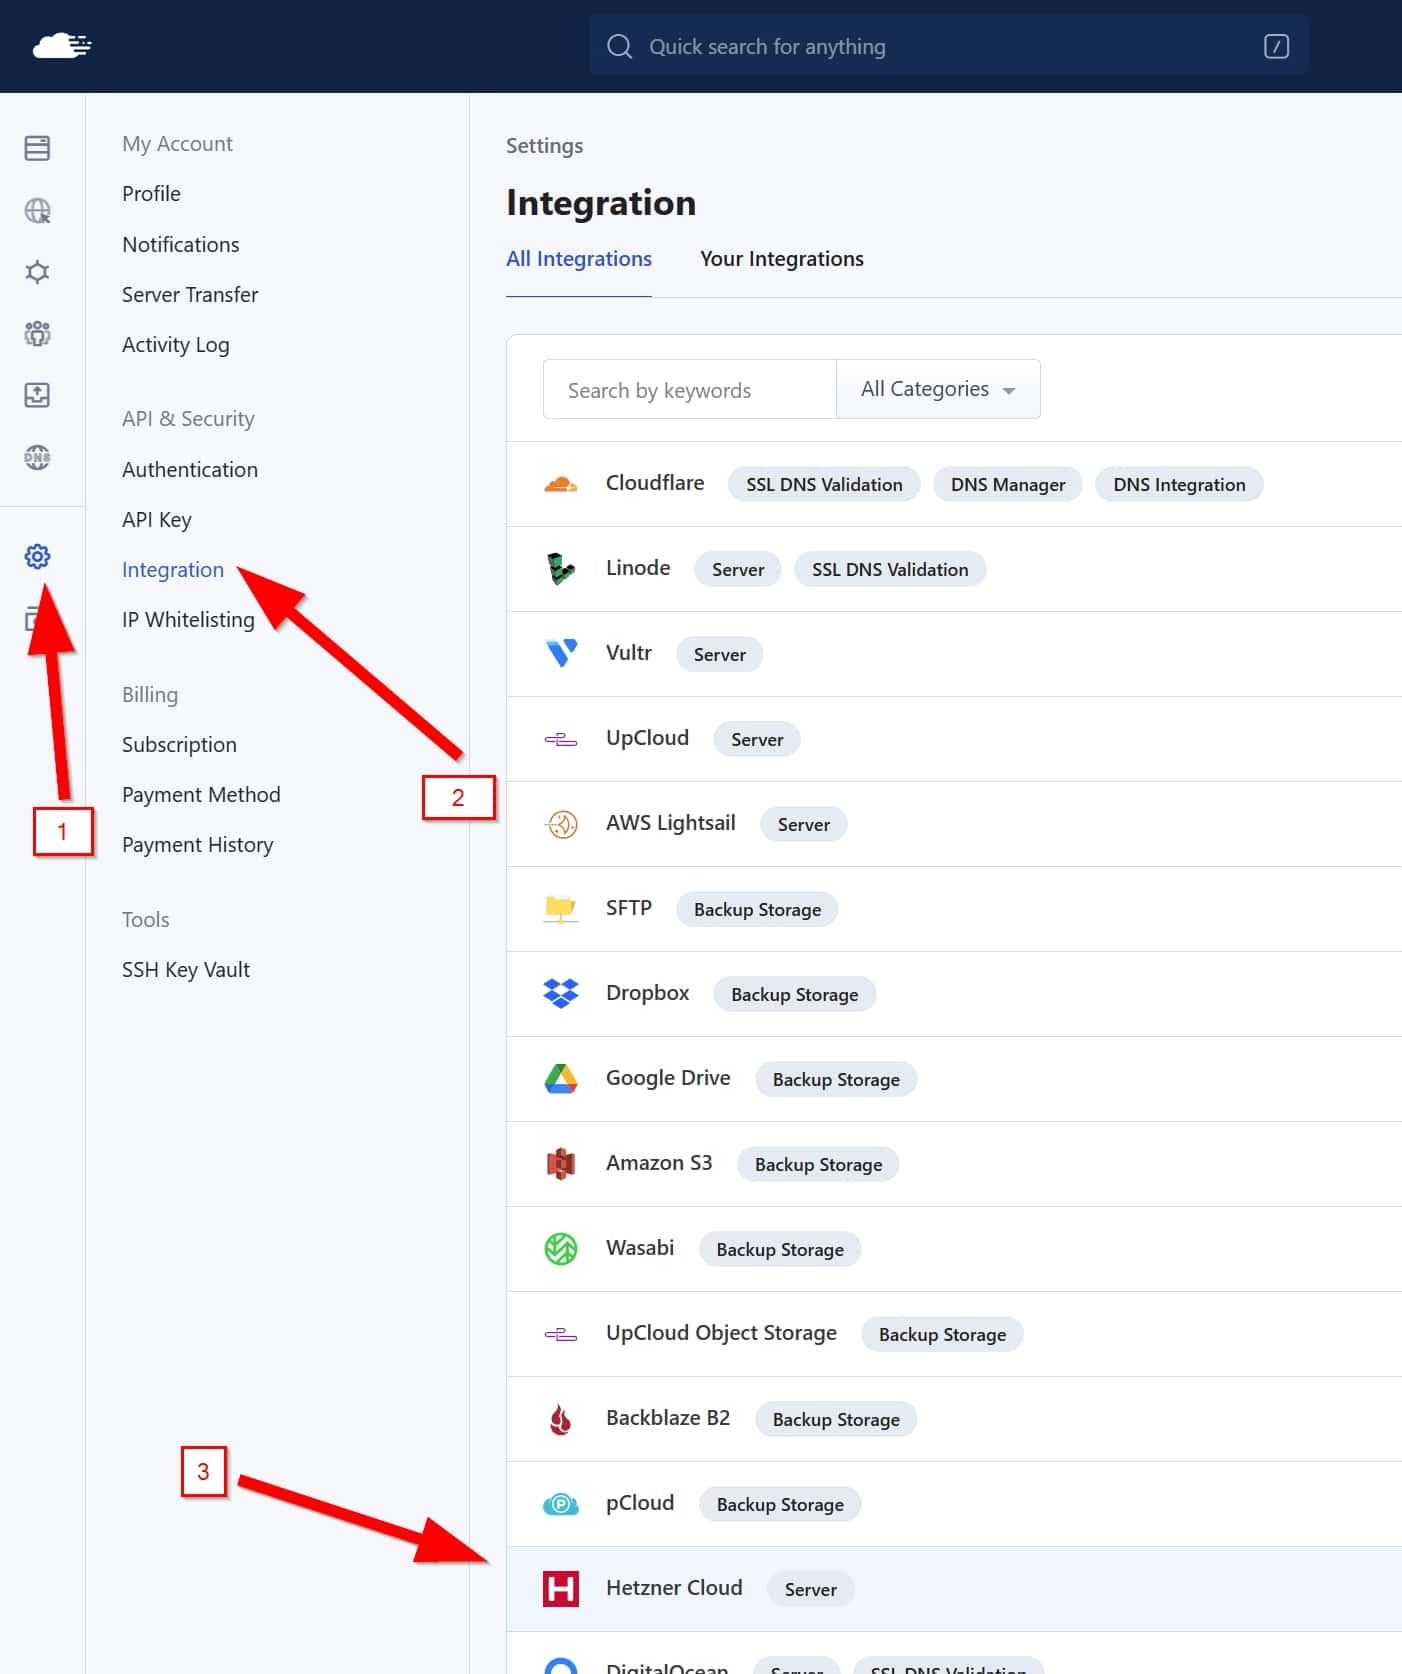
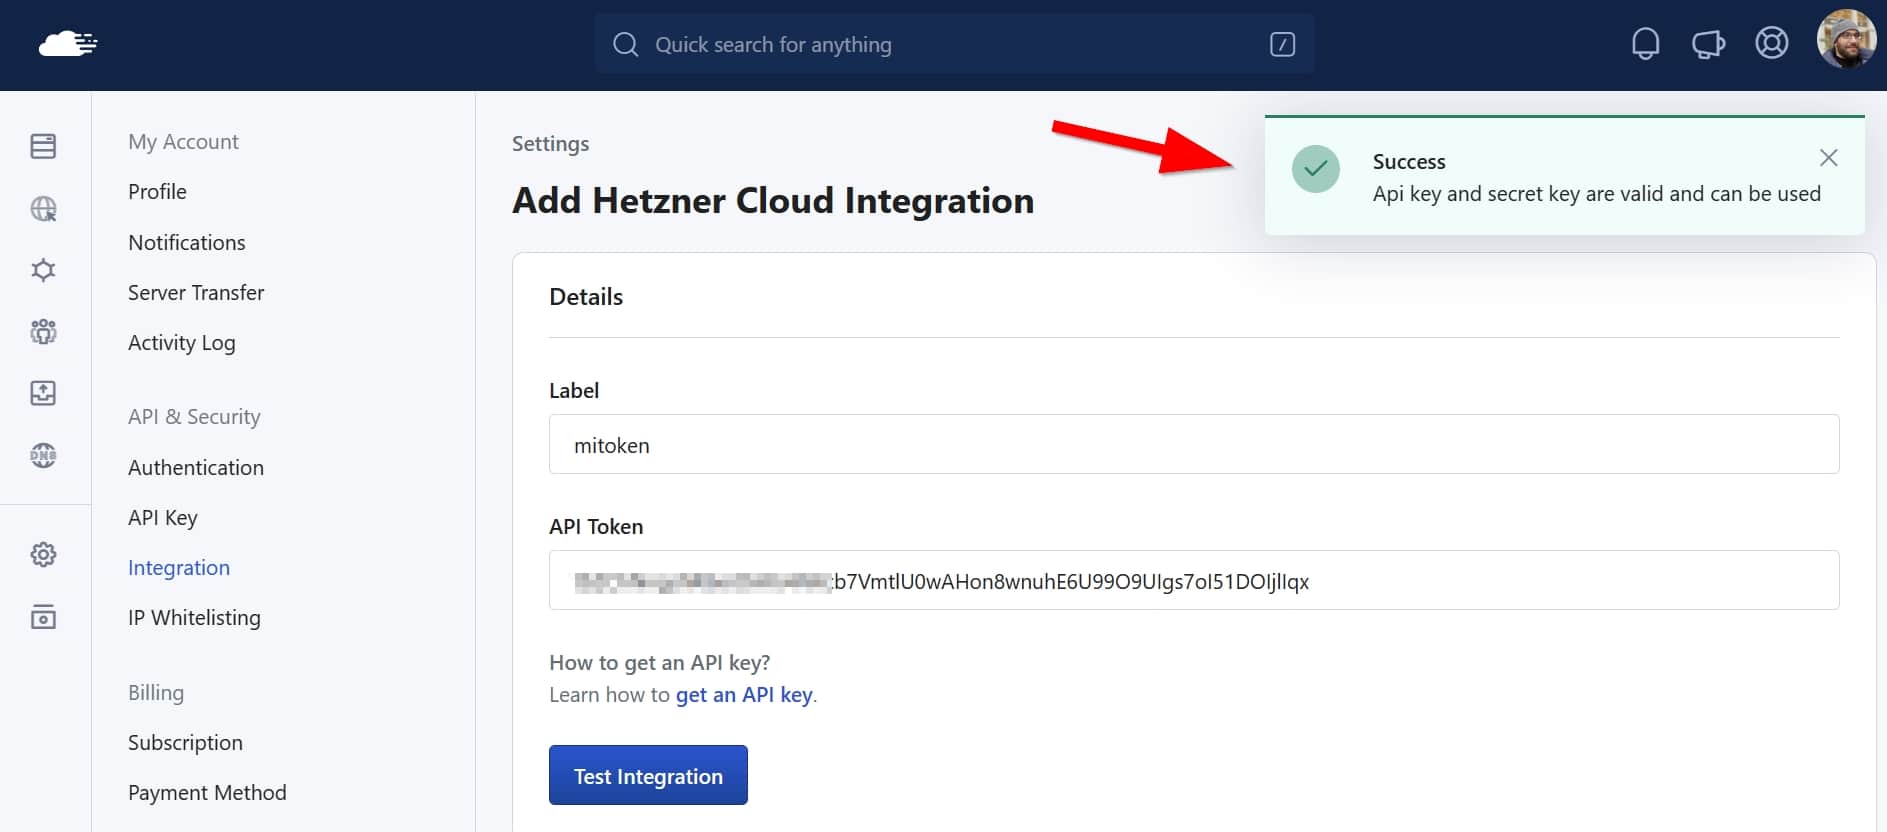
- Go back to your new RunCloud account and add the API token you just created in Hetzner. To do this, go to Settings > Integration and click on Hetzner Cloud.

- In the small window that opens, click on “Add Integration“.
- In the new window that opens, in “Label” enter a name to identify this token, and the API token below. Then, click on “Test Integration” and a green notice should appear saying that everything is in order.

- Click “Save Integration“.
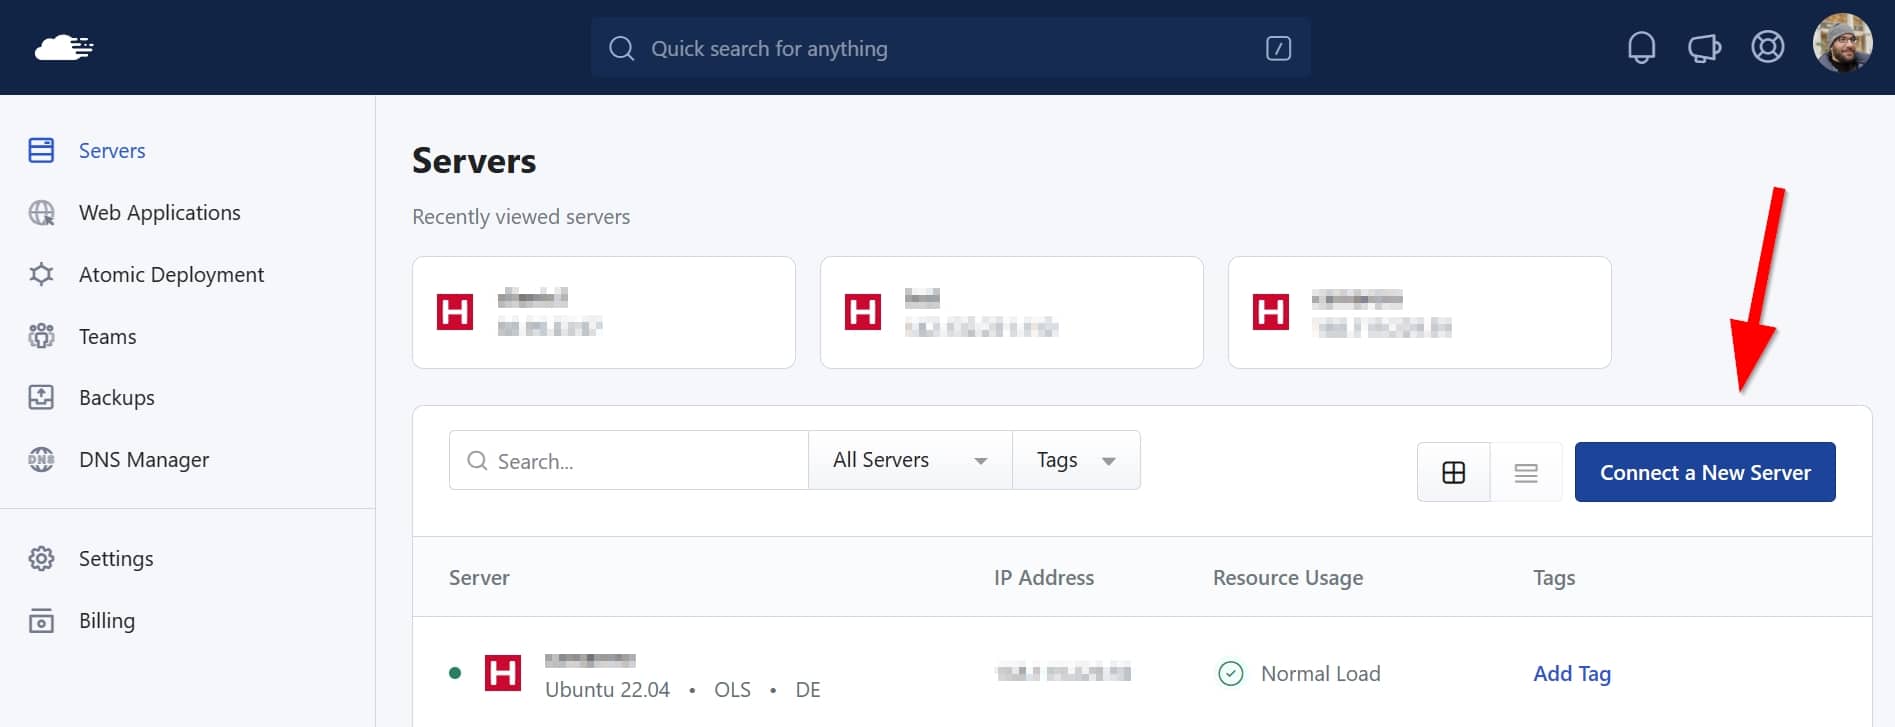
- Now go to your RunCloud account home page and select “Connect a New Server“.

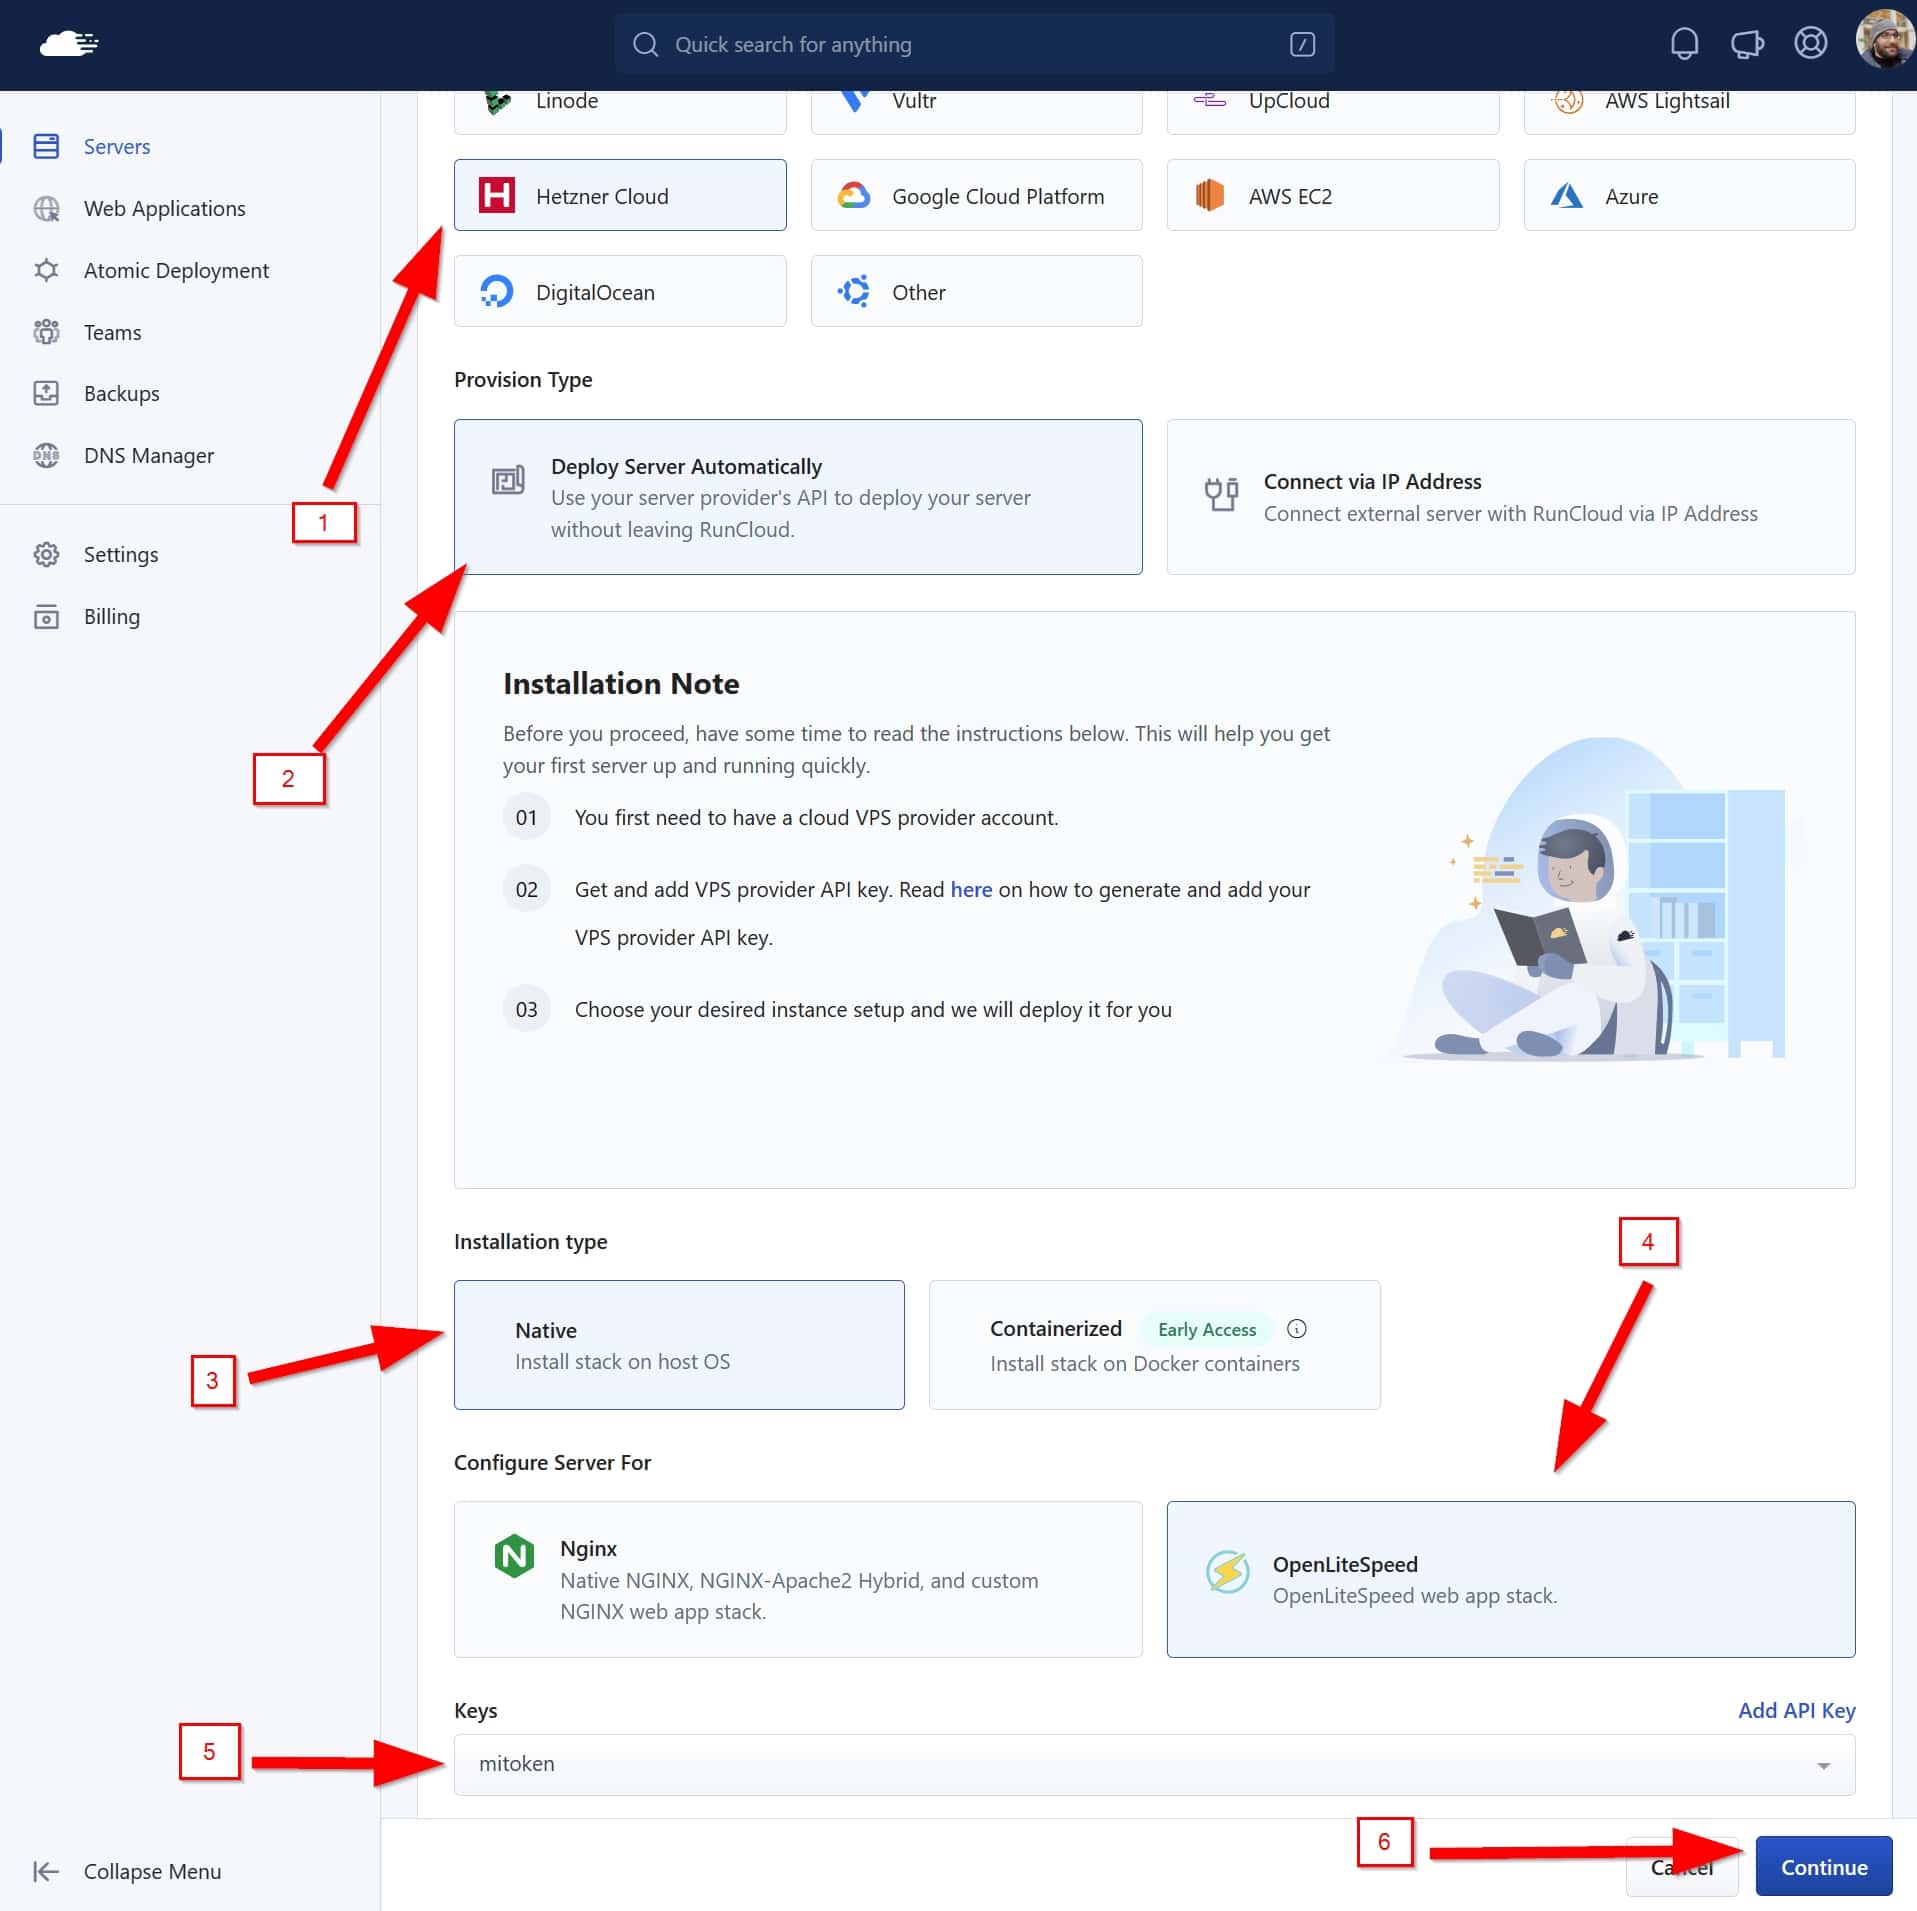
- Select the following and click “Continue“:
- Choose Server Provider: Hetzner Cloud.
- Provision Type: Deploy Server Automatically.
- Installation type: Native.
- Configure Server For: OpenLiteSpeed.
- Keys: The API token you just configured above.

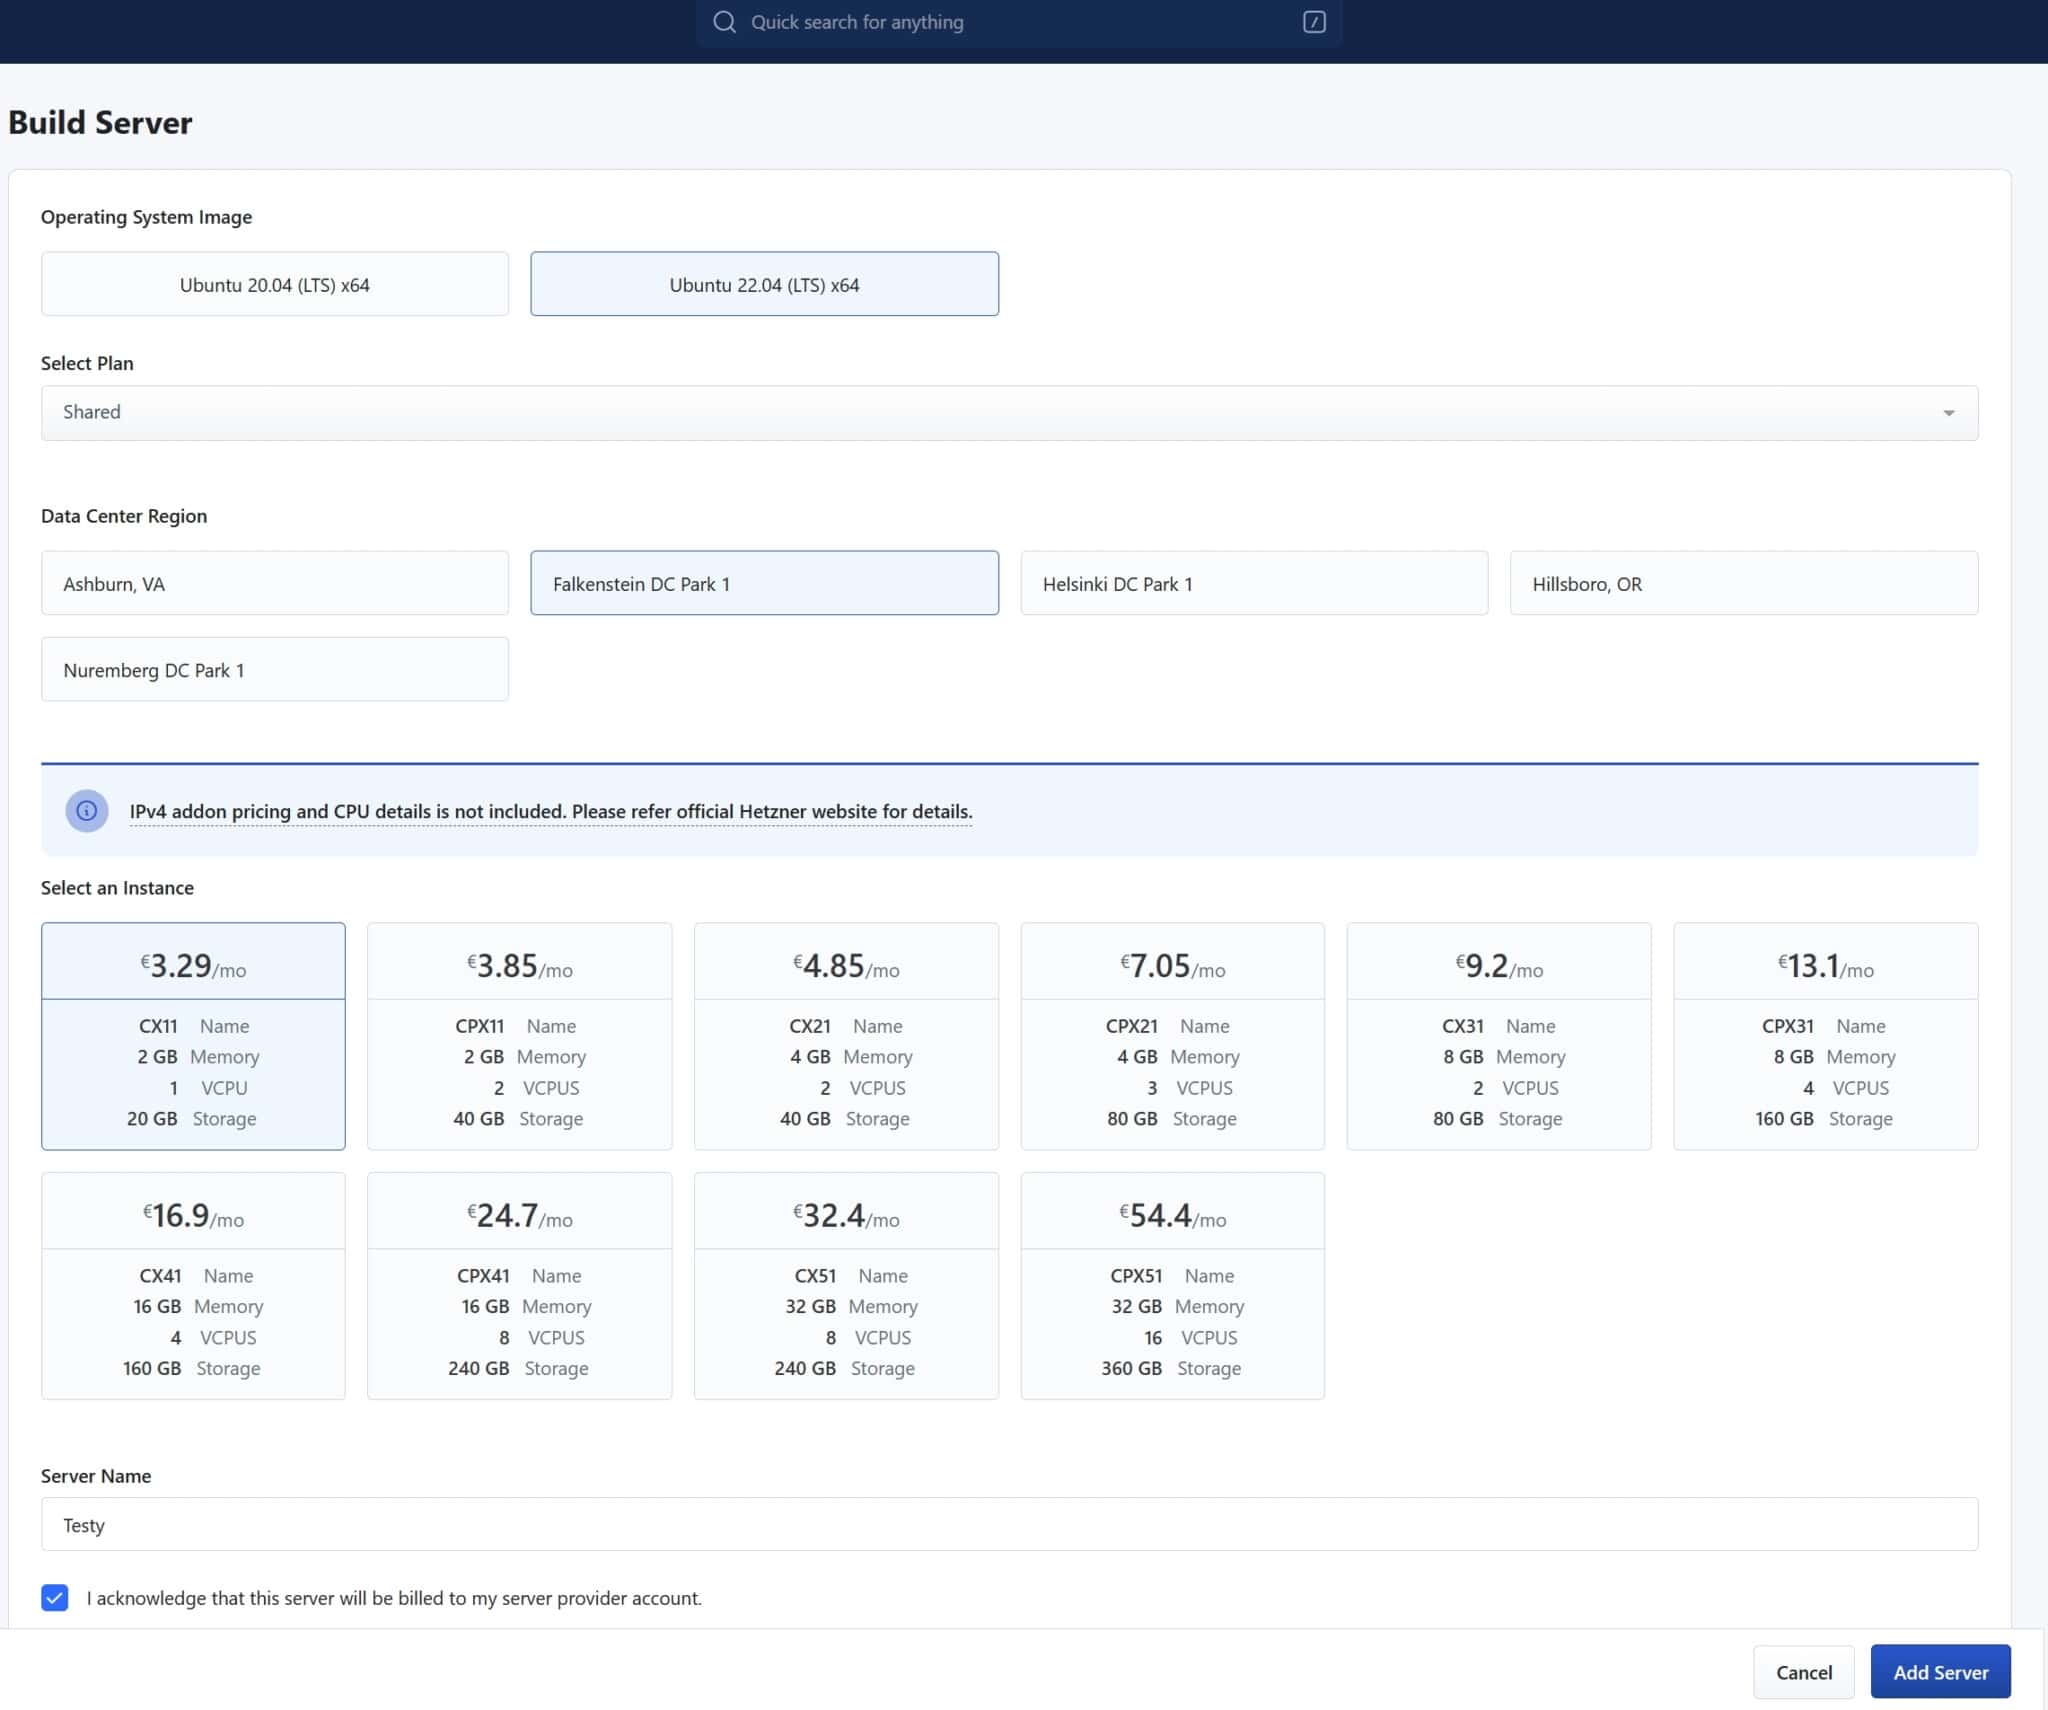
- Now it’s time to select the Hetzner server or VPS. Still in RunCloud, on the next screen, select the following:
- Operating System Image: “Ubuntu 24.04 (LTS) x64” or the newest available.
- Select Plan: Shared.
- Data Center Region: Here you choose where your VPS will be physically. Hetzner has 4 locations available for now; USA (Ashburn or Hillsboro), Germany (Falkenstein or Nuremberg), Finland (Helsinki) or Singapore. Simply choose the city that is closest to the majority of your users. Note: US and Singapore zones use different price points than EU.
- Select an Instance: Here the server itself is chosen. The more expensive it is, the more websites the server can host and the more powerful it is.
- If you are asked for it, make sure you select a Shared vCPU with an x86 architecture.
- If you have a simple website or blog, without complications (e-commerce or multilanguage, for example), with few visits (less than 20,000 page views per month), a good entry choice in EU zones is the CX23 (about €4.49/month). If you want a stronger CPU, move to the CPX22 (about €8.49/month). Keep in mind that in other zones, prices may vary, and not all server types may be available.
- We don’t think it’s worth going for the CX if you can fit the budget for CPX, as CPX instances generally offer faster CPUs.
- If your website is not simple (you have e-commerce, forums, or something special), or if you simply can afford it, we recommend that you use at least the CPX22 server.
- The CPX32 will have a little better performance than the CPX22, but from there, you will not notice a difference in terms of loading time, they are rather indicated for hosting more websites and/or being able to receive many more visits.
- Server Name: The name of your server. You choose.
- Check the box “I acknowledge that this server will be billed to my server provider account“.
- Click «Add Server».

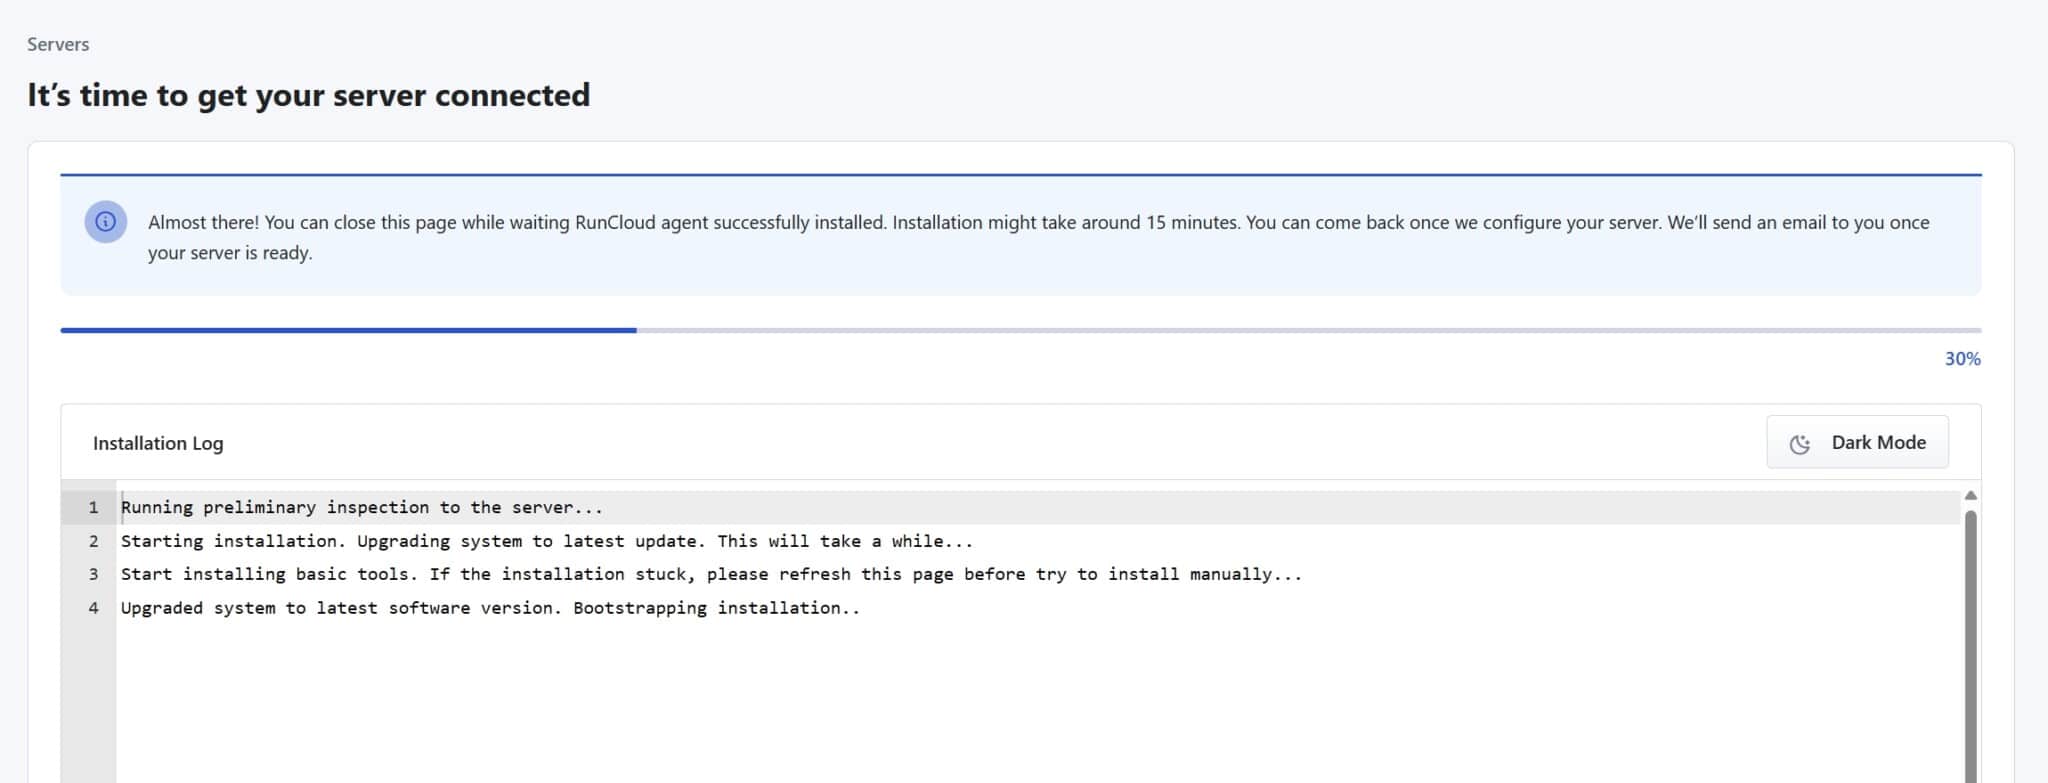
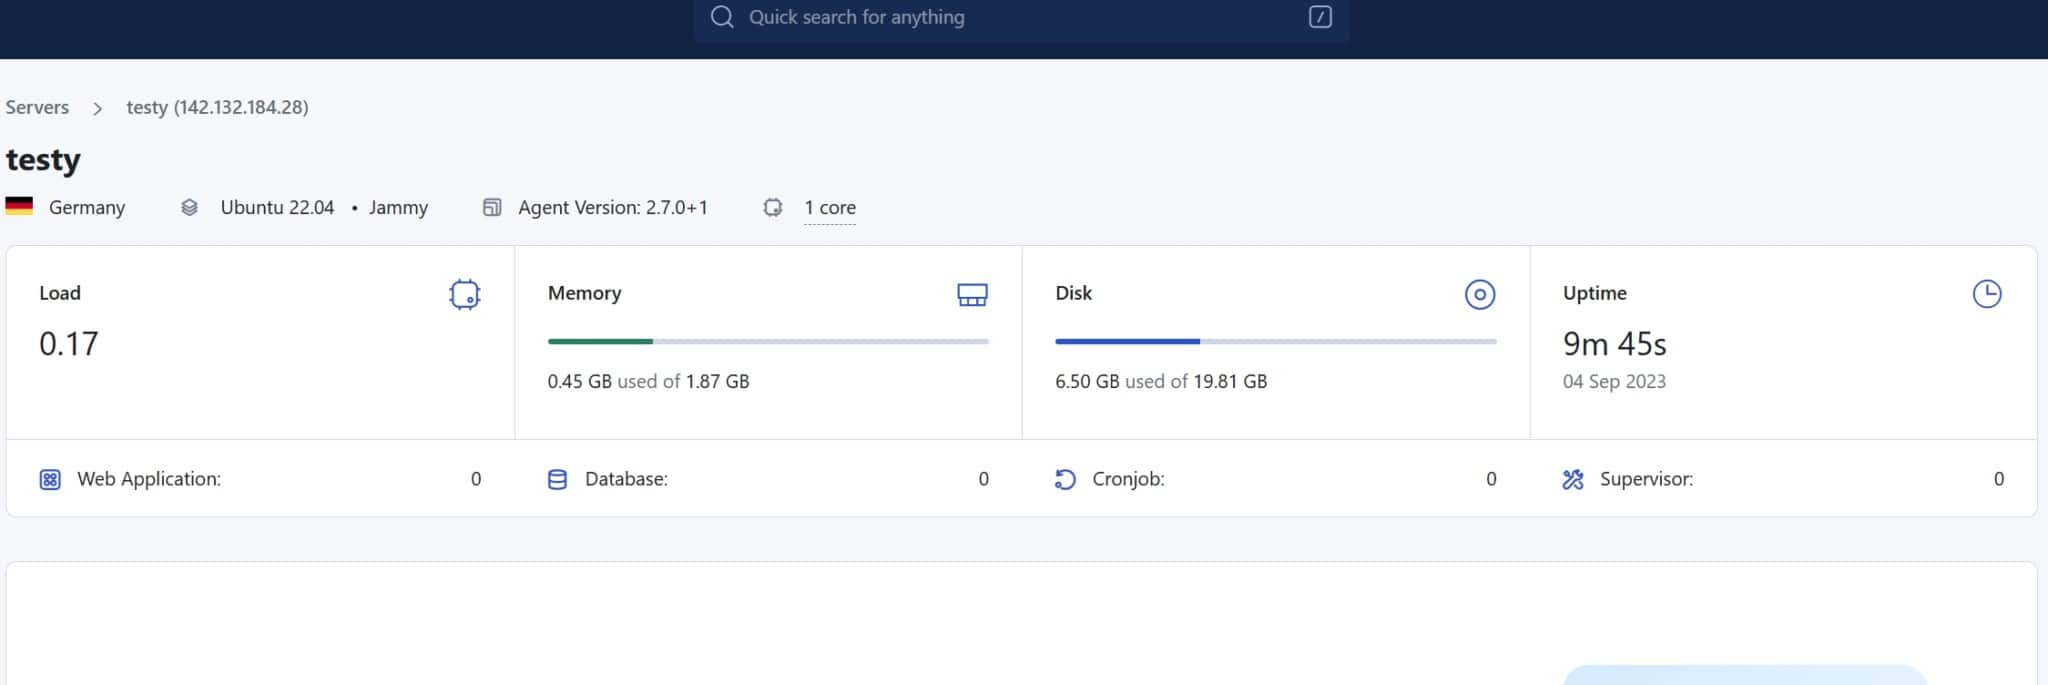
- Now wait a few minutes…

- And when you see this screen with a few graphs and numbers, your server is ready! This is your server’s desktop. If you had more than one configured, you will have one dashboard for each server.

Step 3: Migration of the website to Hetzner and RunCloud
Do you remember the backup you downloaded a while ago? Now it’s time to import it to your new server. The plan is to create a new website in RunCloud, access the WordPress administration panel, and from there restore the backup, overwriting the new website.
Create a new website in RunCloud
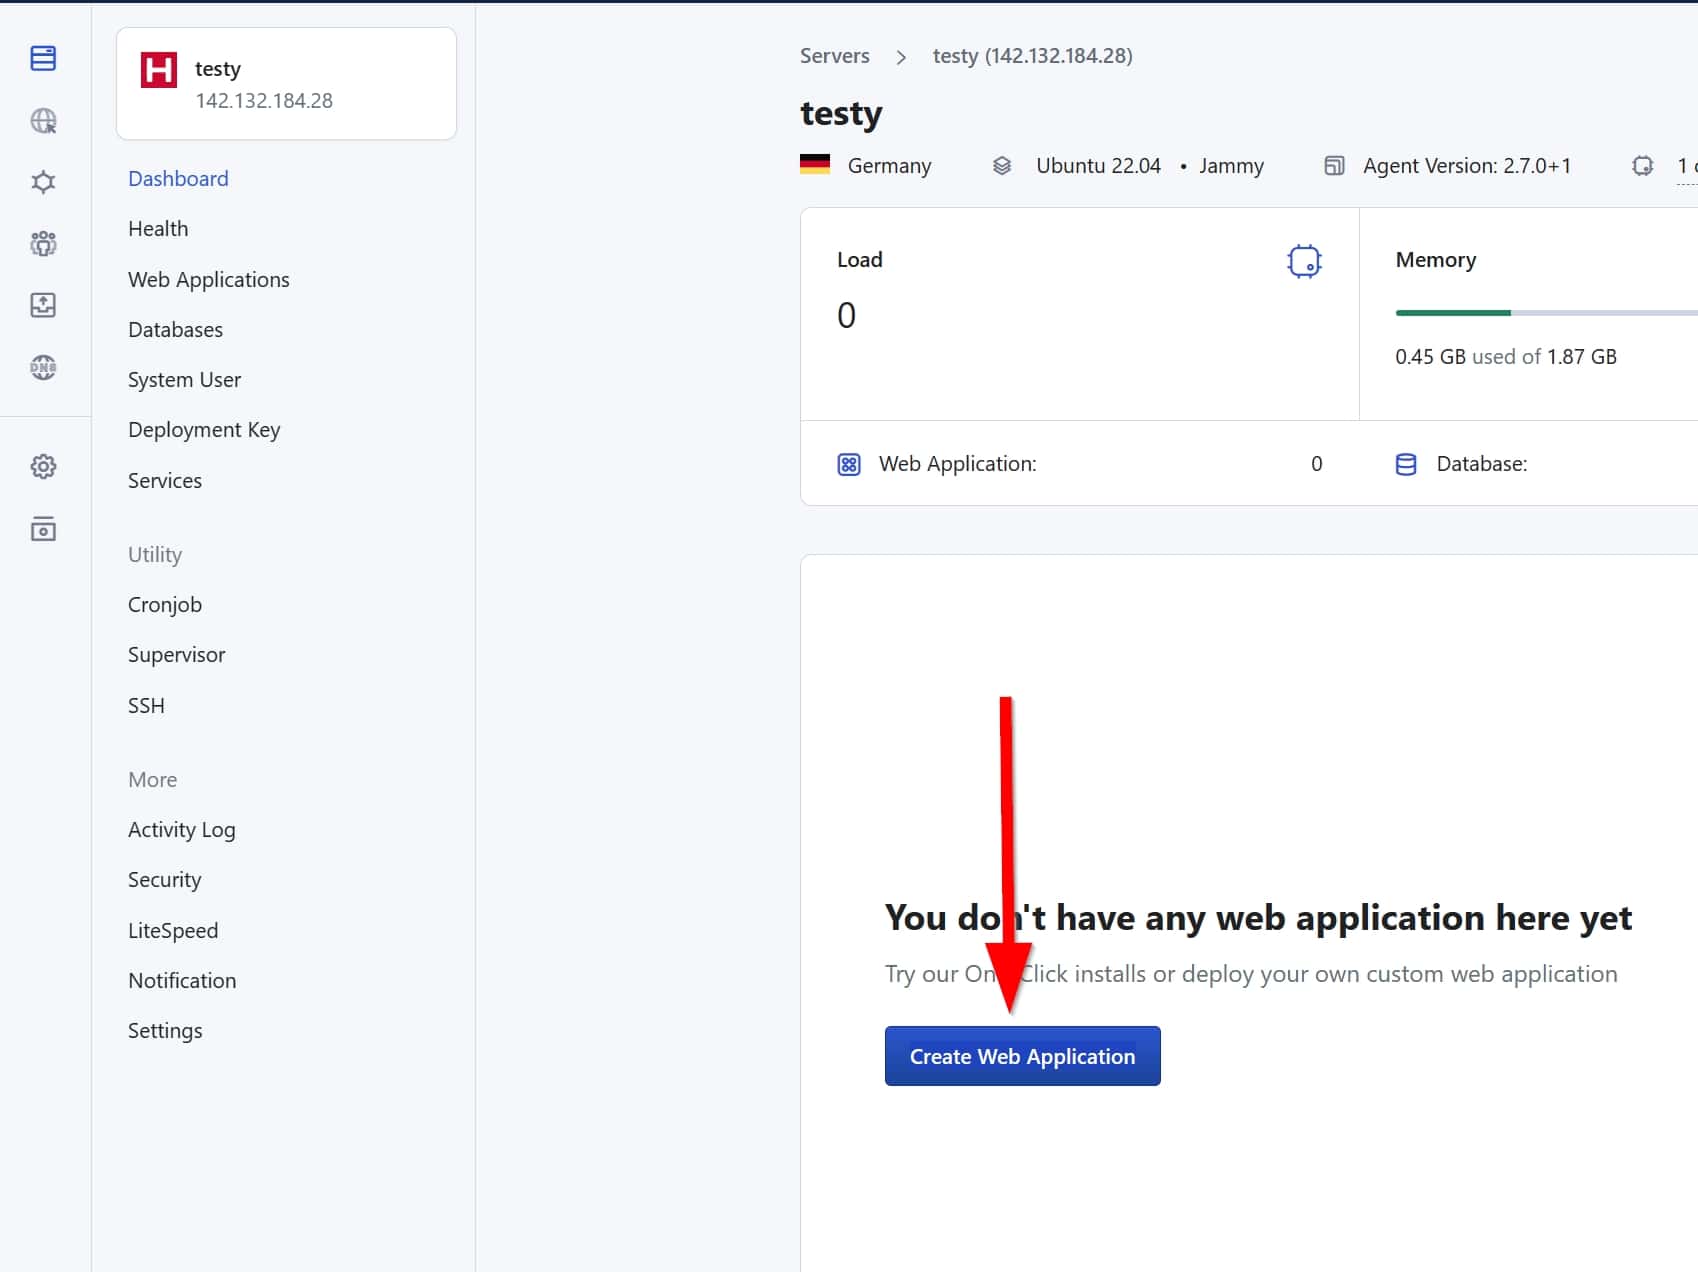
- In RunCloud, on the server desktop screen, you will likely have a big button that says “Create Web Application“. Click on it.

- You will see many fields to fill out. Let’s see box by box. Starting with “Web App Details“.
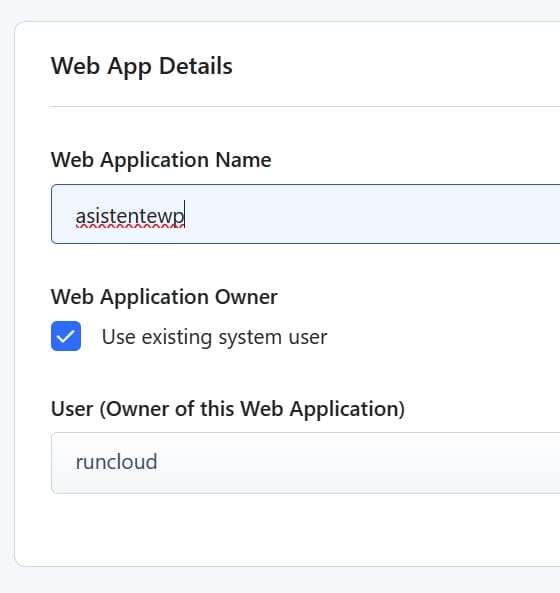
- Web Application Name: Enter a name to identify your website. The same name of the website works.
- Web Application Owner: Leave “Use existing system user” checked.
- User (Owner of this Web Application): runcloud.

- Now we see “Domain“.
- For now, check “Use test domain” and write whatever you want.

- For now, check “Use test domain” and write whatever you want.
- In the “WordPress” box, there is not much to worry about, since everything will be overwritten with the website you are restoring, but you can enter the following:
- Site Title: The name of your site.
- Admin Username: A username.
- Admin Password: A password.
- Admin Email: An email.
- WordPress Multisite: Here you should know yourself whether you are going to need a WordPress multisite or not. If you don’t know, select “No”.
- LiteSpeed Cache: Check the option.
- You can leave the “Database” and “Backup” boxes untouched, they are optional.
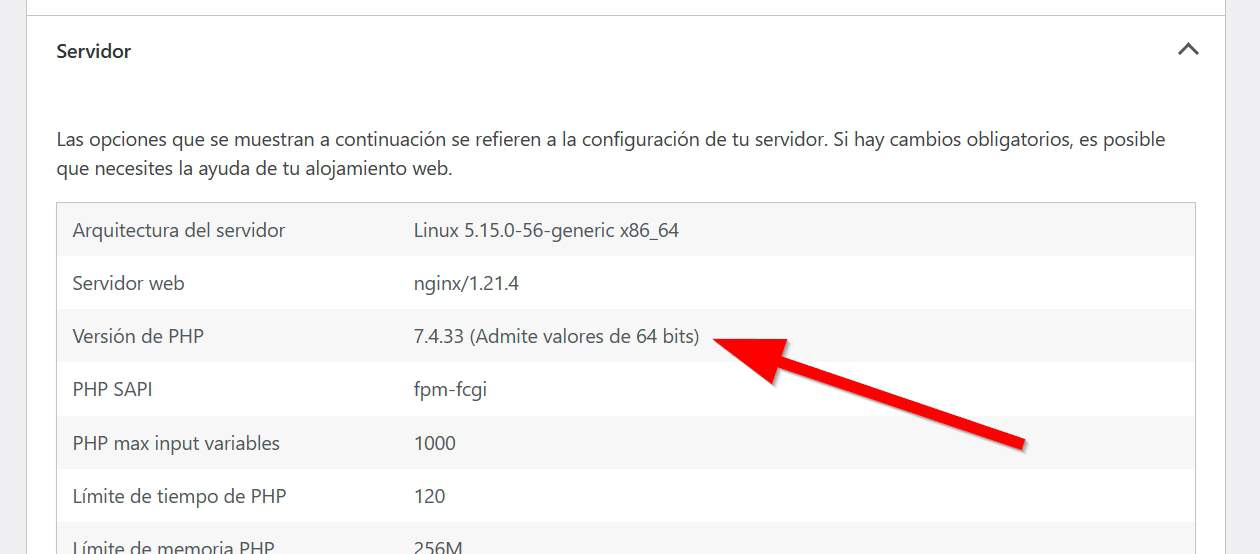
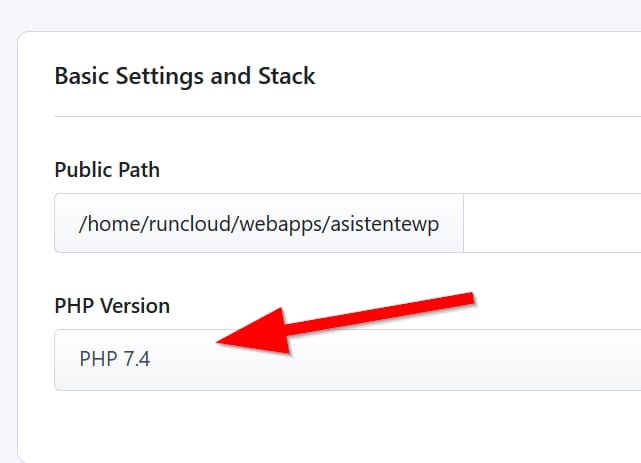
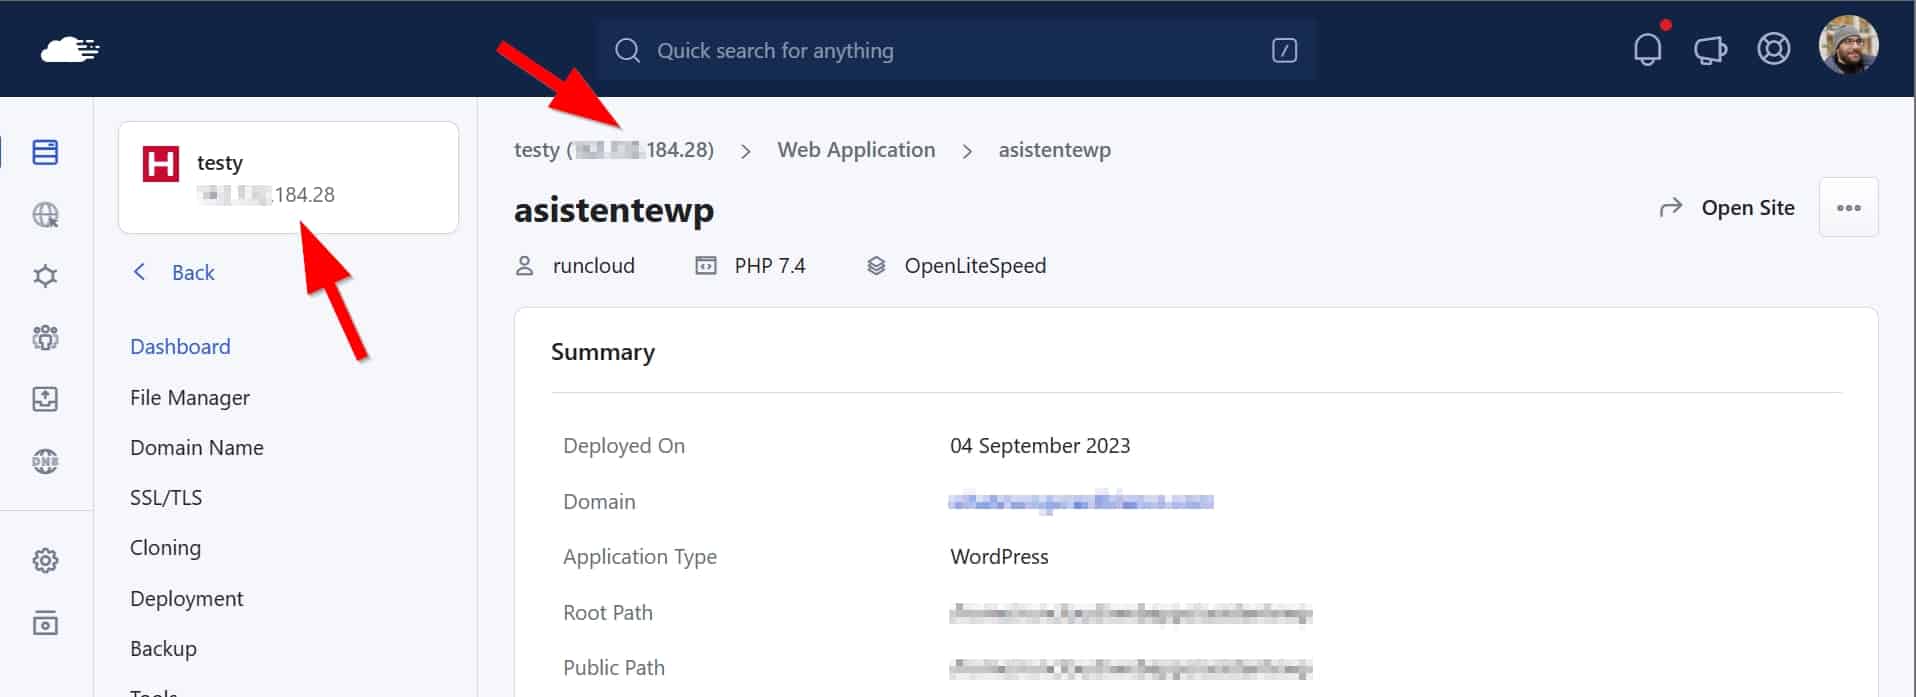
- In the “Basic Settings and Stack” box you will only have to touch the “PHP Version“. Go to your current website, and in your WordPress administration panel, visit Tools > Site Health > Information > Server to see the PHP version in use. We see that, in the case below, it is version 7.4, which is too old too old and unsupported, so you should not use it. Try to choose PHP 8.2 to 8.5, the current supported ones.

- Back in the “Basic Settings and Stack” box, select the PHP version you need:

- Click on “Deploy whatever“, which will create the new WordPress that we will have to overwrite.

Restore the website on the new server
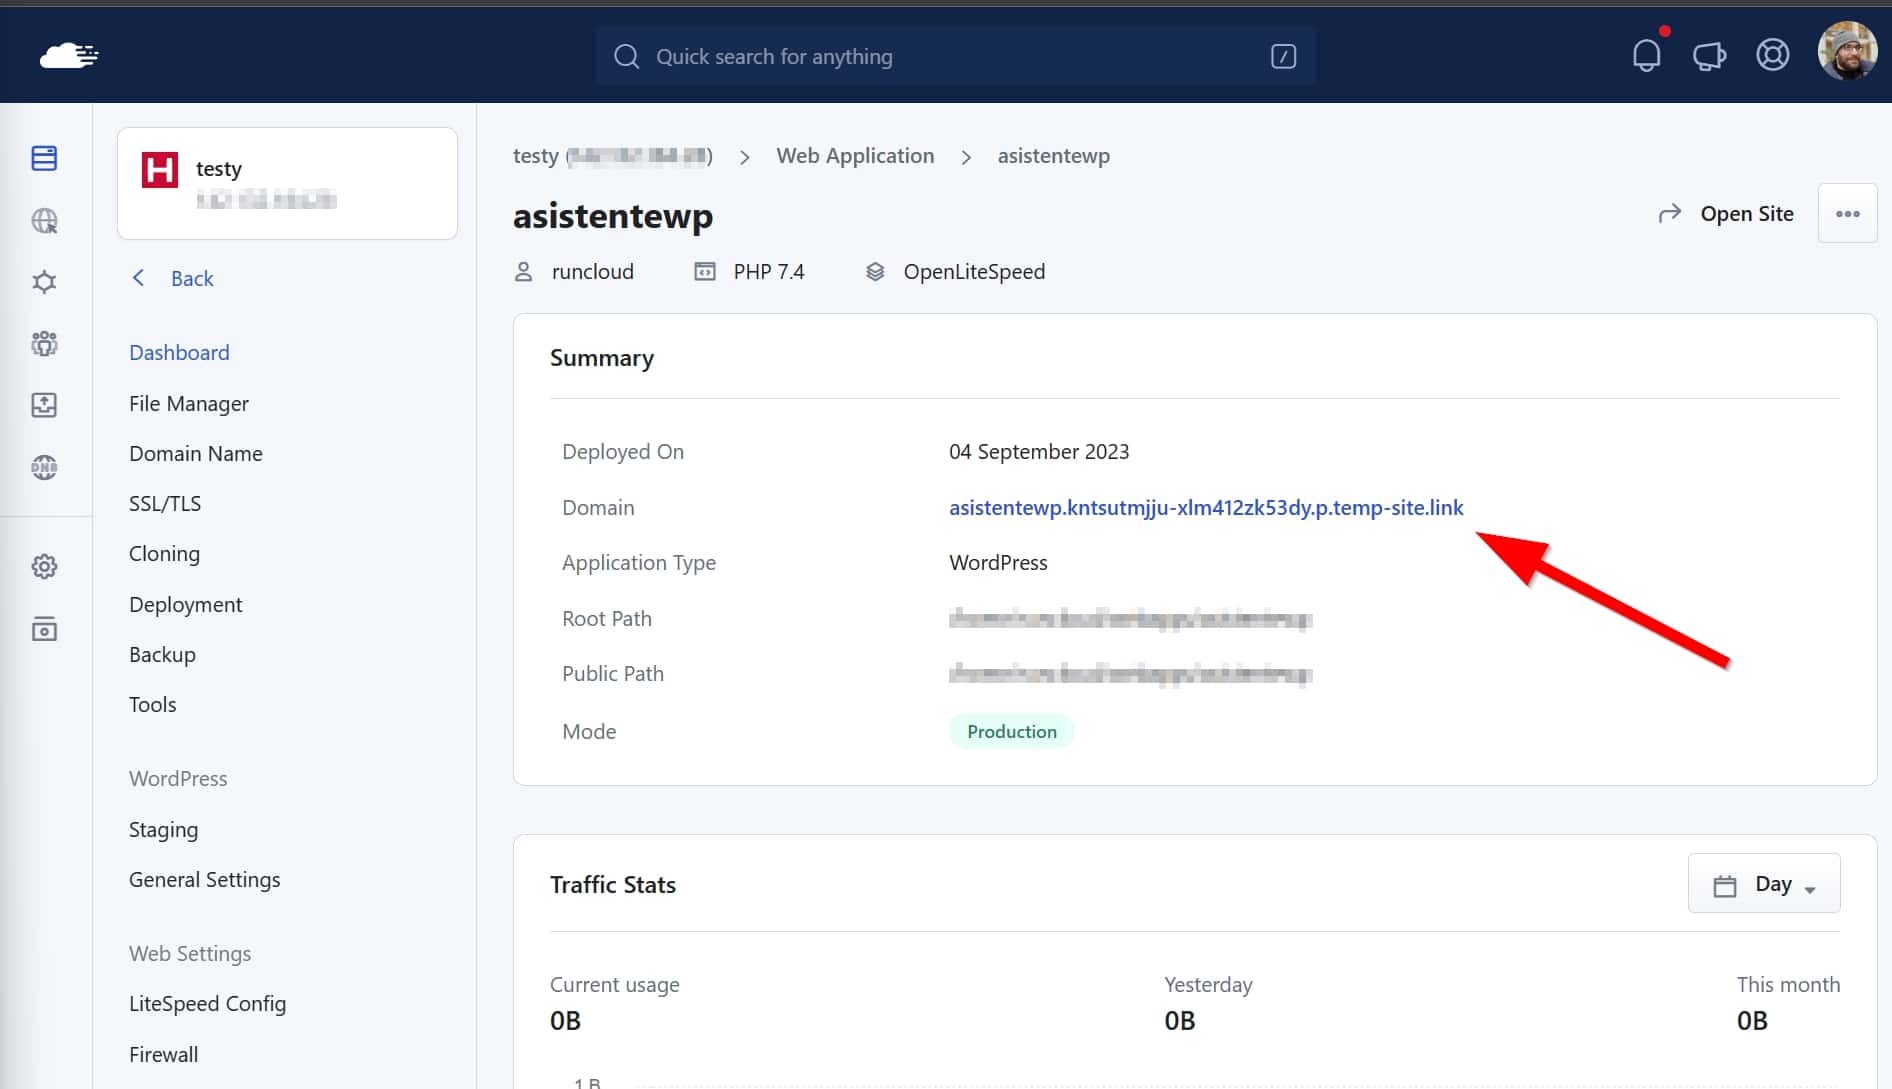
Now it’s time to take the ZIP file that we downloaded from our website thanks to WPvivid and restore it to the new website. If you have followed the step by step, you will now find yourself in RunCloud, on the desktop of the web app that we just created. There you will see the link to your new website (don’t worry, it is temporary). Click on it and enter the WordPress administration panel with the username and password that you created in the previous step.
Once inside WordPress, follow these steps (remember that we assume that you have used WPvivid to create the backup of your website).
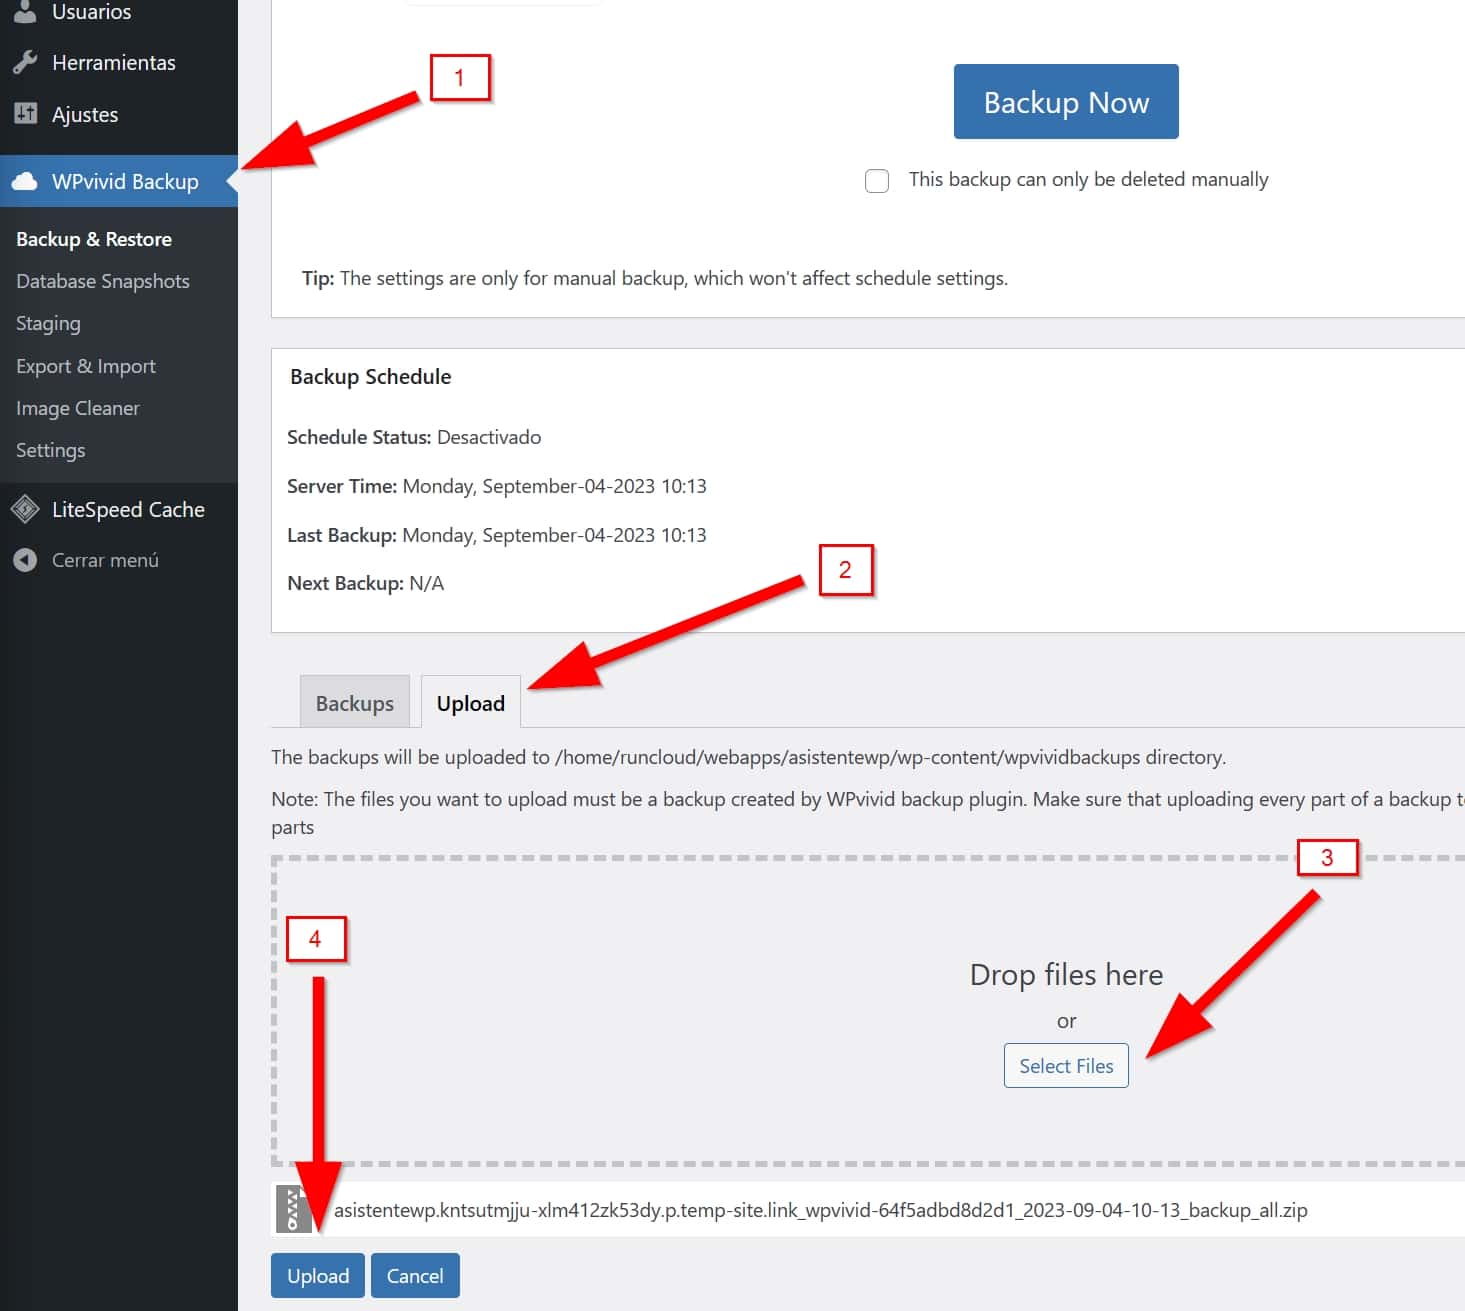
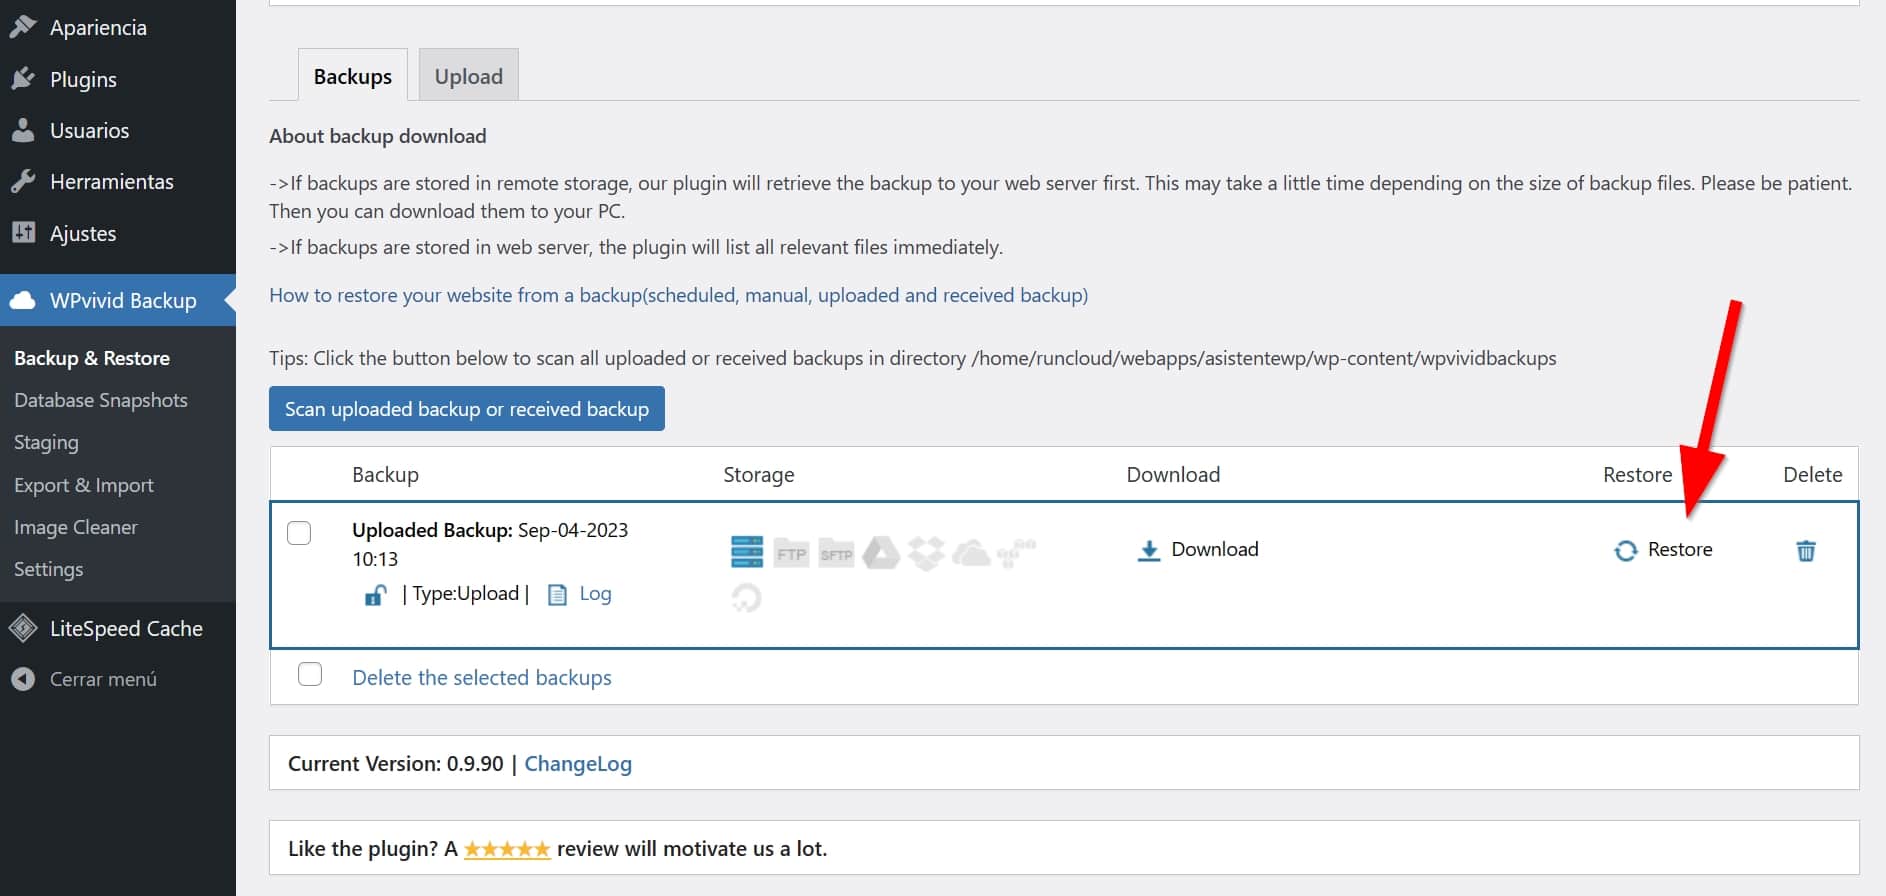
- Install the WPvivid plugin.
- Once installed, go to the WPvivid Backup menu and click on the “Upload” tab to upload the ZIP file from your computer.

- After uploading your backup, click “Restore”, which will show you another “Restore” button. Click on it and it will ask you if you are sure, so go ahead when you are. Do not close the window until it’s done!

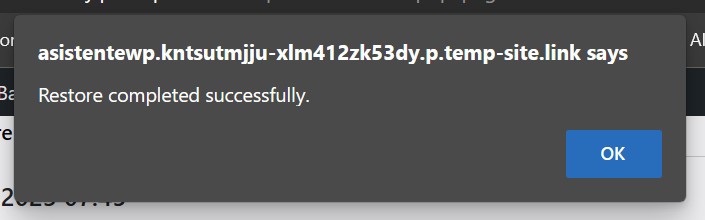
- When it finishes, you will be shown a pop-up window note like the following.

- Accept it and you will probably be redirected to the login screen. Here you can forget the username and password that you entered above and write your real ones from your website.
- Make sure your entire website (on the new temporary domain) looks good and there are no errors.
Step 4: Update DNS and configuration in RunCloud
We’re already finishing. Now we have the server and the copy of our website inside it. We just have to connect our domain to the new server and update a couple of things in RunCloud.
Beware! From here, your website may be inaccessible for up to 1 or 2 days, although it would be unusual. Usually it is seconds or a few minutes.
Set up the domain in RunCloud
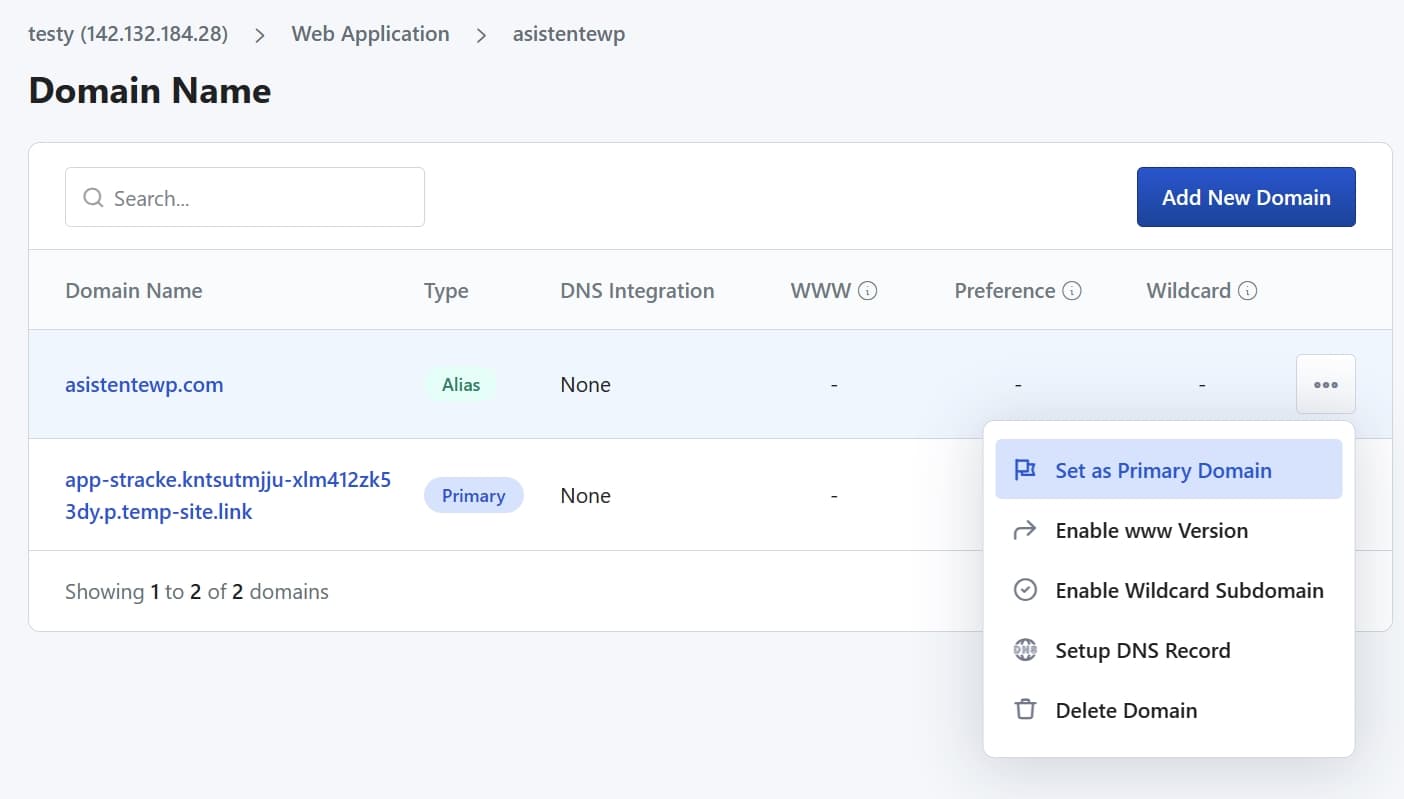
Go to RunCloud, open your app, go to the “Domain Name” menu, and then click “Add New Domain”.
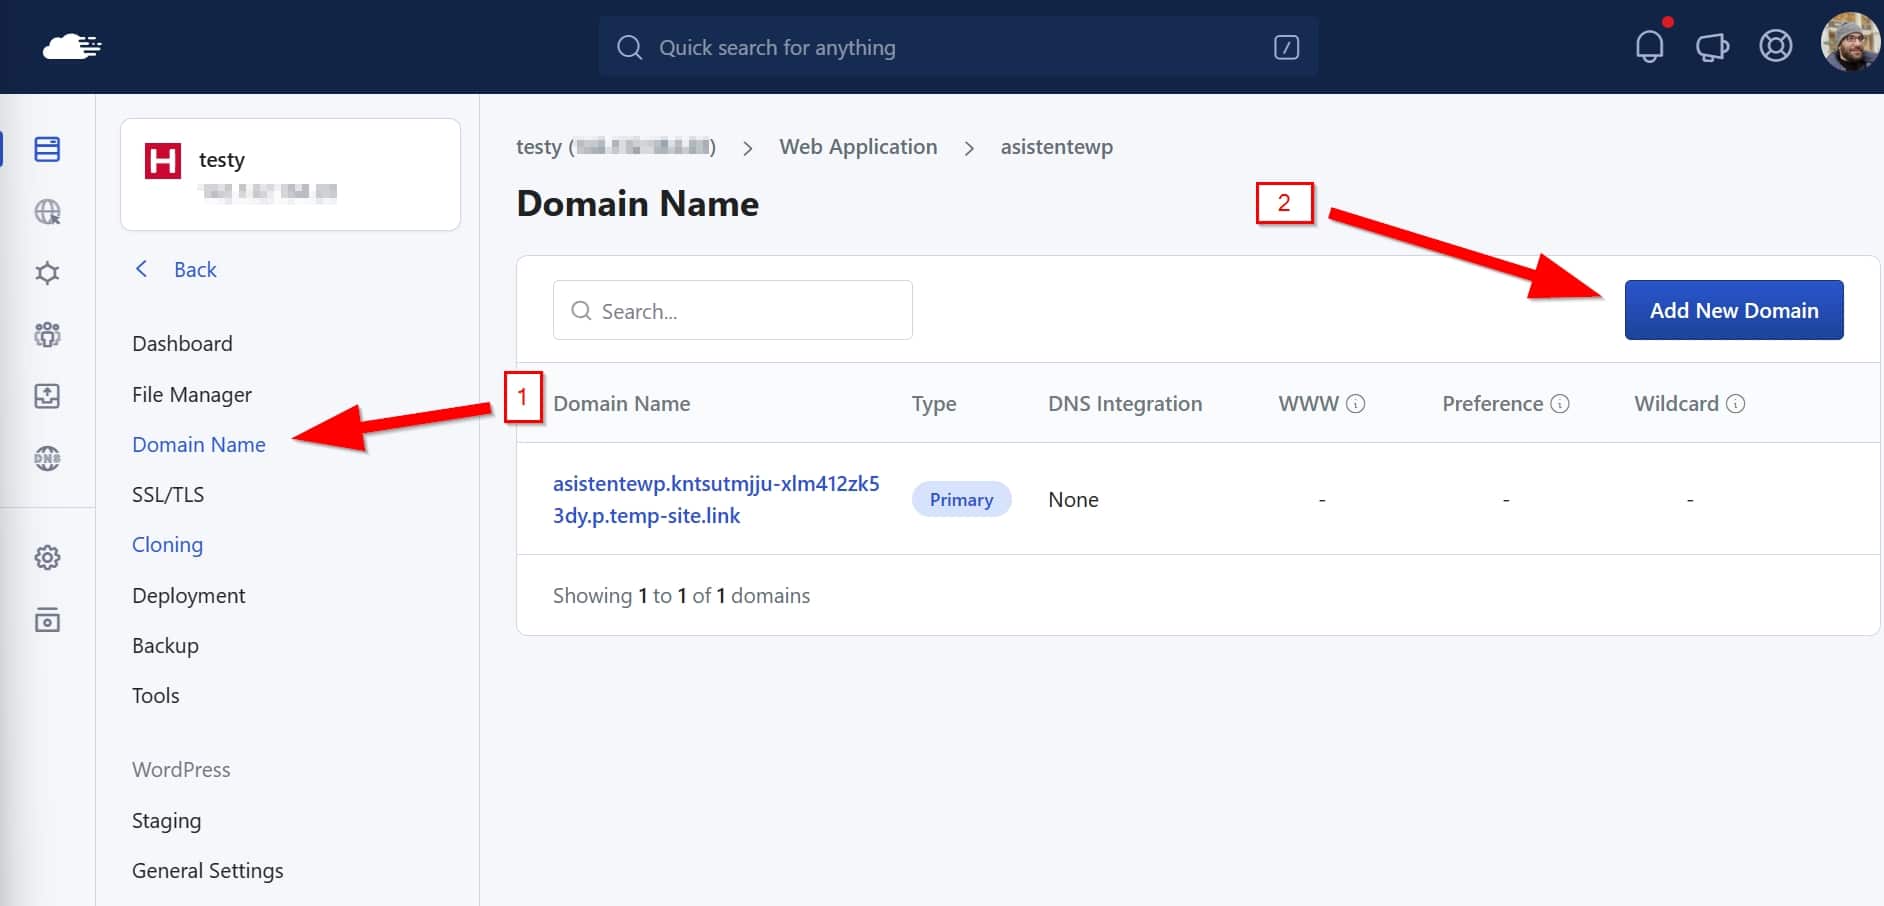
Here enter the following data:
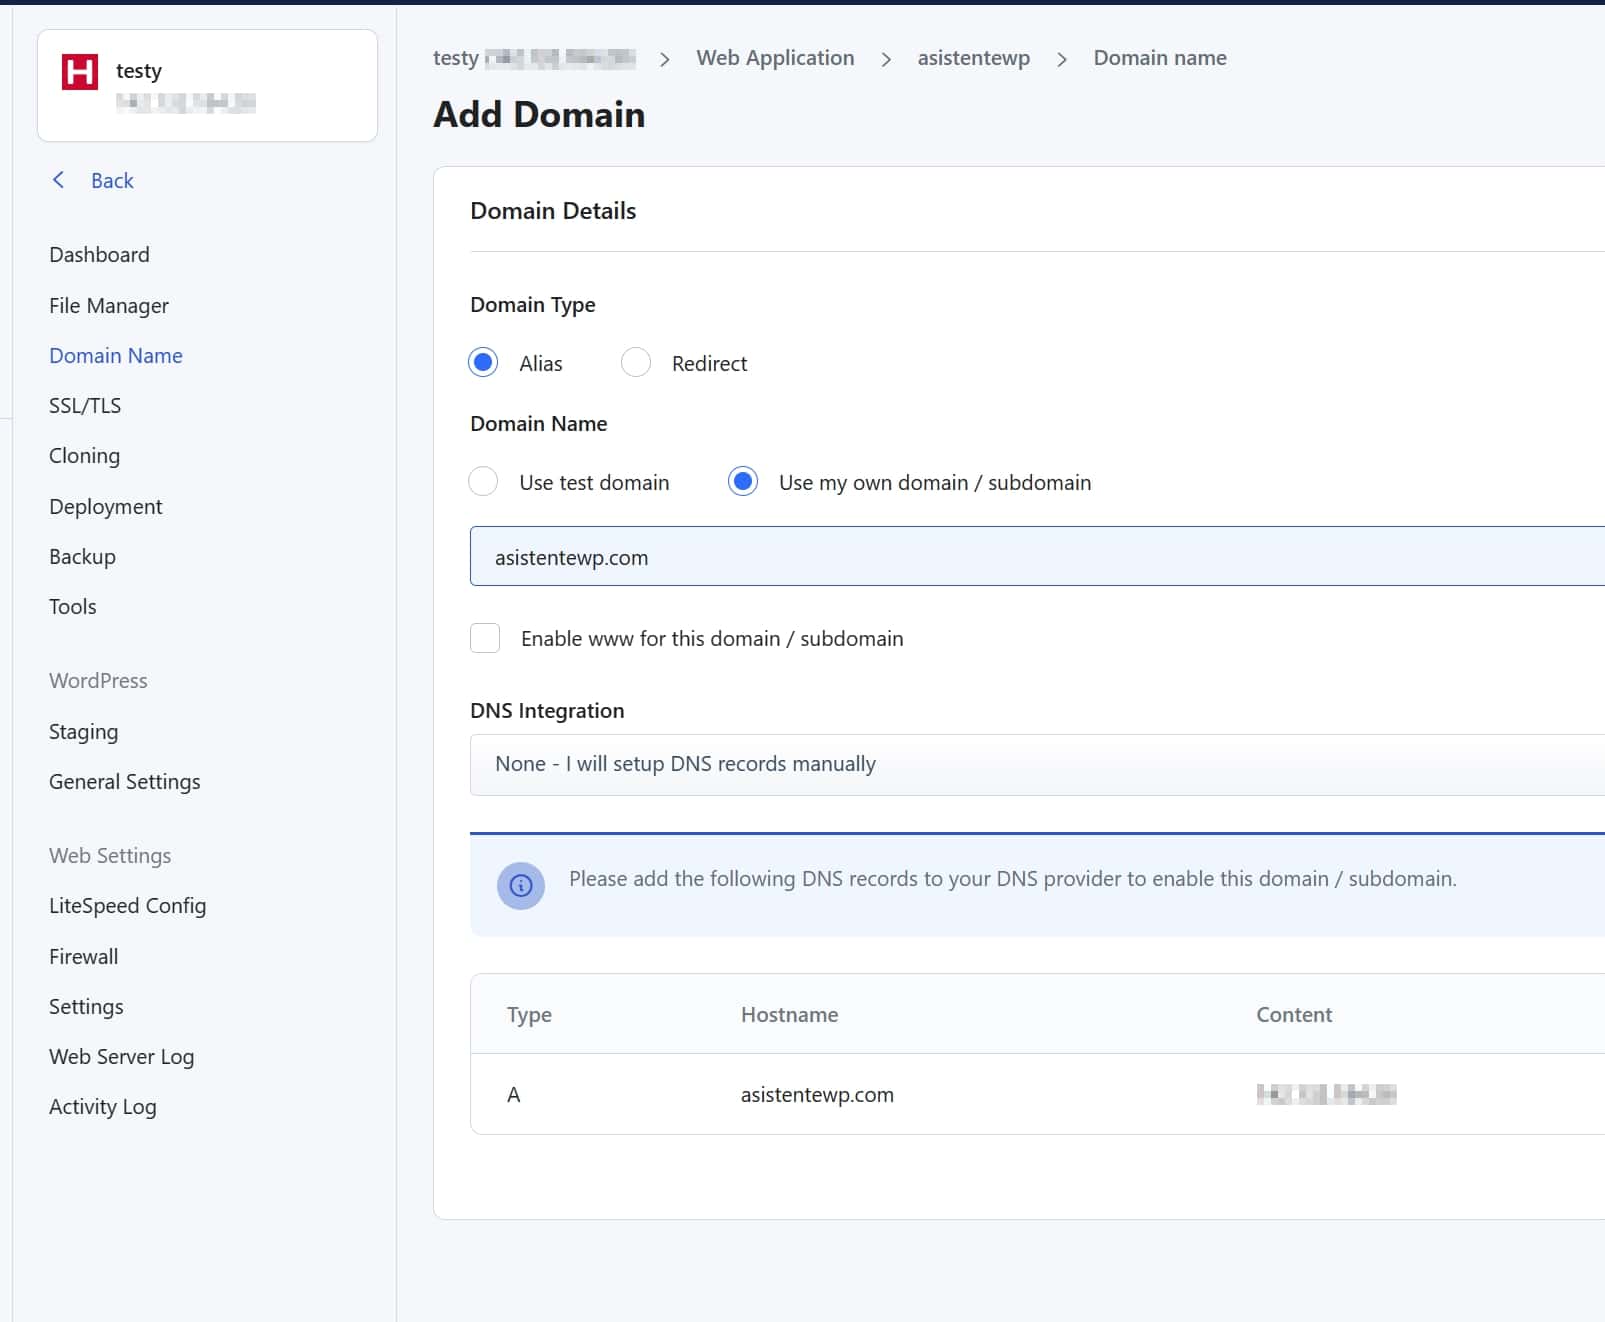
- Domain Type: Alias.
- Domain Name: “Use my own domain / subdomain” and enter your domain without the
www(if applicable). - Enable www for this domain / subdomain: Check this if your website is accessible with the
wwwprefix. E.g. www.asistentewp.com - DNS Integration: None
Click “Add Domain” and you will return to the previous screen, where you will see that you have two domains. The good one and the test one. Hover over the good domain, click on the three dots and click on the “Set as Primary Domain” option. It will ask you for confirmation; click again on “Set primary”.
Now, hover on top of the test domain, click on the three dots and click “Delete Domain”. It will ask you to confirm, so go ahead.
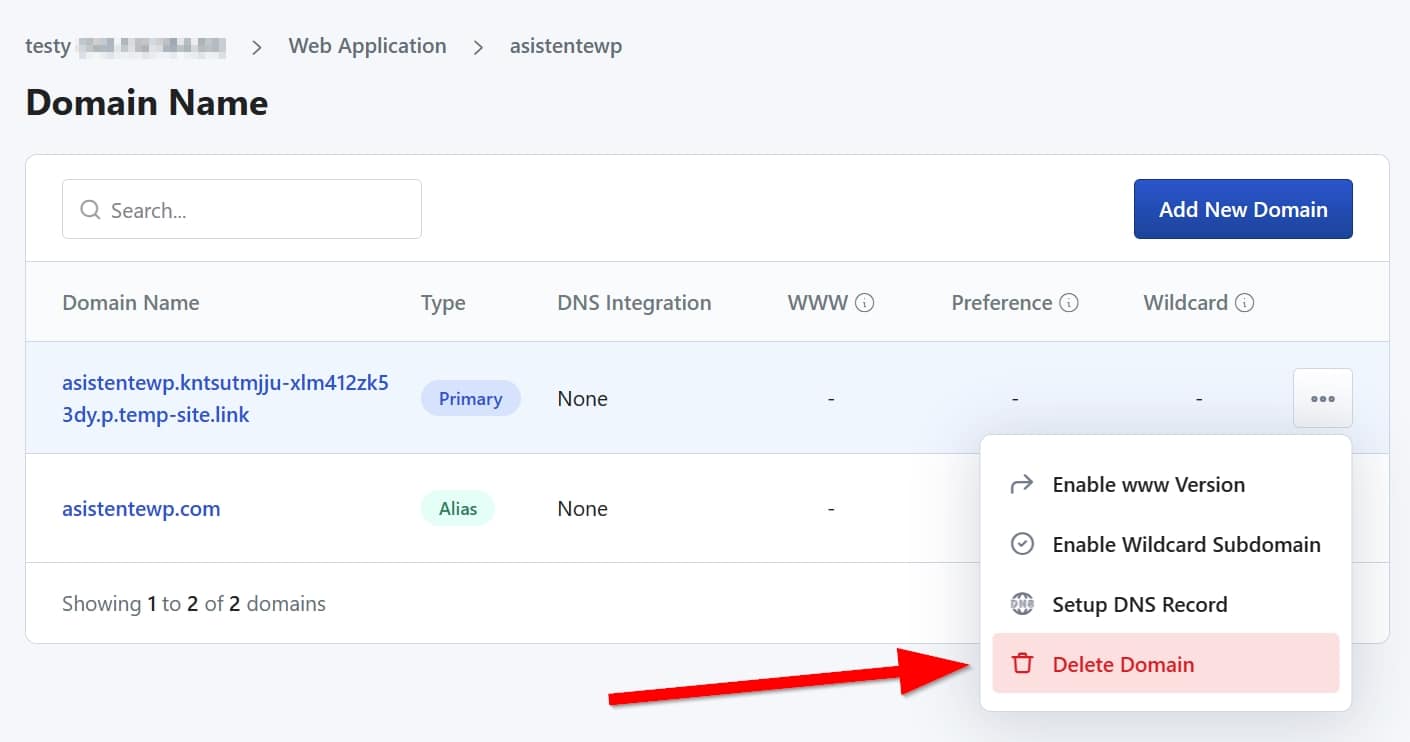
Now you should only have one domain listed.
Update DNS
DNS are like the Internet’s phone book. When you type a web address (like https://www.asistentewp.com), DNS translates that name into a number that the computers understand (called IP). This allows you to find websites and online services without having to remember complicated numbers (IPs). They are essential for browsing the Internet.
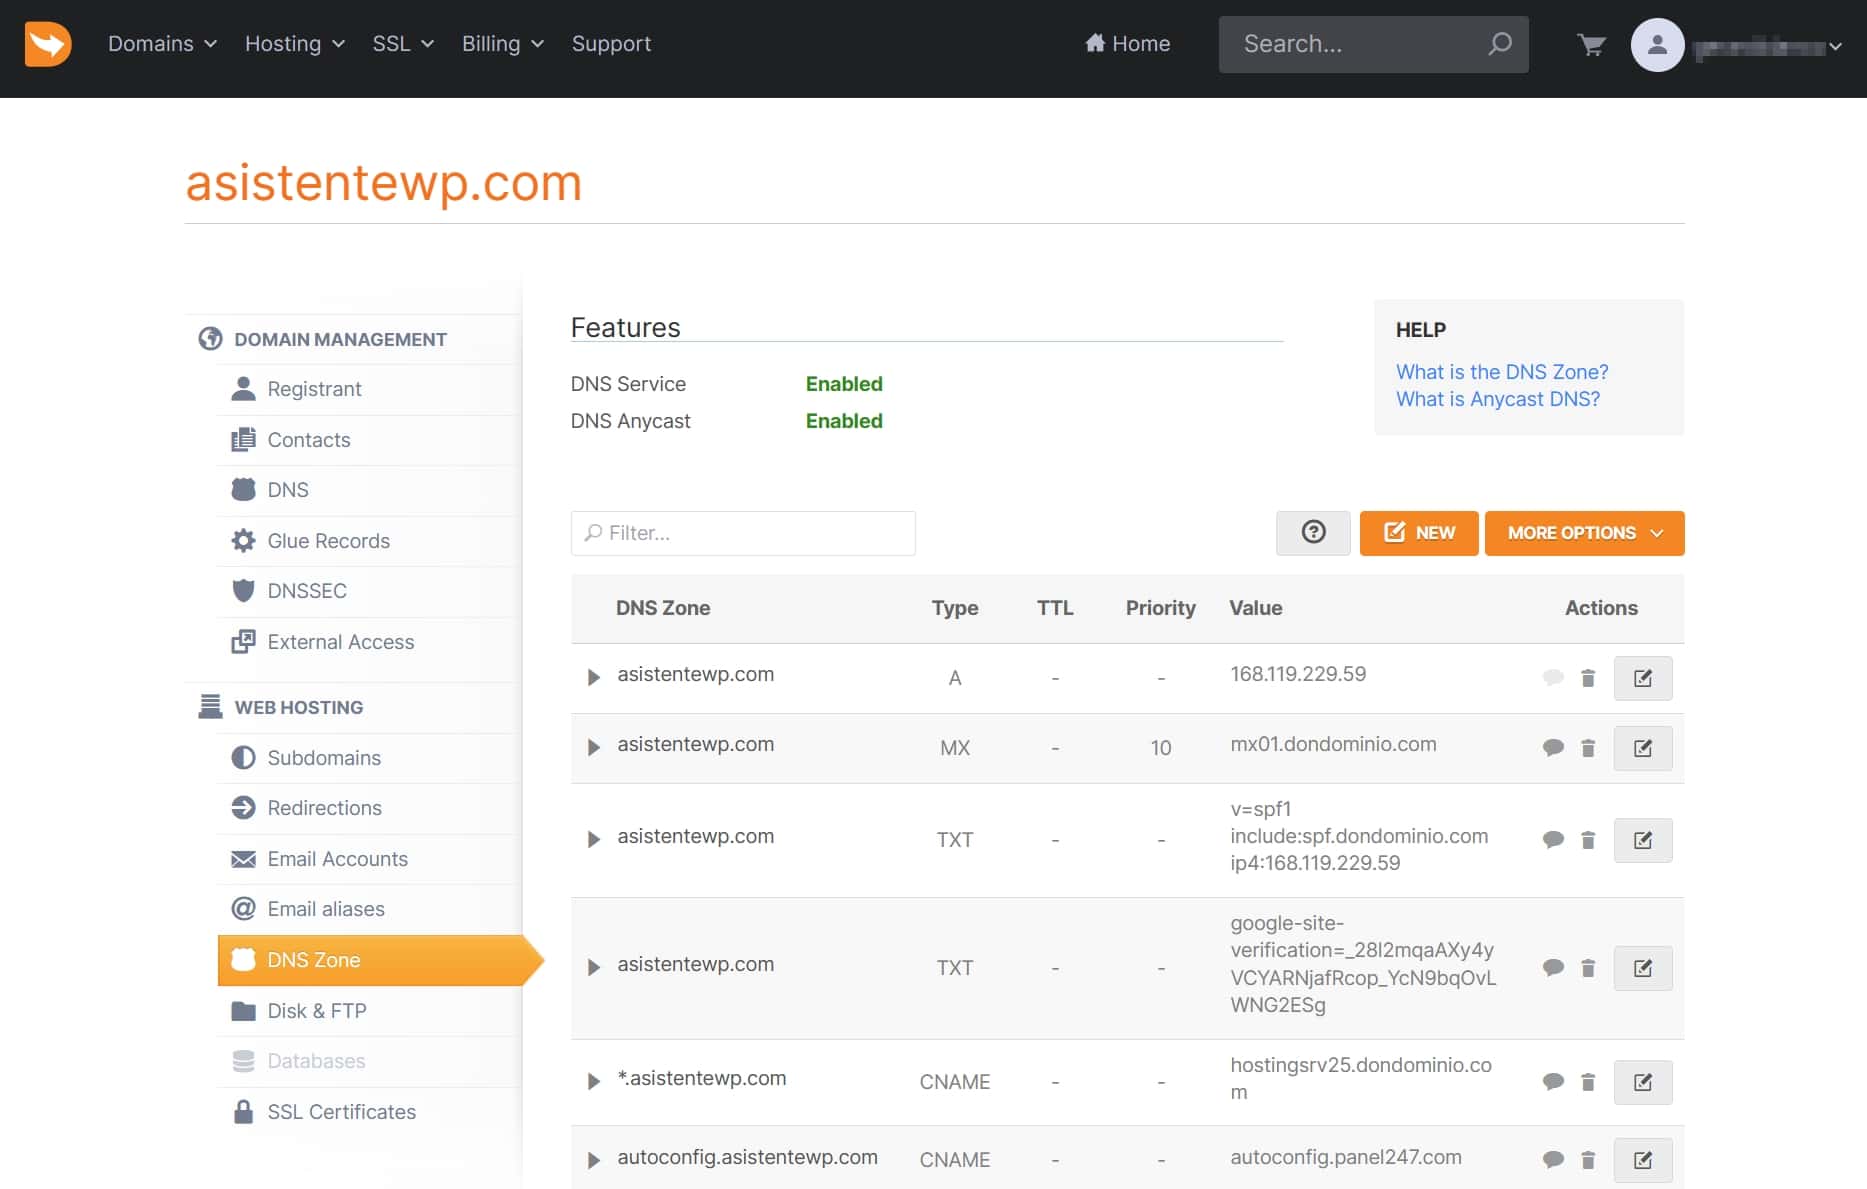
Your domain is currently pointing to an IP address that no longer works, because it belongs to your previous server. Now you have to point the domain to Hetzner’s new IP address. To do this, you must edit the DNS in your domain’s control panel. The instructions below use MrDomain as an example, but keep in mind they can slightly change if you decide to not host your domain there.
- We enter the MrDomain control panel and look for the domain’s DNS zone editor, as seen in the image.

- Here we will have to find the A type record and change its value. In the example above, it is the first line. We change the value to the IP of our server. This IP can be found on RunCloud or Hetzner. For example, in RunCloud, we see it here:

- If your domain can also (or only) be accessed with
www, you will have to find if there is another A type record that contains bothwwwand the IP of the old server. If so, you will need to update the IP there as well.
Create SSL certificate
Your website nowadays needs to be able to be accessed through HTTPS, otherwise, in addition to being a security risk, web browsers will not allow access to your website. So it is essential to create an SSL certificate, which is used for that.
The certificate is created from RunCloud. Follow these steps:
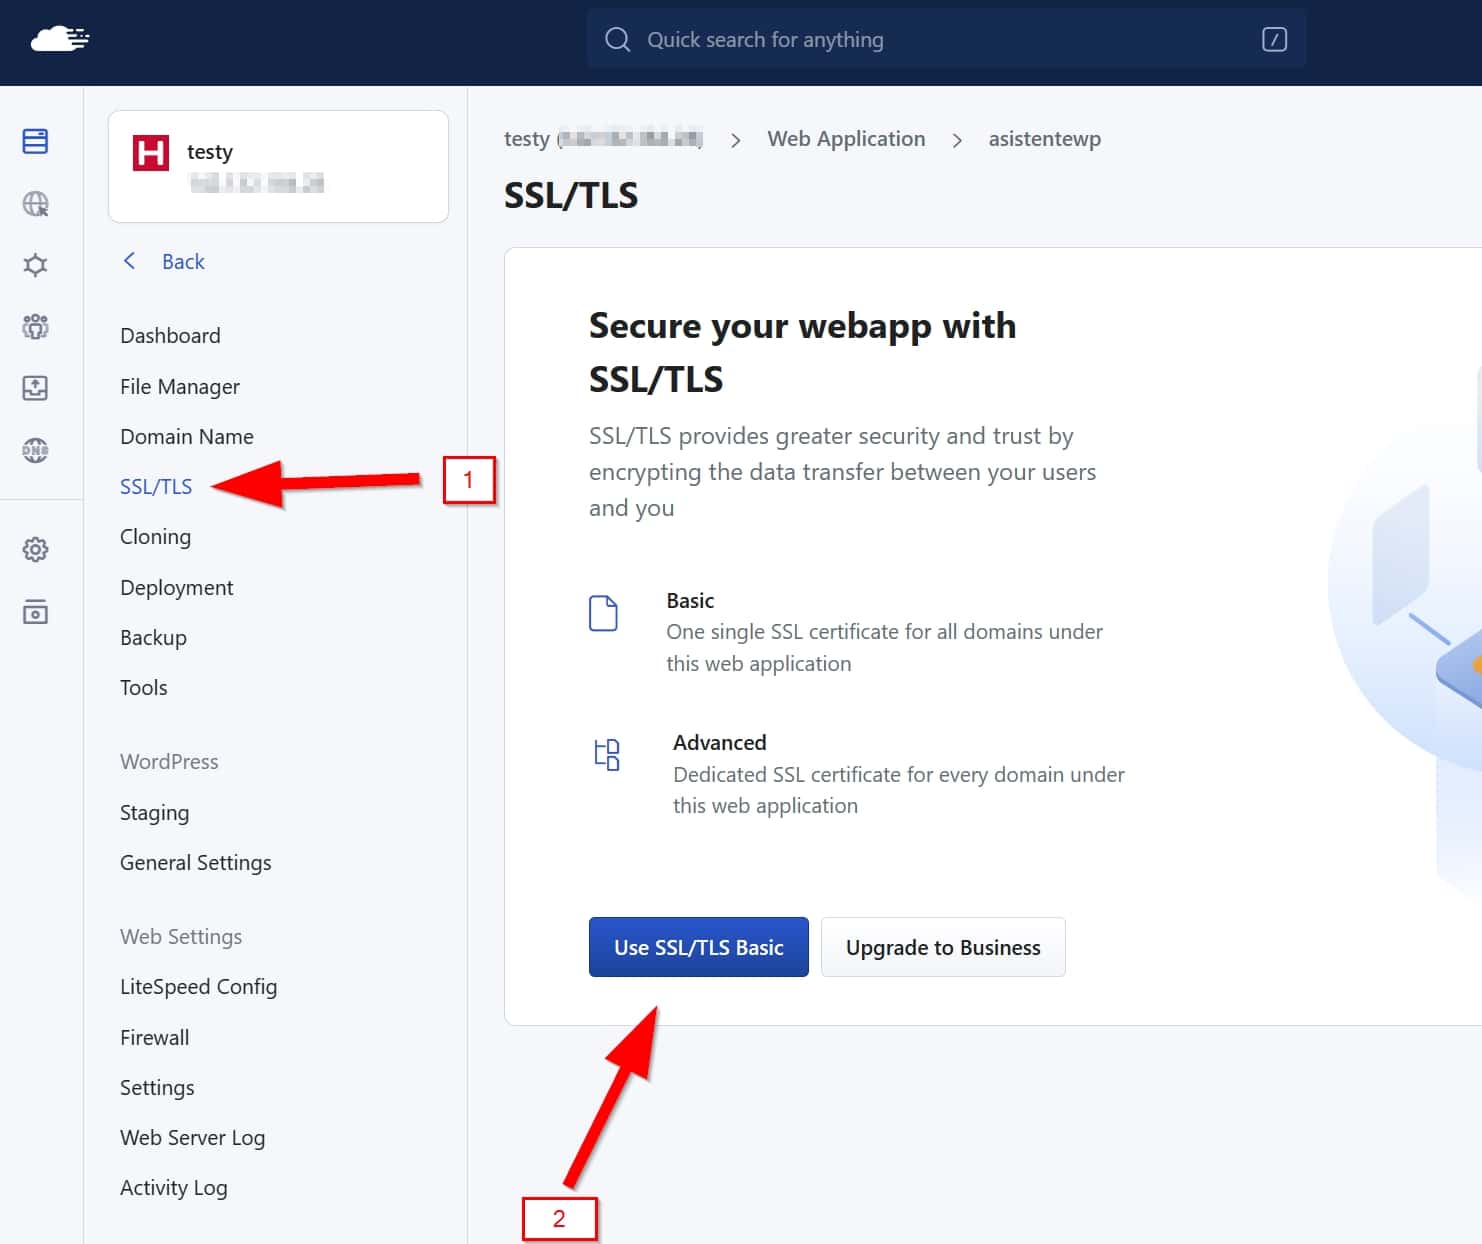
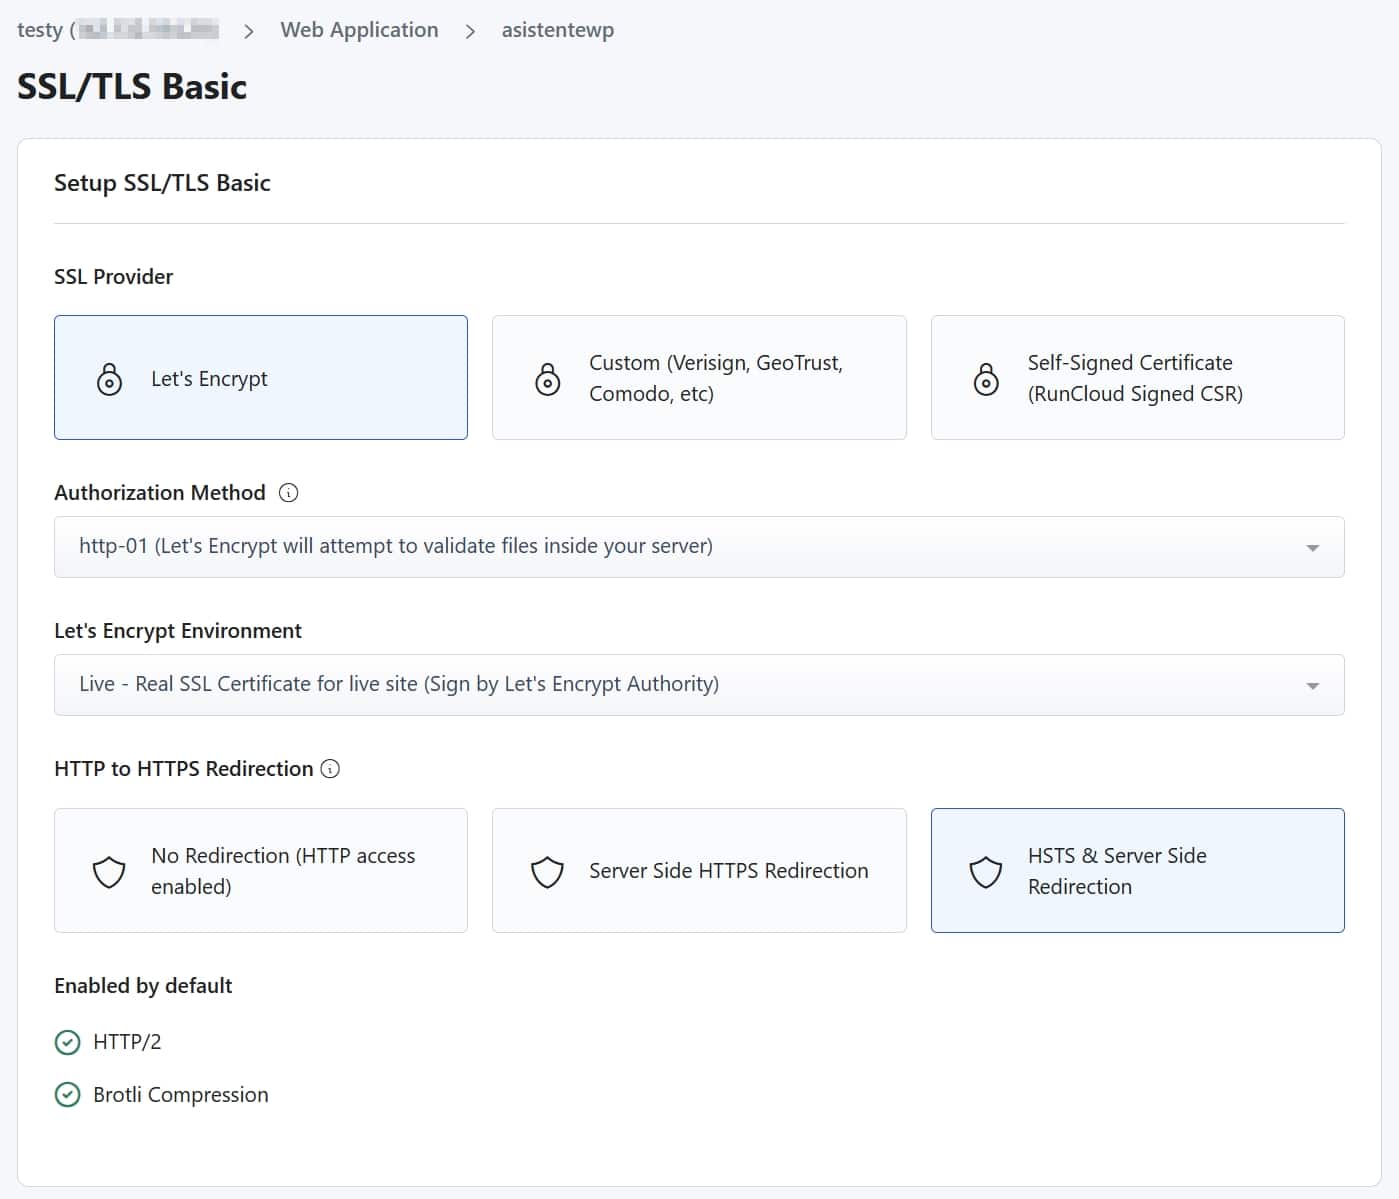
- On RunCloud, access your application’s dashboard and go to the “SSL/TLS” menu. There, click on “Use SSL/TLS Basic”.

- Select the following and click “Deploy SSL”:
- SSL Provider: Let’s Encrypt
- Authorization Method: http-01
- Let’s Encrypt Environment: Live
- HTTP to HTTPS Redirection: HSTS & Server Side Redirection

- Wait 5 minutes for the certificate to be created.
Step 5: Email migration
When you change the server where your website is located to a Hetzner server, two things will happen:
- Transactional email will no longer work. Transactional email in WordPress refers to automated messages that the site sends in response to user actions, such as order confirmations or password resets. These emails are crucial for informing users (including yourself) about their interactions on the site and keeping them up to date on specific transactions.
- Your regular email with addresses ending in @yourdomain.com may stop working.
Let’s see how to correct both types of email.
Transactional email
There are many online services that can be used to send transactional emails, but they are either too expensive for a normal website, or they are free with some limitations. That is why the best option is to have the domain hosted on MrDomain, because they will offer us 5 email accounts for €1 per year. Yes, per year, not per month. That’s 8 cents a month plus VAT.
If you don’t want to be in MrDominio, we recommend Brevo. They have a free plan, but has a few limitations. Below we show you how to configure everything in MrDomain, but if you need help with SendGrid, we can help you too.
- On MrDomain, log in to your account.
- Go here and buy the Mini plan.
- Follow the entire purchase process, and when finished go to My Domains.
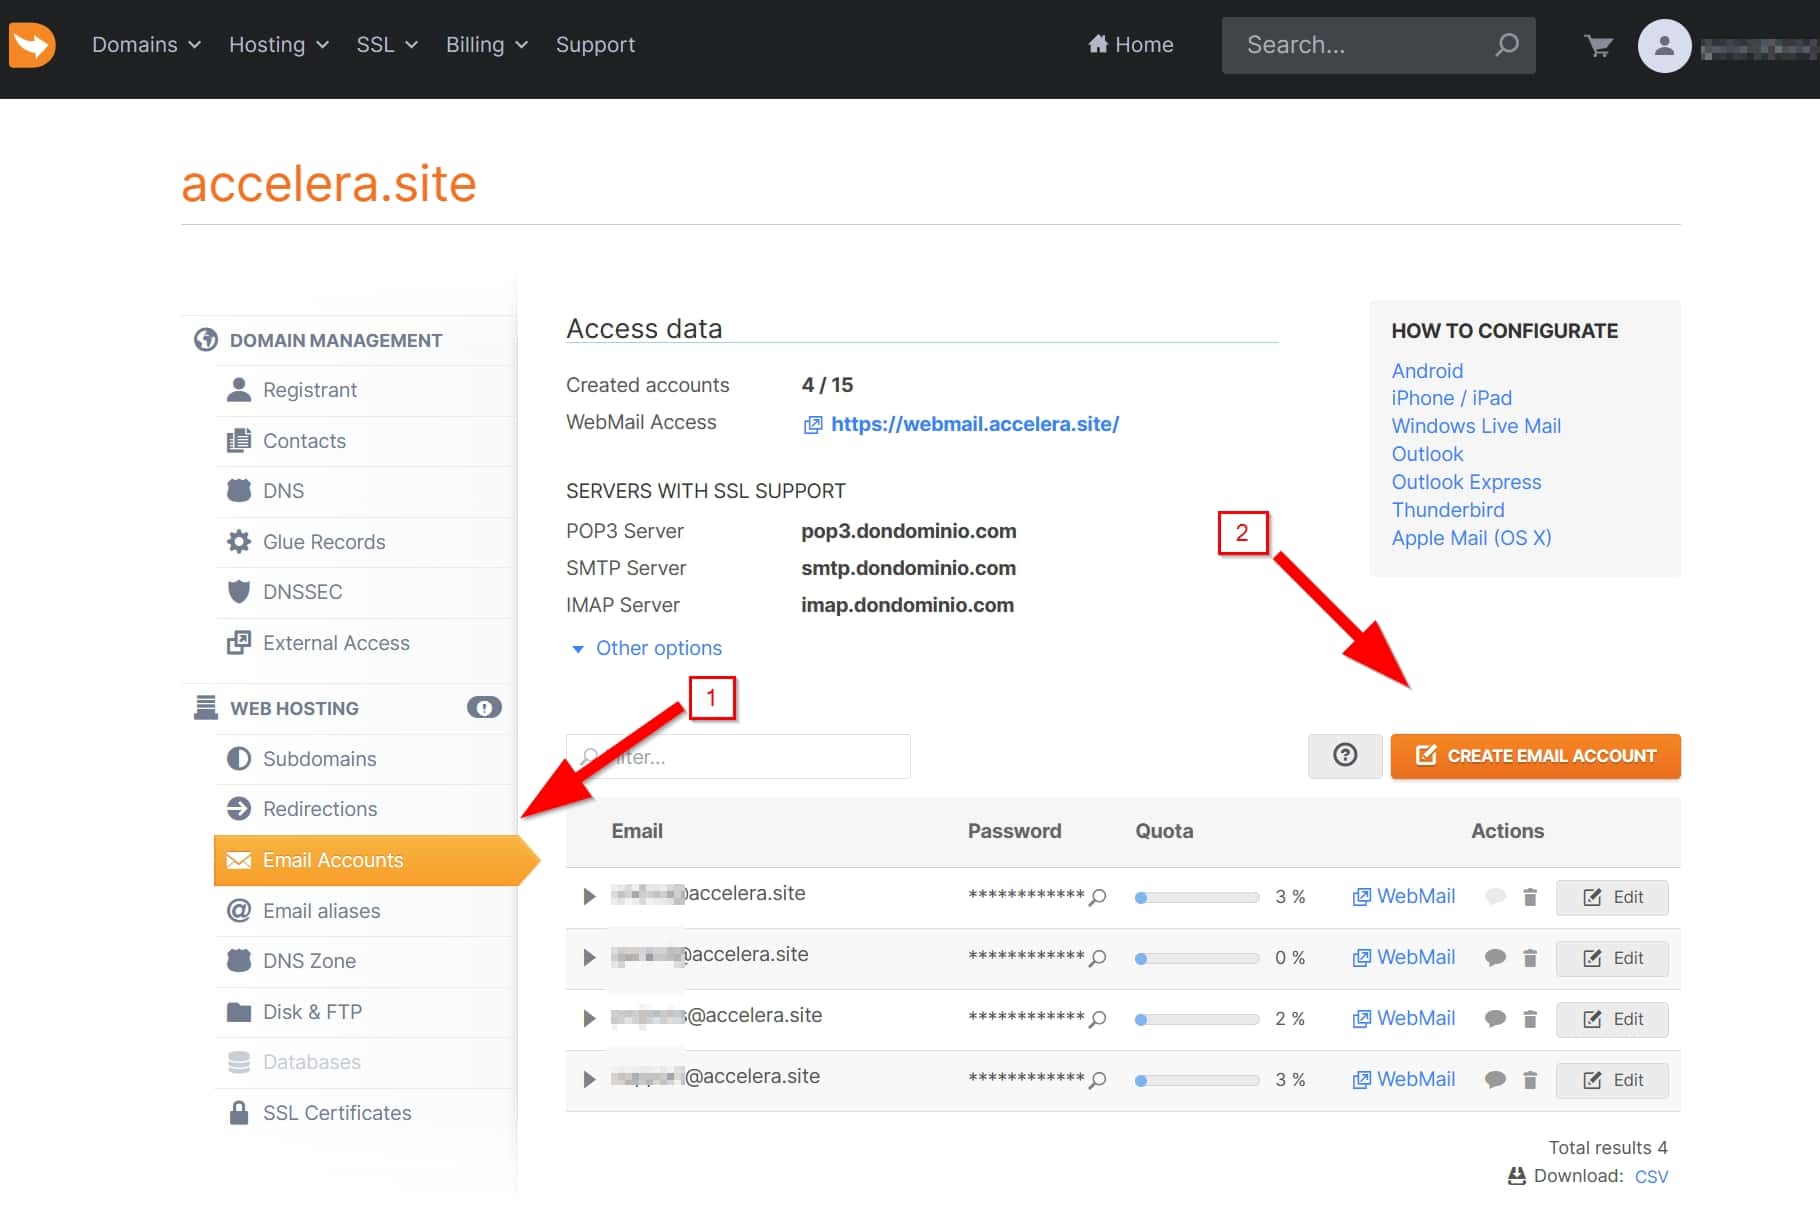
- Select your domain and go to Email Accounts > Create Email Account.

- Choose your email and password and click Save. In theory we will use this account for automatic emails, so you can write something like “email@yourdomain.com”, understanding that instead of
yourdomain.comyou will have to write your real domain. - Once the email account is created, let’s go to the WordPress administration panel.
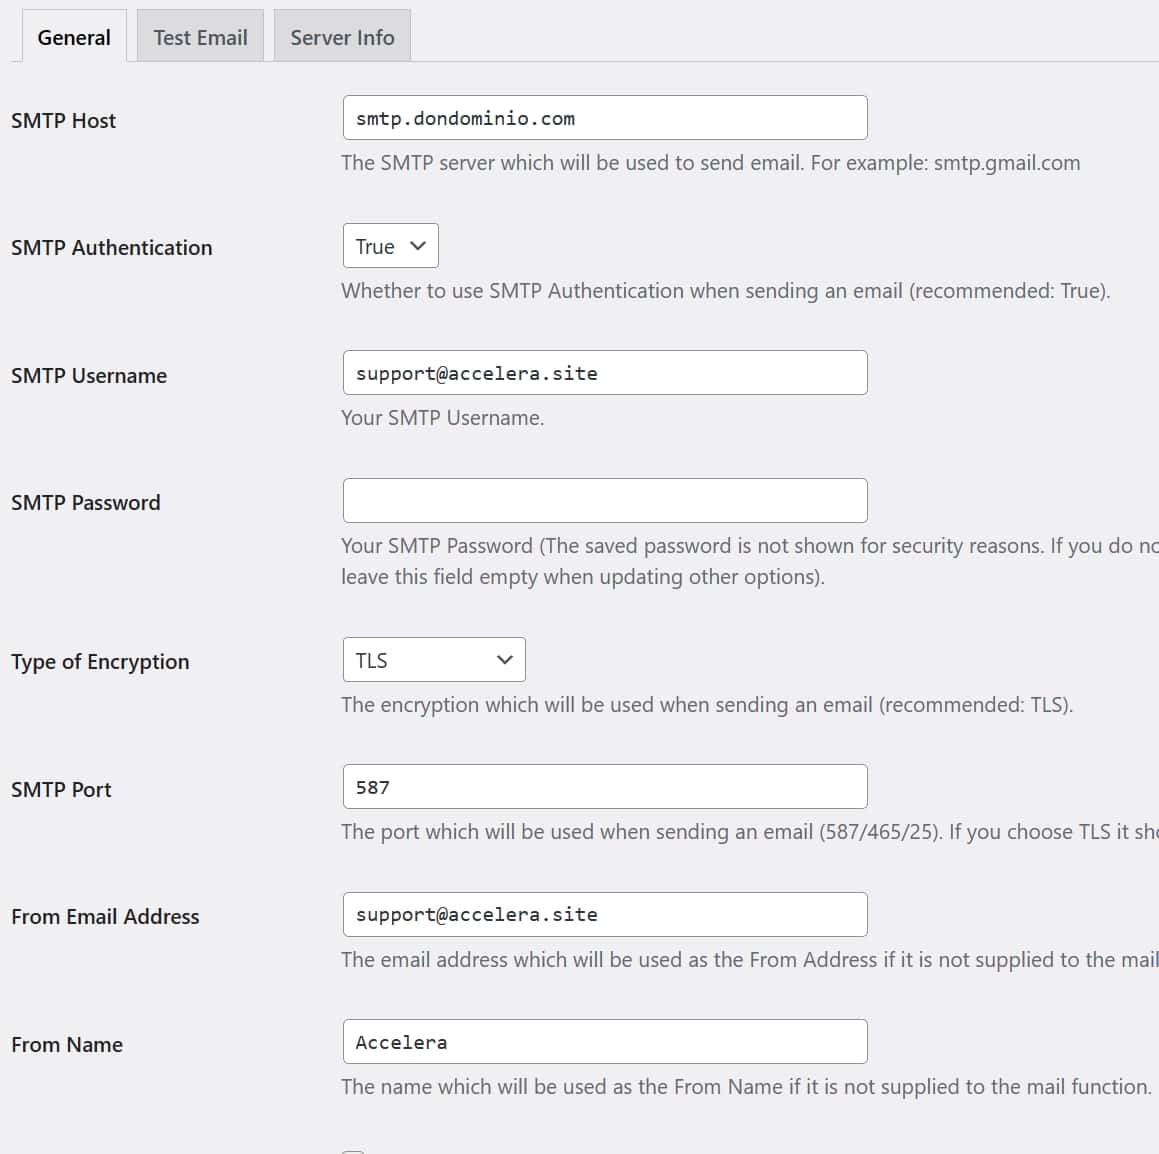
- Install the SMTP Mailer plugin. Do not install the best known ones like WP Mail SMTP or Easy WP SMTP, they are too slow and large for what they have to do.
- Go to Settings > SMTP Mailer and configure all the fields as follows:
- SMTP Server: smtp.dondominio.com
- SMTP Authentication: True
- SMTP Username: The email account you just created
- SMTP Password: The password you chose a moment ago
- Type of Encryption: TLS
- SMTP Port: 587
- From Email Address: The email account you just created
- From Name: You choose

- Now you can go to Settings > SMTP Mailer > Test Email, and test that transactional emails are working correctly.
Normal email
This is a sensitive issue. Setting up email and/or moving emails is always a headache, unfortunately…
If you are not using any email accounts of account@mydomain.com type, or if you are using them but they are created through Google Workspace or any other provider independent of your old hosting provider, you can ignore this step.
First of all, you have to figure out how you are checking your incoming email: POP3 or IMAP.
When you use POP3 to check your emails, it’s as if you are downloading physical letters from your mailbox and storing them at home. Emails are transferred from the mail server to your device (such as a computer or phone) and stored there. Once downloaded, the emails are no longer on the online mail server.
On the other hand, IMAP is like having direct access to your mailbox at the office. You can view your emails online, organize them, delete them, or mark them as read, but the emails are still on the online server. It’s like you can read your letters in the office without taking them home.
The key difference between the two is that with POP3, emails are downloaded and stored on your device, while with IMAP, emails are kept on the online server. So if you use multiple devices to check your emails, IMAP allows you to view the same emails from anywhere since they are always online. With POP3, emails are only on the device where you downloaded them, so you won’t be able to see them on other devices.
It is important to find out how you are checking your email, because the next steps will depend on it. If you are using POP3, everything will be easier, because you will only change one username and password. But if you are using IMAP, the mail server will change, and therefore you will have to transfer all your emails to the new mail server. So, if you are using IMAP, you should back up your emails just in case. You can do this using an email client such as Thunderbird or Outlook, downloading all the emails to your computer.
POP3 account migration
If your email accounts use the POP3 protocol, the migration is relatively simple. You will need to create new email accounts in the MrDomain control panel, just as we have done for transactional email, and then configure your email clients to use these new accounts. The steps are the following:
- Access the MrDomain control panel, after purchasing the Mini hosting package (or a larger one if you have more than 5 email accounts), and create new email accounts for each email account that exists.
- Edit the settings of your email clients (such as Outlook, Thunderbird, or whatever else you use) to reflect the new accounts. This includes changing the following:
- Password: The new one you set when creating the MrDomain email account.
- POP3 server: pop3.dondominio.com
- POP3 port: 995
- POP3 encryption type: SSL
- SMTP server: smtp.dondominio.com
- SMTP port: 587
- SMTP encryption type: TLS
- Test the new email accounts to make sure they work correctly. Send and receive emails, check that folders are located where they should and that you haven’t missed any important messages.
IMAP account migration
IMAP account migration involves transferring all emails and folders from the old mail server to the new one. Below are the steps:
- Configure the new email accounts in the MrDomain control panel, just as we have done for transactional email and in a similar way to how it is done with POP3 accounts.
- Use an email migration tool. Many hosting providers offer migration tools or services that will help you transfer your emails and folders from the old server to the new one. Check your old provider’s documentation for information on how to do this.
- Once the migration is complete, verify that all your emails and folders are in the new accounts.
- Update the settings in your email clients to use the new IMAP accounts instead of the old ones. This includes changing the following:
- Password: The new one you set when creating the MrDomain email account.
- IMAP server: imap.dondominio.com
- IMAP port: 993
- IMAP encryption type: SSL
- SMTP server: smtp.dondominio.com
- SMTP port: 587
- SMTP encryption type: TLS
- Test the new email accounts to make sure they work correctly. Send and receive emails, check that folders are where they should and that you haven’t missed any important messages.
Conclusion and expenses review
This is it! It has been a bit of a long process, but it is worth it. Migrating your WordPress website from a low-performing hosting provider to a Hetzner VPS managed with RunCloud is a smart decision that will significantly improve the speed of your site and save you money in the long run. Let’s make a quick comparison with SiteGround’s cheapest plan that costs $17.99/month+VAT, which is pretty slow even though they sell it as ultra-fast.
Hetzner’s cheapest server is much better than SiteGround’s cheapest plan in terms of performance, so let’s calculate an example using current entry options en EU zones:
- €4.49/month for the CX23 server ($5.26 at the time of writing this post).
- $9/month for RunCloud Essentials.
- About $18/year for the domain at MrDomain, that is, $1.5/month.
- €1/year for 5 email accounts in MrDominio, that is, €0.08/month.
- Total example ≈ $16/month (mixing currencies; your exact total will vary by zone and exchange rate). US and Singapore zones follow different price tables on Hetzner.
And here we are only comparing with SiteGround’s cheapest plan. If you choose any of the most expensive ones, the price increases a lot from SiteGround’s side and the difference is much greater. And let’s not talk about other “managed hosting” options, much more expensive and still not reaching the performance that a Hetzner VPS can provide you.
Follow these steps carefully, or think about hiring a professional if you don’t feel confident. Boost your website and reduce your expenses today!