Page builders have been an incredibly popular tool for WordPress users, allowing them to create visually stunning websites without having to code for them. However, as technology evolves and user preferences change, especially when it comes to loading speed, it’s important to stay ahead of the curve because page builders, while offering a lot of flexibility and customization options, also have some drawbacks: they can slow down your website, cause compatibility issues with other plugins or themes, and limit you with their proprietary code.
In this blog post, you’ll learn how to successfully remove a page builder like Elementor, Divi or Beaver Builder from your WordPress website and use the native WordPress editor Gutenberg for a more streamlined and future-proof web design.
Step 1: Evaluate your existing pages
Before you begin your redesign, take a comprehensive inventory of the pages on your current site. Get an idea of the structure, layouts, and unique features you want to maintain during the transition. This assessment will help you effectively plan and organize your content as you transition with Gutenberg.
The amount of work you need to do will depend on what parts of your site you changed with your page builder. Some you can change more of, and some you can change less of. Each of these parts is called a template in the WordPress world. The full list of templates is:
- Single post
- Single page – Normally you do not need to change this template because each page has already been designed separately.
- Custom post types – E.g. reviews, testimonials, team members, portfolios, events, products and so on. Basically anything else that has its own URL and that is not a post or page.
- 404 page
- Archives – Any list of posts/pages, either the author posts, categories, tags, etc.
- Main list of posts
- Search results
- Header – This is a template part, it is displayed in a template itself.
- Footer – This is a template part, it is displayed in a template itself.
- Comments – This is a template part, it is displayed in a template itself.
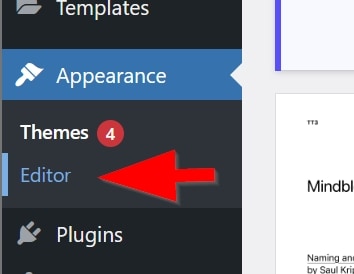
If you are using a block theme (which you can tell by the fact that you have a submenu called Editor in the Appearance menu), this is not a problem because you will use the Editor to replicate any of the templates you have modified with your page builder. However, if you have not used a block theme, you have three options:
- If your current theme allows you to customize your templates using the Appearance > Customizer menu, all is well, you just need to spend some time clicking here and there to choose the settings and design that work best for you.
- If your current theme does not allow you to customize your templates, you can simply adopt the design that is set by default.
- Or you can simply switch to a theme that allows you to customize your templates.
This way, you can already create a list of templates that you need to recreate with Gutenberg. And of course, you must also add to the list each and every regular page that you have already created.
Step 2: Familiarize yourself with Gutenberg
Gutenberg is the block-based editor of WordPress. While it may seem unfamiliar at first, it offers powerful features that are worth exploring. Take some time to get to know the editor and its features, such as reusable blocks, block patterns, and the various customization options. The more you get acquainted with Gutenberg, the more confident you’ll be in your new creation.
If you are also rebuilding your templates with a block editor, you should also take a look at the Site Editor (Appearance > Editor), as you will spend a lot of time here.
This video is a good introduction to Gutenberg:

Step 3: Back up your website
Safety should always come first when making significant changes to your website. Make a full backup of your website, including the database and files. Use a reliable backup plugin (we recommend WPvivid Backup or BackWPup) or your hosting provider’s backup service to ensure that you can easily return to the previous state in case of unforeseen problems.
Step 4: Create a staging environment
To avoid interruptions to your live website, you should set up a staging environment where you can safely experiment with Gutenberg and recreate your pages and templates. Many hosting providers offer staging capabilities, which should be the ideal option, as you can move your site from staging to production and vice versa with one click. However, if you can not easily set up a staging site, you can use the backups you created in the previous step to clone your website.
If for some reason you can not clone your site (maybe your hosting provider does not allow you to have more than one site in the same account), see the alternative path at the end of the article.
Step 5: Remove your page builder
Yes, finally! Remove the page builder. Do not worry about losing content. Remember that you are working on a staging site and you always have your production/live site.
Step 6: Recreate pages and templates using Gutenberg
With a solid plan in hand and a staging site, start rebuilding your pages and templates using the Gutenberg editor. Ideally, you should overwrite the content of your existing pages. This way, you’ll use the same URLs and custom metadata (e.g. SEO information) and save some time and effort. Add the necessary blocks to replicate the design and content of your original pages. Use the reusable blocks feature to save frequently used elements and streamline the editing process.
Remember that you should always give preference to native WordPress blocks, as they are the most optimized and do not affect loading speed. You will probably need to add more blocks that provide more functionality and flexibility. So, if you are using Gutenberg, you should be careful about which blocks you include in your pages, third-party block suites may generate bloated code that can affect your site’s speed. To ensure a streamlined experience, you should use smaller plugins that offer specific blocks. Examples:
You can also use suites of blocks, but try to stick to those that are most optimized. There are some, like Stackable or Qubely, that we think are too big and bloated.
As you saw in the previous video, Gutenberg offers several customization options to adapt your website to your branding and style. Adjust colors, typography, and spacing using the block settings, and add CSS classes for more advanced styling if needed. This flexibility lets you achieve a customized look for your website.
Step 7: Test, test, test
After recreating your pages, thoroughly test your site in the staging environment to make sure everything is working as expected. Check for broken links, missing content, or inconsistencies in the layout. Cross-browser and cross-device testing is critical for a seamless user experience.
Step 8: Prepare for launch
Once you are satisfied with the newly created website in the staging environment, it is time to prepare for launch. Check your backups and make sure you have everything in order. Schedule a window of time for maintenance during low-traffic hours to minimize potential interruptions.
If you have a dynamic website, such as an e-commerce site, a busy blog with comments, or an event site, there’s something important to keep in mind: You need to export and import the new information (new comments, new orders, new registrations…) from the live site to the staging site before putting the staging site into production. Otherwise, you will lose important data! How you do this export/import depends on what kind of information you are dealing with. So it’s best to talk to the developer of the plugin or component you are using so they can help you out.
Conclusion
Switching from a page builder to Gutenberg may seem daunting, but it opens up new possibilities and ensures your site keeps up with the latest WordPress developments. If you follow these steps and take the time to understand and take advantage of Gutenberg’s capabilities, you can confidently rebuild your site without a page builder and enjoy a more efficient, future-proof, and seamless WordPress experience. Have fun building!
Alternative path: What if I cannot create a staging site?
In this case, the procedure is a bit trickier. You need to work with the live site and considering that you stopped reading at step number 4, do the following:
- Perform step #6, but instead of overwriting your existing pages, create new ones so that the old content is still accessible.
- Perform step #7.
- Put your website into maintenance mode so that no new information arrives while you perform the next steps.
- Perform step #5
- Change the URLs of the new pages to the existing URLs.
- Make sure that all your pages, posts, or custom post types use the new templates you created, if any.