Images play a crucial role in website performance and SEO. They account for, on average, 1,054 KB on desktop pages and 900 KB on mobile pages, making them the largest contributor to page weight on homepages, while accounting for about 40% of the total page weight. Using a modern image format (WebP, AVIF) or increasing compression can reduce image download size and significantly improve load times and user experience.
In this guide, I’ll cover everything you need to know about serving images in modern formats in WordPress.
What are modern image formats?
Modern formats like WebP and AVIF offer superior compression compared to traditional formats like JPG and PNG. Here’s a quick comparison:
- WebP: Developed by Google, WebP provides better compression than JPG and PNG while maintaining high image quality. It supports both lossy and lossless compression, transparency (like PNG), and animations (like GIF). Lossless WebP images are 26% smaller than PNG, and lossy WebP images are 26-30% smaller than JPEGs. WebP is widely supported across all major browsers, including Chrome, Edge, Firefox, and Safari.
- AVIF: Based on the AV1 video codec and therefore making AVIF its counterpart, AVIF is an even more advanced image format than WebP. It offers superior compression efficiency (50% smaller than a JPG), meaning smaller file sizes with better quality and also supports lossy/lossless, transparency and animation. AVIF is now broadly supported across major browsers (Chrome, Edge, Firefox, and Safari), with global support in the mid-90% range, close to WebP.
Using a modern image format (WebP, AVIF) can improve image download size, which is why these formats have become essential for performance‑focused sites.
Can you upload WebP/AVIF in WordPress?
Yes, WordPress natively supports WebP uploads, meaning you can easily upload WebP images and serve them to all visitors. However, if you upload WebP images manually, they won’t be optimized further unless you process them beforehand, which can lead to unnecessarily large files if they weren’t compressed well before uploading.
AVIF is also natively supported in WordPress (added in WordPress 6.5). You can upload, edit, and generate AVIF image sizes in the Media Library, provided your server’s image processing libraries (GD/Imagick) support AVIF. However, you’ll face the same limitation as with WebP: AVIF files won’t be optimized unless you compress them before uploading.
Best practice: Convert JPG, PNG or GIF to WebP/AVIF in WordPress
Instead of uploading WebP/AVIF directly, the best practice is to upload images in standard formats (JPG/PNG/GIF) and then convert them inside WordPress with a plugin. This ensures images are properly optimized before serving.
Option 1: Compress and convert with ShortPixel
The best plugin for image optimization is ShortPixel Image Optimizer (SPIO), hands down, because it balances compression quality, AVIF/WebP generation, multiple delivery options (local, <picture>, CDN), broad server compatibility, straightforward setup, and fair pricing. The process involves just a few simple steps:
- Install SPIO on your WordPress site: ShortPixel Image Optimizer – WordPress.org
- Go to Settings > ShortPixel and configure the settings to your liking.
- Now go to Settings > ShortPixel > WebP/AVIF & CDN.
- Enable “Create WebP Images” and/or “Create AVIF Images”.
- Upload your images and let the plugin optimize and convert them to WebP/AVIF.
Option 2: Convert already-compressed images with Modern Image Formats
If you already compress your JPG/PNG/GIF images before uploading them, you just need a solution to create and deliver their modern formats. To do that, you can use a simple plugin like Modern Image Formats. The recommended settings are as follows:
- Image output format — AVIF. It’s better than WebP.
- Output fallback images — Checked, so you always have the original format available.
- Generate all fallback image sizes — Checked, so you always have the original format available.
- Picture element — Unchecked for better performance. This option is the same as ShortPixel’s (which we’ll see explained below), and while it offers good compatibility, it changes the HTML structure, which can be problematic in some cases.

How to deliver WebP/AVIF images to visitors
All right, once your images are converted to WebP or AVIF, it’s time to serve them to your visitors. If you stopped here, the only thing you would’ve done is increase your disk usage.
Option 1: Let the Modern Image Formats plugin do it for you
If you went with option #2 above (using the Modern Image Formats plugin), you can skip this whole step. That’s actually all you need to do, because the plugin is already delivering the modern formats for you. It relies on WordPress hooks and filters to perform the replacement on the fly, rather than using JavaScript or modifying the source code.
There is an even better way to serve WebP/AVIF than the one Modern Image Formats uses: letting the server do the job by using the .htaccess file or tweaking the Nginx configuration (if you happen to use Nginx and not Apache or LiteSpeed). However, the method Modern Image Formats uses is still better than using the <picture> tag syntax.
Option 2: Serve locally stored WebP/AVIF files with ShortPixel
ShortPixel allows you to generate WebP/AVIF files and serve them from your own server. To enable this feature:
- Go to Settings > ShortPixel > WebP/AVIF & CDN.
- Activate the option: “Serve WebP/AVIF images from locally hosted files (without using a CDN).”
- Choose a delivery method:
- Using the
<picture>tag syntax: This method scans your HTML source for<img>tags and replaces them with<picture>tags containing references to the original image, WebP, and AVIF versions. The browser will automatically select the best format, prioritizing AVIF. This approach avoids server configuration (unlike the.htaccessmethod) but is less effective—it only applies to<img>tags, not background images—and has a greater performance impact. - Without altering page code (via .htaccess): This is the most performance-efficient method because the server directly delivers WebP/AVIF files instead of relying on WordPress. However, it does not work on Nginx servers. If you have an Nginx server, I recommend checking their official documentation.
- Using the

Option 3: Use ShortPixel’s CDN to deliver WebP/AVIF
The second method ShortPixel offers is delivering WebP/AVIF via its built-in CDN. This method:
- Does not depend on your web server’s configuration.
- Dynamically rewrites image URLs to serve optimized versions. Each time a page loads, ShortPixel scans the HTML and replaces standard image URLs with ones pointing to
spcdn.shortpixel.ai. Your original physical files remain unchanged. - May be slower than local delivery if your server is already fast.
- Some image URLs may not be replaced depending on how your website is built.

To enable this method, simply go to Settings > ShortPixel > WebP/AVIF & CDN and turn on “Deliver the next generation images using the ShortPixel CDN“. Keep in mind that you must also enable either “Create WebP Images” or “Create AVIF Images.”
Option 4: Generate WebP and use another plugin for delivery
If you prefer not to use ShortPixel’s delivery options, you can still use the plugin to generate WebP files and let another plugin handle delivery. The most popular compatible options are:
- LiteSpeed Cache: Enable the “Image WebP Replacement” setting under LiteSpeed Cache > Image Optimization > Image Optimization Settings.

- WP Rocket: Enable the WebP Compatibility add-on.

- Cache Enabler: Enable the “Create a cached version for WebP support” option.


Unfortunately, these three plugins are also caching plugins, so using them solely to deliver WebP may be overkill. However, if you’re already using one of them, feel free to take advantage of its WebP support!
Remember, you must generate WebP versions with ShortPixel beforehand and disable both native ShortPixel delivery methods. In ShortPixel’s settings, make sure:
- Create WebP Images: Enabled.
- Deliver the next generation images using the ShortPixel CDN: Disabled.
- Serve WebP/AVIF images from locally hosted files (without using a CDN): Disabled.

What’s the fastest method to serve WebP/AVIF?
Of all the possible configurations, the fastest way to serve WebP/AVIF images in terms of performance is usually to let the server handle the delivery. This means:
- Using .htaccess on Apache servers, which you can configure directly from ShortPixel’s settings.
- Manually configuring Nginx, either through your hosting provider or by yourself if you manage the server.
However, if your audience is worldwide or your server isn’t powerful enough (e.g., Bluehost, HostGator, SiteGround, GoDaddy, etc.), a CDN will likely provide better performance. See method #3 above.
Use this table that will help you choose how to serve WebP/AVIF in WordPress:
| Method | Implementation | Setup difficulty | Performance | Background-image support | Server compatibility | Best for |
|---|---|---|---|---|---|---|
Server rules (.htaccess) | Via ShortPixel | Easy | Excellent | Yes | Apache/LiteSpeed | Maximum speed on own server |
| Server rules (Nginx) | Manually | Hard | Excellent | Yes | Nginx | Maximum speed on own server |
Plugin <picture> replacement | Via ShortPixel | Easy | Good | No (HTML <img> only) | Any | As a last resort |
| CDN delivery | Via ShortPixel | Easy | Very good | Depends on plugin implementation | Any | Worldwide audiences |
| WordPress hooks & filters | Via Modern Image Formats | Easy | Very good | Depends on plugin implementation | Any | Manual optimization before uploading |
In any case, I recommend first compressing your images with ShortPixel to ensure the final WebP and/or AVIF files are as small as possible.
How to verify WebP/AVIF are being served
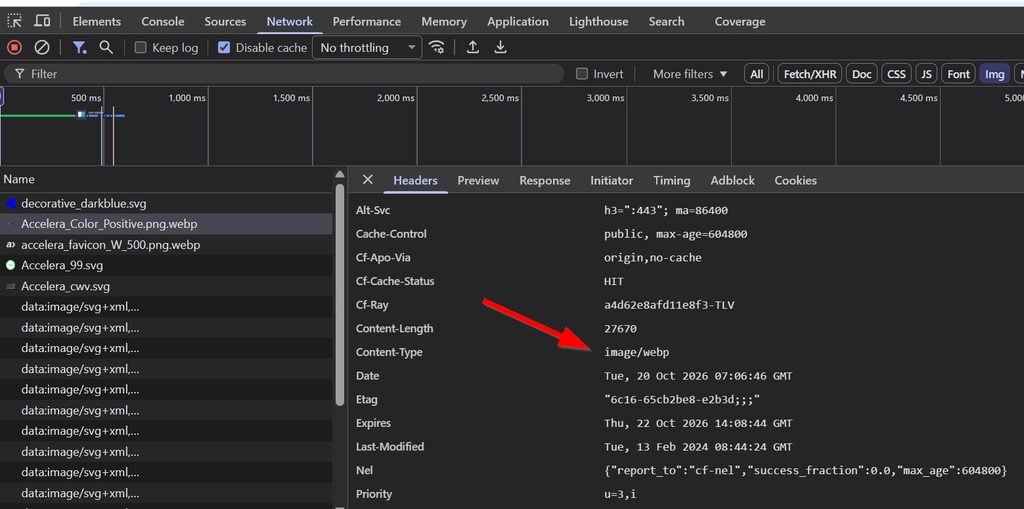
No, the best method to verify that your next-gen image formats are being delivered correctly is not by checking the extension of the file in the URL, because the extension does not always match the actual file format. The most reliable one is using the Developer Tools of your browser:
- First of all, clear all caches from your site.
- Open a page, press
Ctrl/⌘+Shift+I. - Go to Network, filter by Img.
- Select an image that you know has a WebP/AVIF counterpart.
- Check Headers > Content-Type for
image/aviforimage/webp.
Conclusion
The best way to serve images in modern formats while achieving great performance is:
- Upload images in JPG or PNG format.
- Make sure the images are compressed before uploading, or use ShortPixel Image Optimizer to compress them afterward.
- Use ShortPixel Image Optimizer or Modern Image Formats to convert images to WebP or AVIF, depending on whether they were compressed before uploading.
- Choose the best delivery method based on your server setup. If possible, let the server handle it (Apache/LiteSpeed/Nginx) instead of WordPress.
And if you need any help with this, I can help you!
Troubleshooting common WebP/AVIF delivery issues
Here is a very condensed list of possible issues that you may encounter, along with a jump-start solution that will help you figure out where to start looking in order to solve them.
- AVIF not generated: If AVIF images are not being generated for any of your images, your server’s GD or Imagick library probably lacks AVIF support. Ask your host to enable it, or switch to WebP generation. If only some of your images have no AVIF counterpart, it means that the plugin or method you used to generate the AVIF images decided that those specific images did not need one, for whatever reason.
- Variant larger than original: Although it’s uncommon, some images (e.g., tiny icons) can be larger in AVIF or WebP format, and that is expected, especially for AVIF. You can either live with this or use WebP.
- CDN serving the wrong variant: If your server is delivering the correct modern image format but the CDN is not, you should either purge the CDN cache or make sure that the
Acceptheader are forwarded to the origin. - Background images not converted: This issue only happens when using the
<picture>tag delivery method. Since this only affects<img>tags (and background images do not use those), you should change your delivery method. Use server rules or CDN rewrites, or manually convert your CSS backgrounds to<img>tags. - Existing images not processed: If you find that only newly uploaded images are served as WebP or AVIF, you will most likely need to use your plugin’s bulk-optimize or regenerate-thumbnails option so that all images and sizes get WebP or AVIF variants.
- Nginx rules not applied: When you use Nginx and apply the relevant rules to serve WebP or AVIF transparently to the user, you need to verify that you have reloaded the service and that no location blocks are shadowing your rewrite or map configuration.