Nowadays, if your website doesn’t appear on the first page of Google search results, it means that you are practically invisible to your potential users. And if you want Google to love you more and promote you to the top, one of the most important things you need to do is improve the performance of your WordPress website. Besides, your users will be happier if they do not have to go for a coffee first while your site is loading 😉
We have written this article to help anyone who needs to optimize their website’s performance but doesn’t want to get lost in hundreds of pages and/or has limited technical knowledge. This tutorial aims to cover all the essential points needed to easily boost your website’s speed.
Let us take a look at what you can do to optimize your website’s performance.
WordPress Optimization Checklist
- Get good WordPress hosting
- Tune your web server configuration
- Use as few plugins as possible
- Use the best plugins
- Do not use a page builder
- Choose the best theme
- Use a CDN
- Cache your site
- Optimize all images
- Optimize JavaScript
- Optimize CSS
- Optimize fonts
- Preload resources
- WordPress general optimization
- Update the PHP version
- Clean up the database
- Optimize the external resources
1) Get good WordPress hosting
It is annoying to visit a website and see this for more than 0.5 seconds:

This is what happens when you get a hosting service from a company that offers super cheap hosting services. You’ll have a server that is shared by many, many other people, all of whom use the same resources as you. And not only that, since your website takes too much time to load, your visitors will just leave it. You are effectively losing customers and visitors if you have a slow WordPress site.
So maybe it’s time to switch web hosts! But where should you start looking? There are a few categories of hosting solutions, for all budgets and needs. Here we describe them and give our honest recommendations:
Shared hosting
This is the cheapest option, suitable for websites with low traffic (around 50,000 page visits per month or less) and without components that require a lot of resources (like WooCommerce or WPML on WordPress).
Best shared hosting providers:
- Cloudey: Very active in online forums, you will not find that many reviews, and that actually makes them a good option; nowadays the vast majority of reviews are mostly paid.
- Lightning Base: A lesser-known provider whose website is not the best, but is one of the best year after year.
- Krystal: UK-based company, with satisfied customers and very good reviews in various Facebook groups and online forums.
- WebHostFace: American company with LiteSpeed servers that offer quite good performance for their price.
- MechanicWeb: Another small company that is quite loved by professionals. They use LiteSpeed servers.
In our experience, you should avoid all hosting providers that belong to Newfold Digital, like Bluehost or HostGator. Also, we think you should stay away from GoDaddy, OVH, NameCheap, 1and1, Namecheap, Hostinger, DreamHost and other low-cost providers. All of these have limited resources, overcrowded server and a slow architecture with outdated technology. So why are they so popular? Easy, extremely low prices, huge budget for marketing and affiliate marketing. A good rule of thumb to recognize them is: they offer you unlimited stuff (hard drive, CPU, bandwidth, websites…) and their advertised super low price only applies if you commit for 1, 2 or 3 years.
Also avoid SiteGround. In another post we will talk more about the subject, but in short, today they live from affiliate marketing, because they are neither cheap nor offer an extraordinary performance. And they have all sorts of annoying limits.
If you want more recommendations about shared hosting, we recommend that you do your own research, since everyone has different needs and every hosting provider offers something different, but for starters, here are the minimum requirements that you should pay attention to when looking for a new shared hosting provider:
- Avoid unlimited offers: In the hosting world, nothing is unlimited (disk space, domains, bandwidth…), and if the provider offers you that, it probably means that they are very limited in something else.
- Enough disk space: Calculate how much disk space your website needs (most of it is taken up by image files), and double that so you have enough space for at least one local backup.
- Good support: Make sure your host is there for you 24/7 and that you can reach them via chat, email or phone. You do not want your website to go down on a Sunday and have no one to help you. You can even try sending them a short e-mail or message and see how they respond, how soon they answer or how useful they are.
- Free SSL certificates: Your hoster should support Let’s Encrypt, which offers free SSL certificates, and they should be able to install them for you. This is very important not only for the security of your users, but also for better search engine optimization, because Google does not like websites that are not https.
- Backups: A good hosting should at least provide free backups. If you choose a cheap plan, you may have to pay to restore a backup, but at least you will have a backup.
- LiteSpeed: Try to choose a hosting provider that offers LiteSpeed or NGINX as web server. Apache is often beaten by its rivals in terms of performance.
- Good reputation: Forget about the top results on Google. They are (almost) all paid. Do your research on Reddit, the WP Speed Matters Facebook group, forums like Web Hosting Talk or similar. You will find the best recommendations there.
Managed WordPress hosting
Let’s first talk about what “managed WordPress hosting” is supposed to be.
Managed WordPress hosting offers higher performance than shared hosting while following the same formula (many websites sharing resources). In theory, these providers do not limit hardware resources but instead restrict traffic to maintain high performance.
As the name suggests, this type of hosting is ideal for businesses or individuals who don’t have the time or expertise to handle technical aspects or for websites with high traffic that have outgrown shared hosting. Additionally, they provide a user-friendly control panel with only the necessary options for managing your website. If you’re looking for good support, you’ll typically find it here—though that’s to be expected given the price.
However, a major drawback is the restrictions on what you can install on your website. For example, most managed hosting providers do not allow caching plugins like WP Rocket or WP Super Cache. Some even prohibit certain plugins, such as image optimizers or backup tools, that can consume significant server resources. Additionally, you won’t know exactly how many resources (CPU, RAM, etc.) are allocated to your site. But in a way, that’s the point—you’re not supposed to worry about it and instead trust them to manage everything for you.
Now, let’s see what managed WordPress hosting really is.
In reality, things aren’t always as ideal as they seem. Many companies have taken advantage of the “managed WordPress hosting” label to charge more while offering the same—or even less—than standard hosting. Most providers in this category do not deliver significantly better performance, yet they impose more restrictions on what you can do with your site. In other words, you’re almost always simply paying extra for better support and a fancy (but sometimes more limited) control panel.
In our experience, you should avoid WP Engine, Pressable and Flywheel. They offer mediocre speed while imposing a lot restrictions. For example, Pressable doesn’t even allow you to add a cron job, and WP Engine even disables revisions by default. We’re not including SiteGround here because, despite marketing itself as managed WordPress hosting, it still falls under the shared hosting category. On the other hand, the best Managed WordPress Hosting is:
- ChemiCloud: LiteSpeed servers, QUIC.cloud, no plugins or CPU limits, LiteSpeed Cache crawler and very good performance even without cache. What’s best is that the price is also good, plans starting at $15/month!
- Rocket.net: Don’t confuse it with WP Rocket, the caching plugin; Rocket.net’s secret lies in Cloudflare and its control panel. Very few options, only the necessary ones, and your website is constantly behind Cloudflare. Moreover, it’s impossible to deactivate it, so most of the time, your website will be served through Cloudflare and its hundreds of servers worldwide. Yes, this means you could use any other cheaper provider, set up Cloudflare yourself, and achieve the same results. But Rocket.net makes it much easier to get started.
- Cloudways: Cloudways has an interesting formula; they let you choose the VPS (Virtual Private Server) you want (see below for what a VPS is), so you know exactly how much RAM or CPU you have, and then they add their control panel on top, allowing you to manage everything from there. In the end, you get the performance of a VPS and the ease of use of managed hosting. Compared to Kinsta, it’s slightly less user-friendly but delivers slightly better performance. Tip: choose Vultr High Frequency when adding your server!
Want to learn more details about each managed WordPress hosting provider? We’ve compiled a list with their features and our honest opinion here: Best and worst managed WordPress hosting of 2025: Real reviews
VPS
With a VPS, you get a “part” of a server. The hosting company provides you with a Virtual Private Server and allocates resources to your account that no one shares with you, unlike shared hosting. Thus, you’ll get better performance than with those, and it’s ideal when your business starts to grow and you don’t mind having to deal with a few technical stuff.
It’s important to note that a VPS (Virtual Private Server) is cheaper but more complex to set up. You’ll need some technical knowledge and system administration skills to configure everything, from managing server updates to setting up the email server. In other words, you rent a server, and the provider gives you access to it and says, “do whatever you want.” If you need more user-friendliness but don’t want to lose all control as you would with managed WordPress hosting plans, it’s a good idea to combine a VPS with a “cloud panel”. Keep reading.
Best VPS hosting providers:
- Hetzner: almost unbeatable prices for VPS, only recommended if your business is based in Europe or United States, as it is a provider with servers only in those areas and known to perform the best there. An excellent combination that we always recommend is Hetzner+RunCloud.
- DigitalOcean: more expensive than Hetzner but equally performant.
- Linode: more expensive than Hetzner but equally performant.
- Vultr: more expensive than Hetzner but equally performant.
Cloud panels
As mentioned earlier, what do we do if we want the performance of a VPS but the user-friendliness of managed hosting? The answer is a VPS with a “cloud panel”.
In this case, you contract the server separately from the cloud panel (yes, you’ll have two bills), and then you connect them. To do this, each panel provider has its own instructions, but it usually involves accessing the server and running a series of commands. Once connected, the cloud panel takes care of managing the server: backups, WordPress installation, FTP accounts, and more. All with a few clicks.
Important note: Don’t expect the support team of these panels to guide you on how to do certain basic tasks. If the issue is related to WordPress, it’s your responsibility, not theirs.
The best cloud panels are:
- RunCloud: The best option for managing VPS that offers top-notch performance. It comes with excellent support and is compatible with NGINX and OpenLiteSpeed.
- SpinupWP: From the makers of ACF and WP Offload Media, here comes another wonderful product from them, a cloud panel to manage your VPS. It is one of RunCloud’s competitors and offers similar pricing with excellent performance as well.
- Enhance: A new player in the field, but that has been adding a lot of features and they have now many more than the previous two, and for a much cheaper price when you have a low number of websites. Compatible with NGINX and OpenLiteSpeed as well.
Dedicated server
If you find yourself in a situation where Managed WordPress Hosting or a VPS from our recommendations is not enough, then you should opt for a dedicated server (or several). This means a whole server for your website.
Dedicated servers need to be managed by someone, and the performance you can get from them depends on how well that is done and how good the server’s hardware resources actually are. For this reason, we recommend that you get professional advice. You will definitely need it if your business is so successful 😉
General tips
Regardless of which type of hosting you choose, you should also consider the following tips and advice:
- Server location: Choose a datacenter near your target audience for faster response times.
- High-performance web servers: If you have the option, avoid Apache; use LiteSpeed, OpenLiteSpeed or Nginx for better performance, especially for high traffic websites. There are some hosts that use a hybrid Nginx+Apache option; they essentially do it so that clients can continue to use the .htaccess file, because Nginx is quite difficult for a normal user to configure. This option is better than Apache alone, but worse than Nginx alone.
- Disable unused services: Turn off unnecessary services that run on your server by default, such as FTP/SFTP, SSH, e-mail, New Relic, etc. Everything consumes server resources, even if it is very little.
- MariaDB: Choose a host that uses MariaDB instead of MySQL, which offers slightly better performance.
2) Web server configuration tuning
There are many adjustments and tweaks one can do to the server where a website is hosted, although keep in mind that depending on the type of hosting you choose, you’ll be able to do more or less. Managed WordPress Hosting in particular is very restrictive, so don’t expect to be able to make a lot of changes.
HTTP/2 and HTTP/3
HTTP stands for HyperText Transfer Protocol. As a protocol it defines how the client (e.g. your browser) and the server should communicate with each other.
HTTP/2 brought many improvements that are very important for the performance of websites. Probably the most important one is multiplexing. With HTTP/1.1 (the previous version), resources were loaded one after another. So if one resource failed to load, this could block all other resources behind it. In contrast, HTTP/2 is able to use a single TCP connection to send multiple resources at once, so that no resource blocks another. This is very important in today’s world where more and more resources are downloaded when a page is requested (JavaScript files, CSS files, fonts, etc.).
While HTTP/2 was a significant improvement, HTTP/3 goes even further in optimizing web performance. HTTP/3 is built on top of a different transport protocol called QUIC (Quick UDP Internet Connections), which replaces the traditional TCP (Transmission Control Protocol). One of the key advantages of QUIC is its ability to handle packet loss more efficiently. Unlike TCP, where packet loss would slow down the entire connection, QUIC allows the browser to continue downloading resources without being hindered by lost packets. Additionally, HTTP/3 reduces latency during connection establishment, making websites feel faster, especially over poor or unreliable networks.
Both HTTP/2 and HTTP/3 should be enabled on both the client and the server. Fortunately, you do not have to worry about the client, as all browsers already support HTTP/2 and HTTP/3. You should focus on your server.
How to activate HTTP/2
First, check your website with this tool. If you are using HTTP/2, you are good to go.
If you do not use HTTP/2 yet and your server is managed by someone else (shared hosting or managed hosting), just ask your hosting provider if they can do it for you. If not, it’s time to change providers 😉
If you are responsible for managing your server yourself, the steps will change depending on which server you use.
- If you use NGINX, KeyCDN has a nice guide for you.
- If you use Apache, check out this guide.
- If you use LiteSpeed or OpenLiteSpeed, support for HTTP/2 should be enabled by default as long as you are using HTTPS. If this is not the case, update the web server to the latest version and try again. For more information, we recommend that you check these or these instructions.
How to activate HTTP/3
There’s also a website to check if your website is already using HTTP/3: http3check.net
Again, if you have the chance to use it because your hosting provider gives you the option to do so, we encourage you to do it. And if you are the one managing your server, know that Apache still does not have support for HTTP/3. However, if you are using Nginx, here’s the official instructions. And if you are using LiteSpeed or OpenLiteSpeed, here’s the instructions you need.
An easy workaround to use HTTP/3 is to just configure a CDN. Both Cloudflare and QUIC.cloud have the option to enable it in a simple click in their settings.
HTTP Compression
Yes! Just like you can compress some files on your computer, web pages can be compressed too! The technique is called HTTP Compression, but why should you do that? Quite simply, to save bandwidth and speed up your website. As Pingdom (web performance experts) shows, you can easily reduce the size of your website by more than 75%.
Nowadays, it is very common that your hosting provider is already setting up the compression for you, as this is a server-related setting. You can check if this is case using this page. As you can see, the page checks for two different compression algorithms: gzip and Brotli, the latter being better than gzip. However, there is one latest addition to the most popular algorithms used in HTTP Compression, and that is Zstandard, which offers even better compression rates.
You should note that some (very) older browsers may have problems with the HTTP compression, especially Brotli or Zstandard. Take this into account if your website is visited by these older browsers.
How to enable gzip
gzip is the easiest HTTP compression algorithms to implement, and that’s because gzip is enabled by default on every new Apache, Nginx and LiteSpeed installation. However, if you don’t pass the previous test, there are several way to make sure you have gzip enabled.
First, there are several WordPress plugins that help you compress the code, usually with a single click, such as WP Super Cache or WP Rocket. These two in particular are also page cache plugins (see below), so you kill two birds with one stone. Just note that while the plugins will help you with caching, the compression will only work if your web server uses Apache or LiteSpeed (check here to see if this is the case).
If you don’t want to use a plugin and still have Apache or LiteSpeed, simply add the following code to your .htaccess file:
# compress text, html, javascript, css, xml:
AddOutputFilterByType DEFLATE text/plain
AddOutputFilterByType DEFLATE text/html
AddOutputFilterByType DEFLATE text/xml
AddOutputFilterByType DEFLATE text/css
AddOutputFilterByType DEFLATE application/xml
AddOutputFilterByType DEFLATE application/xhtml+xml
AddOutputFilterByType DEFLATE application/rss+xml
AddOutputFilterByType DEFLATE application/javascript
AddOutputFilterByType DEFLATE application/x-javascript

# Or, compress certain file types by extension:
<files *.html>
SetOutputFilter DEFLATE
</files>
But what if you don’t have Apache or LiteSpeed? Chances are you are using Nginx. The HTTP compression of Nginx must then be configured by your hosting provider, as you most likely cannot do this yourself. But if you do manage your server, you just need to make sure that the Nginx configuration files have the correct settings. See the Nginx section of this article for more information.
How to enable Brotli
Brotli is a little more complicated to set up, and that’s because, unlike gzip, Brotli isn’t enabled by default in most server environments. This is largely due to Brotli’s relatively recent introduction and its more advanced compression capabilities, which may require additional configuration steps depending on your server. Brotli offers even higher compression rates than gzip, meaning even faster load times and reduced data transfer sizes. Since LiteSpeed and OpenLiteSpeed have Brotli enabled by default, here’s how to enable it on both Apache and Nginx server setups.
Enabling Brotli on Apache Servers
First, make sure that Brotli is supported by your server’s Apache installation. Brotli is available as a module, mod_brotli, which you may need to install separately if it’s not already there. For example, on some Linux distributions, you can enable Brotli by running:
sudo a2enmod brotliAfter enabling Brotli, add the following lines to your .htaccess file to set it up for specific file types:
<IfModule mod_brotli.c>
    AddOutputFilterByType BROTLI_COMPRESS text/html text/plain text/xml text/css text/javascript application/javascript application/x-javascript application/json application/xml
    BrotliCompressionQuality 4
</IfModule>
Once added, restart your Apache server to apply the changes.
Check out these instructions for more information.
Configuring Brotli on Nginx Servers
If you’re using Nginx, enabling Brotli may require slightly more configuration, as with everything in Nginx. First, you’ll need to make sure Brotli is installed as an Nginx module, which is sometimes not included by default. Many Nginx installations allow you to add Brotli support by enabling the ngx_brotli module.
To configure Brotli in your Nginx config file, you can add the following lines in your server block:
# Enable Brotli compression
brotli on;
brotli_comp_level 4;
brotli_types text/plain text/css application/json application/javascript application/x-javascript text/xml application/xml application/xml+rss text/javascript;
Here, brotli_comp_level sets the compression level (1-11). Setting it to 4 is a good balance between compression speed and data reduction. After updating your config file, restart Nginx.
Check out these instructions for more information.
Apache/Nginx/LiteSpeed configuration
Most web servers are already set up with good standard configurations. Especially the most popular of them: Apache, Nginx and LiteSpeed. However, if you have a more demanding website with a lot of traffic or a special type of website, you probably would want to tweak some of the settings.
Each web server and each website is a different world and there is so much documentation out there. For this reason, and since this is an expert-level optimization, we simply recommend that you do your own research. It’s impossible and unwise to try to advice a specific configuration that will work for everybody. So as a good starting point, here’s some documentation you can follow:
- Apache: Apache Performance Tuning | apache.org
- Apache: apache2buddy | github.com
- Apache: How to speed up Apache webserver for maximum Performance | bobcares.com
- Nginx: Nginx Resources | github.com
- Nginx: nginxconfig.io | github.com
- Nginx: High‑Performance Caching with NGINX and NGINX Plus | f5.com
- LiteSpeed: Dedicated Server with a Large Site | litespeedtech.com
- LiteSpeed: Tuning | litespeedtech.com
PHP configuration
For optimizing WordPress speed through PHP configuration, there are several PHP settings that can have a direct impact on performance. Adjusting these parameters helps manage server resources more effectively, speeds up execution, and ensures smooth handling of WordPress requests, especially under high-traffic conditions, but these can also break your site. You need to have a good technical level. Here are the most impactful parameters to tweak, along with recommended values:
memory_limit– Defines the maximum amount of memory a PHP script is allowed to use. Setting it too low will lead to out of memory errors, but a value that is too high can affect other websites on the server or even cause the server to crash, e.g. if a plugin consumes an unnecessary amount of resources. The default value of128Mis fine, but you will have to raise it to a minimum of256Mif you use a heavy component such as WooCommerce or WPML, and512Mshould be the absolute maximum for 99% of the websites.max_execution_time– Limits the maximum time (in seconds) that a PHP script is allowed to run. As withmemory_limit, a low value is better to ensure that PHP scripts don’t hang indefinitely, which could cause server slowdowns. However, if you set it too low, complex tasks (like importing large files or running a backup) may time out. A value of30seconds balances script execution and server performance, but feel free to increase it to a maximum of60if you see that you need it.opcache.memory_consumption– This setting in PHP determines “the size of the shared memory used by OPcache, in megabytes”. This memory is used to store compiled PHP scripts so they don’t need to be recompiled each time they are executed. The appropriate amount of memory depends on the size and complexity of the code being cached. If the memory of OPcache is full or nearly full, some files may not be cached, slowing down performance; however, allocating too much can limit available memory for other server processes. A setting of128(the default) is suitable for small to medium sites, while larger sites can benefit from256.opcache.max_accelerated_files– Sets the maximum number of PHP files that can be cached by OPcache at once. The default value of10000should be good enough for most cases, considering that a normal WordPress installation contains less than 1200 PHP files. However, plugins and themes can quickly increase this number, so we recommend running a command such asfind . -type f -print | grep php | wc -l(assuming you have access to a Linux terminal) and see if you need to increase the setting. Bear in mind that the actual number used will be the first number in the set of these prime numbers, which means that by default the value is not 10000, but actually 16229.
To configure these PHP settings, you have three ways of doing it: with the php.ini file, the .htaccess file or the wp-config.php file.
php.ini
The php.ini file is the primary configuration file for PHP, and it’s often used when you have full control over the server environment, such as on VPS or dedicated hosting.
To add the values in php.ini, use this format:
memory_limit = 512M
max_execution_time = 60
opcache.memory_consumption = 256M
opcache.max_accelerated_files = 10000- Location: The
php.inifile is generally found in the PHP installation directory (e.g.,/etc/php/8.0/apache2/php.inifor Apache on Ubuntu, orC:\xampp\php\php.inion XAMPP for Windows). However, we’ve seen it located in many other different places. - Effect: Changes here apply globally across all PHP applications on the server.
- Note: After editing
php.ini, restart the web server (e.g., Apache or Nginx) to apply the changes.
.htaccess
If you don’t have access to php.ini, you can configure some PHP settings through the .htaccess file if you’re using Apache or LiteSpeed as the web server.
To add the values in .htaccess, use this format:
php_value memory_limit 512M
php_value max_execution_time 60
php_value max_input_time 120
php_value upload_max_filesize 128M
php_value post_max_size 128M
php_value session.gc_maxlifetime 3600- Location: The
.htaccessfile is found in your WordPress root directory (wherewp-config.phpis located). - Effect: Changes here apply to the specific directory and subdirectories where
.htaccessis placed, which means it will typically only affect the current WordPress site. - Note: OPcache and other advanced settings (like
opcache.memory_consumptionandrealpath_cache_size) cannot be configured in.htaccess. Only general PHP directives (like memory and upload limits) will work. Also, ensure you don’t addphp_valuedirectives within<IfModule>sections in.htaccessas they may not execute properly.
wp-config.php
In wp-config.php, you can set PHP values directly using the ini_set() function. This method is best for settings specific to the current WordPress site.
To add the values in wp-config.php, use this format:
@ini_set( 'memory_limit', '512M' );
@ini_set( 'max_execution_time', '60' );
@ini_set( 'max_input_time', '120' );
@ini_set( 'upload_max_filesize', '128M' );
@ini_set( 'post_max_size', '128M' );
@ini_set( 'session.gc_maxlifetime', '3600' );- Location:
wp-config.phpis in your WordPress root directory (usuallypublic_htmlorhtdocs). - Effect: Settings here only apply to the specific WordPress site where
wp-config.phpis located. - Note: OPcache and some other PHP settings cannot be changed via
wp-config.php, as they require server-level access (usually inphp.ini). Also,wp-config.phpchanges apply only after WordPress is loaded, so certain server-based settings may not take effect until then.
MySQL/MariaDB configuration
And finally, getting to the optimization of the database configuration, there are also quite a few things to tweak in order to improve the performance of the site. This part is especially important to get it right, because the pages will not always be cached, and when that happens, the request will go to the origin server, which will make the necessary requests to the database, which we want to answer as fast as possible.
It’s important to note that this is an advanced optimization technique and you should know your way around the Linux terminal. Also, the majority of sites will not need to tweak the database configuration, but you can try it if you have a non-average site (high traffic for example).
MySQLTuner
MySQLTuner is a free Perl script that analyzes your MySQL/MariaDB configuration and performance, offering recommendations to optimize it. It’s especially useful because database optimization is complex, and MySQLTuner helps you identify potential improvements without needing deep expertise.
First, install MySQLTuner by SSHing into your server and run the following commands to download and set up MySQLTuner:
wget http://mysqltuner.pl/ -O mysqltuner.pl ; chmod +x mysqltuner.plThen, run the script (you might need to provide your database root credentials for the script to access the database).
./mysqltuner.plMySQLTuner will analyze your database usage, load, and configuration settings, then generate specific recommendations on what parameters you can tweak in your MySQL or MariaDB configuration.
To implement the changes, just apply them in your configuration file (my.cnf), typically found in /etc/mysql/ or /etc/, then restart MySQL/MariaDB to apply the updates. Bear in mind that you should only edit the configuration file manually if you are managing your own VPS (and not using any cloud panel, managed hosting, or shared hosting). Otherwise, the tool or panel you use may override the changes at some point, or worse, you could create conflicts or even break the site.
Using MySQLTuner every few months (or weekly on high-traffic sites) is a good practice, as it helps keep your database optimized as your website grows and evolves.
Tuning MySQL/MariaDB
To optimize MySQL/MariaDB for WordPress, you’ll want to focus on several core parameters in the my.cnf configuration file. These adjustments should also be made carefully; you need to have a good understanding of how databases work internally.
You can start with MySQLTuner to find out where exactly you should start. If you cannot run the script, you should at least check and optimize (if necessary) the following important settings: key_buffer, max_allowed_packet, thread_stack, thread_cache_size, max_connections or table_cache.
If you try out different configurations, you should also always consider the current status of your website, as the values of the individual parameters depend on this: the load of your server, the traffic on your website, the number of websites on the server, the load of your database and the hardware resources of your server.
3) Use as few plugins as possible
This situation is similar to a newly purchased phone or laptop. It comes with a lot of software that you do not use, and that makes the device slower. With WordPress, the same thing happens when you install a lot of plugins.
Try to keep the list of plugins as small as possible; use only the necessary ones, otherwise you will affect the performance of your WordPress. Here is what you can do to clean up your WordPress installation:
- In general, look at each plugin and ask yourself if you need it. If you do not need it, remove it. Do not keep it “just in case”. For example, do you have a plugin that gives a cool effect to the titles of the administration area? Not needed.
- Do you have two plugins that do the same job? Get rid of one. An example we often see: two cache plugins. This makes no sense, because caching your pages twice has no benefit.
- Are you using a large plugin only for a single function included in that plugin? Try to find a smaller plugin whose purpose is exactly the function you want, or you can even search Google for the code you need.
- Could you replace plugins with a simpler alternative? For example, most people think they need a slider on the homepage; the problem is that a slider affects a lot the loading speed and it’s very difficult to optimize. Instead, you could use a still image. After all, almost no one sees the second slide.
Remember, the goal is to reduce the number of plugins so WordPress does not have to load too much stuff.
4) Use only the best WordPress plugins
A single poorly coded plugin can ruin your entire site and make it very sluggish. To choose the best plugin for each need, keep this checklist at hand. With time, you will be able to easily identify which plugins are the best in each category:
- Last updated: If a plugin has not received an update in the last 6 months, it usually means that it is outdated and probably has functionality or compatibility issues or even security problems. We advise you to avoid outdated plugins unless you know you can use them safely.
- Compatible with the latest WordPress version: If the plugin states that it is compatible with the latest WordPress version, it usually means that the developer has taken the time to test the plugin with the latest version of WordPress.
- Be wary of free plugins with a pro/premium version: It’s okay for the free version of a plugin to include a small ad promoting the paid version. However, it’s not okay to display an “Upgrade now!” banner on every settings screen, as well as in the Toolbar and side menu, if you know what we mean. The plugin should be 95% functionality and 5% ads, not vice versa; excessive ads indicate that the plugin is bloated and prioritizes profit over user experience.
- Screenshots: This is one of the things that show whether the developer cares about the users or not, as some good screenshots will help them see if the plugin meets their needs or not.
- Good description: It’s important to have a good description so you know what the plugin does and how it works. If you have to install the plugin first to see how it works, that’s not a good sign.
- FAQ: Same as the screenshots. This shows that the developer wants you to understand how the plugin works.
- Average rating: Obvious, but be sure to check them against the number of reviews, because a plugin with a single 5-star rating does not mean it’s better than another with 37 4-star ratings. The single 5-star rating is probably written by the author itself…
- Size: Imagine you want a plugin to add a Google Maps Gutenberg block to your website. Would you take a plugin that is 300 KB or one that is 3 MB? Usually a small plugin will be better coded, optimized and more efficient than a larger plugin, given that both serve the same purpose.
- Support: You’ll want to have good support in case something goes wrong. Check if the plugin or extension has a public area where you can view questions and answers. WordPress, for example, has public support forums. We also recommend that you contact the author(s) of the plugin directly and ask them a simple question. This is not about the answer itself, but about how the support handles your question.
- Developer profile: It’s worth checking who the developer is, what they do, and whether they are active in WordPress. Also, plugins developed by a single developer many times are better than than those under a company name. Nowadays, if a plugin is listed under a company, it’s often just an ad for the “pro” version for X€ per month.
- Test it: Create a test website on tastewp.com or a similar site and install the plugin in question there. A good plugin will keep things simple and follow the WordPress UI guidelines. If you need too much time to understand how the plugin works, or if the plugin has a highly customized UI, you should probably consider another option (although there are always exceptions, of course).
- Check the database: If you have the opportunity to have a test site with access to phpMyAdmin or a database viewer, install the plugin there, activate it, and then uninstall it. Then check the remnants of the plugin in the database tables. If it’s a good plugin, the plugin should clean itself and leave little to nothing behind.
- Avoid multipurpose plugins: If you want to add a small feature to your site that is not natively available in WordPress, you should find a plugin that does just that. For example, let us say you want to add an icon to your page created with WordPress’ native block editor. Why would you install a huge and bloated suite of blocks that happens to include an icon block when you can simply install The Icon Block?
Are you looking to get a head start and rule out some plugins? Avoid anything from these developers:
- Awesome Motive: OptinMonster, WPForms, MonsterInsights, All in One SEO, WP Mail SMTP, BuddyBoss, etc. These plugins often cross-promote each other a lot, resulting in bloated code. Their ethics are questionable as well.
- WPMU DEV: Smush, Forminator, Defender, Hummingbird, etc. Free versions primarily exist to upsell the premium ones, resulting in poor performance and overloaded designs, while also trying to mimic the competition.
- SiteGround: Speed Optimizer, Security Optimizer, etc. They mainly exist to promote their hosting services, with only average performance.
- YITH: Extremely limited free versions and very poor performance. Sometimes, too many plugins can play against you.
Here at Accelera we are also comparing all sorts of plugin types to find out which one is the best in their category:
- Best Free WordPress Slider Plugins: Performance Comparison
- Best Free WordPress Security Plugins: Performance Comparison
- Best Free WordPress SEO Plugins: Performance Comparison
5) Do not use a page builder
Interest in page builders increased significantly in the second half of 2010. WordPress was the most popular system for building websites and everyone wanted one. But WordPress did not have a nice and user-friendly way to create pages. It all depended on the theme itself. And that’s when page builders came into play.
Page builders made creating websites much easier. All you needed to do was install a plugin or two and voilà!, you could create pages by just drag and drop items. And the big boom came with Elementor. A small company from Israel created the most popular page builder today. Just take a look at Google Trends:

But now people demand speed. Page builders have made everything much easier, but because they have to tailor it to millions of people at once, they add a lot of scripts, CSS and functionalities that have to be loaded on every page. This makes the page slower.
Fortunately, WordPress noticed how page builders ruin the user experience and decided to develop Gutenberg: a way to build your pages with blocks. It’s similar to a page builder, but different. You just add the blocks you need (image, heading, video…) and that’s it. And because it’s tightly integrated with WordPress (it is WordPress), it’s very lightweight and streamlined.
Elementor (or any other page builder) vs. Gutenberg
Just look at this comparison. We created this sample page on a new test site first with Elementor and then with Gutenberg blocks. Just a few colors, images and text.

When we open the Developer Tools of the browser and examine the page, these are the results with Elementor:

And this is when we create the page with Gutenberg:

With Elementor, the user has to load more than twice the resources and the browser takes more than twice the time to parse the document. And that’s just for a very small page!
These are the real results of a real browser, but if we apply a speed tester, things are just as interesting. This is the test result for the page created with Elementor:
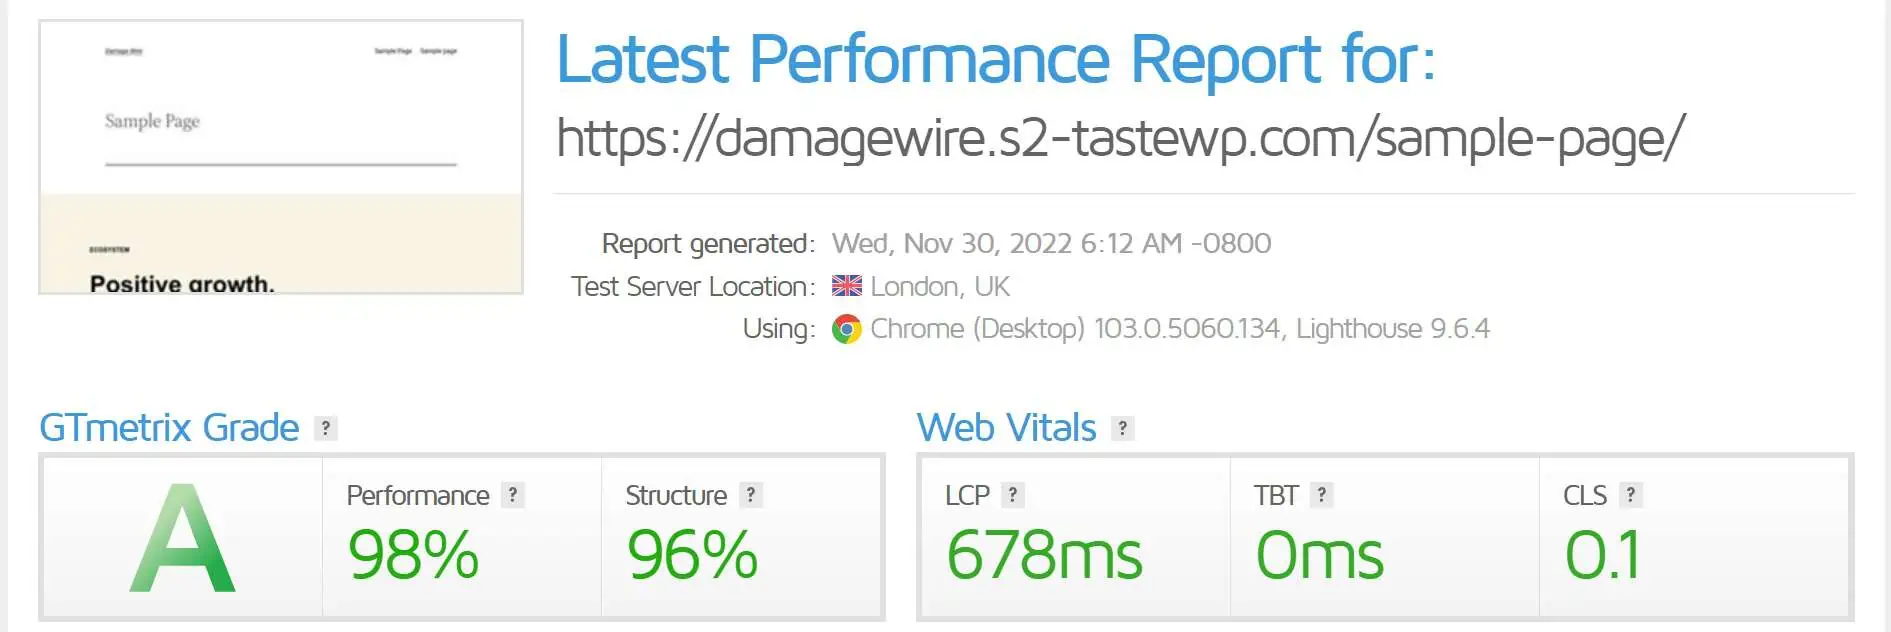
And this is the same page created with Gutenberg blocks only:
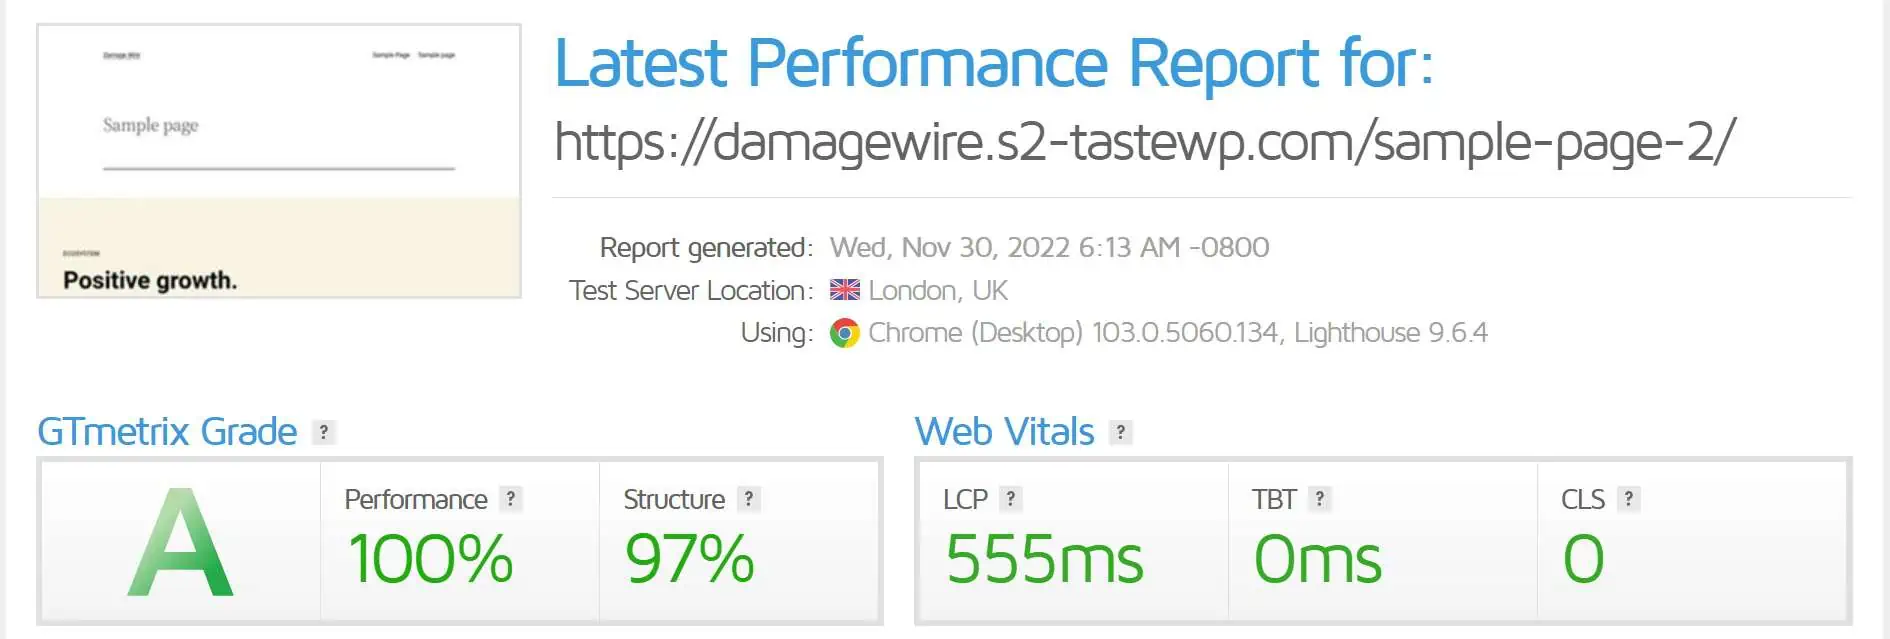
Now, if you are thinking “Well… the difference is not that big…”, remember that this is an extremely simple example page. On a regular web page with sliders, other plugins, lots of photos, animations, content… the difference is much more drastic.
Bottom line: Do not use a page builder for a new website. Don’t use Elementor, Beaver Builder, Divi, WPBakery or others. And if your website already exists, just rebuild it with Gutenberg. You will definitely notice the difference.
6) Choose one of the best WordPress themes
Something similar happens with a theme. Let’s say you do not using a page builder and build all your pages with Gutenberg blocks. Well, you could ruin everything by choosing a bad theme.
A theme is what gives the website a look. We can divide the theme market into three categories:
- Simple themes with one design and little to no customization. These are usually free and available on wordpress.org. A Good option.
- Themes with some basic settings that allow you to change buttons, colors, fonts, or a few pre-made layouts. These usually require a monthly subscription to get access to all the features, but also offer a free limited version on wordpress.org. Also a good option.
- Bloated themes with an infinite number of options that try to emulate a page builder without being one. That’s what you’ll find on most theme marketplaces like Themeforest. Of course, if you are trying to target the same audience as a page builder, you’ll be forced to include so many settings and features in your theme that the theme will slow down your website. Clear examples are Avada, The7, Betheme, Enfold, Flatsome, Salient, etc.
So we are targeting categories #1 and #2 and trying to avoid #3. Here is another comparison between a good theme and a bad theme.
This is the size and number of requests for one of the demos of the Enfold theme, a top seller on Themeforest:

The screenshot does not show it (it would be too big), but we see that Enfold loads 104 JS, CSS and font files, with a transferred size of 265 KB.
Now let us compare it with Blocksy, one of the best themes money can buy:
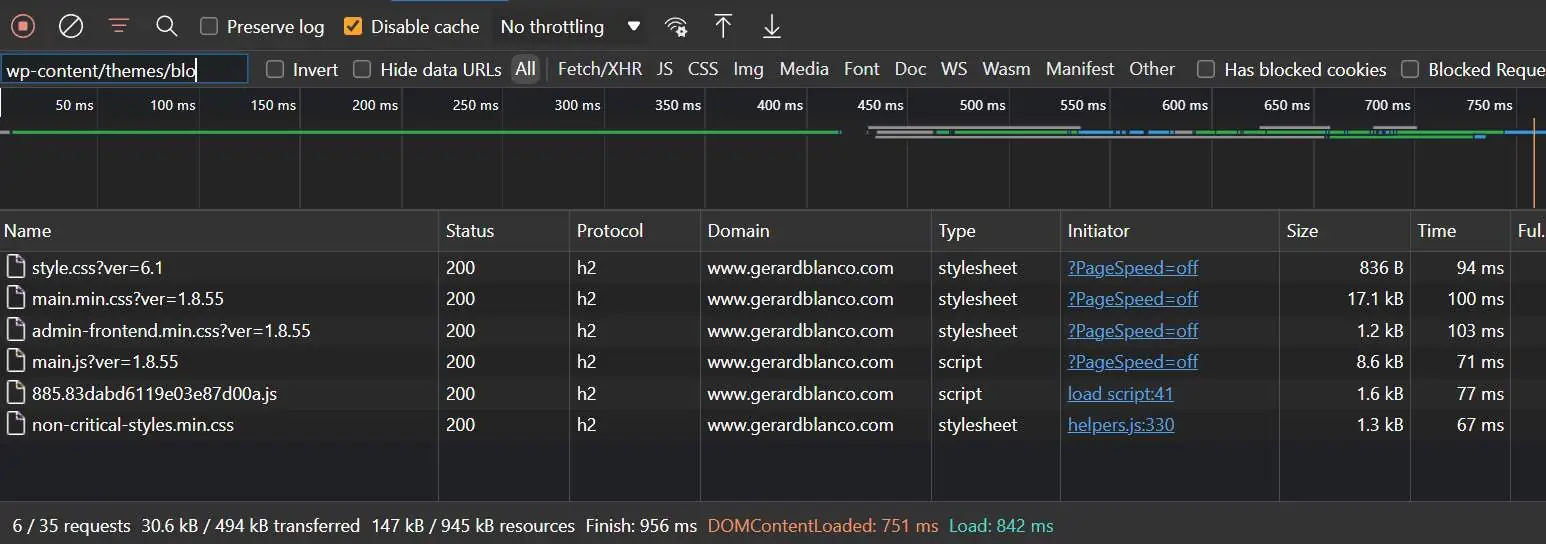
Here we can show you the full screenshot. Only 6 requests and 30 transferred KB. The numbers speak for themselves. Of course, this is not the only way to judge a theme, and it should not be, but it helps us see if a particular theme is worth choosing or not.
Below is a small and honest list of recommended themes that you will not regret choosing. Best themes for performance:
- Blocksy
- Neve
- GeneratePress
- Suki
- Kadence
- Genesis
- Astra
- Any standard WordPress theme (Twenty Twenty-Two, Twenty Twenty, etc.)
- Storefront
If these do not meet your requirements, there are many others that are great! Try to follow these guidelines. In our experience, this almost always guarantees that you will choose a good theme:
- Do not buy a theme that requires a page builder to make it work. That includes Divi.
- Do not buy themes from mainstream marketplaces, like Themeforest.
- Avoid themes that clearly market themselves as “multipurpose themes”.
- If you search, for example, “best themes for WordPress”, ignore the recommendations from the top results on Google or YouTube. These are almost never honest recommendations from WordPress experts. Your best source of knowledge is communities like Facebook groups.
- Browse the WordPress theme repository, and if you see a theme you like, you should buy or use it if it does not contradict the previous lines.
7) Use a CDN
CDN stands for Content Delivery Network. With a CDN, your website’s resources are replicated across a global network of servers. This means that your website will load just as quickly for someone on the other side of the world as it does in your server’s country. This is an essential setup for WordPress performance, especially if your visitors are geographically dispersed.

A CDN can be configured in two ways. The first is the traditional “pull zone” setup, where your website directs the visitor’s browser to download resources from the CDN. In this method, each request for the HTML content still comes to your server, but the static assets (images, fonts, CSS, JS, etc.) are delivered by the CDN.
As you can imagine, a pull zone setup speeds up the delivery of static assets but doesn’t improve the loading speed of the HTML itself, as that’s still served by your server.
The second way to configure a CDN is as a reverse proxy. A reverse proxy acts as an intermediary server that receives client requests and forwards them to the backend (origin) server. Unlike the pull zone setup, a reverse proxy can cache the HTML content as well. This means that when a visitor requests a page, the reverse proxy can serve the cached HTML directly, reducing the load on your server and speeding up the overall loading time of your website.
Here’s a quick list of the best CDNs for WordPress (and for regular websites) out there:
- Cloudflare: Cloudflare operates one of the most efficient CDN services in the world. In addition to their speed and security features, they also offer DNS servers, like 1.1.1.1. However, be aware that their free plan only caches static resources, not the HTML of your pages, even though it acts as a reverse proxy by default. To have Cloudflare serve your HTML content as well, you’ll need to pay $5/month to use Cloudflare APO. Alternatively, if your hosting provider has a partnership with Cloudflare, like Kinsta, you might get this feature for free.
- bunny.net: One of the fastest (if not the fastest) CDN, previously called BunnyCDN. It’s supposed to be more affordable than Cloudflare as well. Check out where their CDN has points of presence on this page.
- QUIC.cloud: This CDN was brought to all of us by the developers of LiteSpeed (the web server) and LiteSpeed Cache (the WordPress plugin). It offers free image optimization, page optimization and CDN services, with HTTP/3 and also paid plans for those who need more. It is, of course, very tightly integrated with LiteSpeed Cache and acts as a reverse proxy by default.
It’s important to note that adding a CDN to your website isn’t always necessary. In some cases, it can even be counterproductive. If your site’s audience is primarily local, from a specific region or country, you might be better off with a server located in that same region or country. This could provide faster loading times than a CDN with its nearest point of presence farther away than your original server.
As a rule of thumb, consider using a CDN in one of two situations:
- Your hosting provider is very slow (in which case you should change it), and you need the CDN to compensate.
- Your audience is international.
8) Cache your website
Multiple page caching services may be available between the user and the server and you did not even know it!
File based caching
Depending on the technology your website uses, you may have some plugins or extensions for page/file caching. These create HTML files on disk and serve them up on every request, instead of running PHP code and MySQL database queries for every page request. With WordPress, for example, the best are these (they are not all of them, remember that WordPress has more than 50,000 plugins!):
It’s worth noting that LiteSpeed Cache can be installed on any WordPress website, but its caching functionality is only available on LiteSpeed servers. So if you do not have a LiteSpeed server, you should opt for one of the others.
While file-based caching sounds wonderful (and it is), you shouldn’t cache every single page. Pages that change dynamically based on other variables should be excluded from caching. These typically include cart, checkout, and account pages on an e-commerce shop, as well as affiliate or customer dashboards, and sometimes even contact pages. The last thing you want is for one user to see incorrect data—or worse, information belonging to another user!
Server cache
Some hosting providers offer you server-caching features under different marketing names. SiteGround offers the Supercacher feature, RunCloud gives you RunCache, Cloudways has Varnish (in this case they did not rename it). These are all server-level caching solutions, technically acting as “reverse proxies” like a CDN.
As we explained, a reverse proxy is a service that runs independently and sits between the client and the website, so it is not part of WordPress, and accepts requests to the WordPress server. Like a cache plugin, it provides a pre-saved copy of a WordPress page on request (although this is not the only function of a reverse proxy). The difference is that cache plugins require WordPress to run, which can become slow as the load increases. Tools like Varnish specialize in serving cache requests directly from the server and can be much more efficient than WordPress itself.
Note that server-based caching does not necessarily replace file-based caching plugins. For example, you can use your favorite caching plugin along with Varnish. This way, if a page is not in the server cache, the request will be forwarded to WordPress and it will be the regular page cache plugin who delivers it to the visitor.
Pay close attention to exclusions as well; the same rule applies to server-based caching: do not cache dynamic pages.
Browser caching
On the one hand, we have the cache levels that we control server-side (see above), but did you know that your customers can also cache your website so they do not have to request everything again when they revisit your site?
When you visit a website, your browser stores all the assets (JS, CSS, images, fonts…) on your hard drive so that they load faster on subsequent visits; the browser simply loads the assets from your hard drive instead of requesting them again from a distant server. This is called browser caching and is something you can control (somehow). This is also related to the famous “Leverage browser caching” or “Serve static assets with an efficient cache policy” advice you see on page speed testers.

All you need to do is configure your site to tell browsers how much time they need to save all assets before they need to be requested again. 6 months or 1 year is a good number because, after all, these resources do not change that often. The problem with this is that the configuration is not as simple as it seems, because any level of your website can override the specifications of another.
Feel free to take a look at our guide on the correct way to serve static assets with an efficient cache policy in WordPress.
Persistent object caching
The WordPress object cache stores frequently used data from the database in memory. By doing so, it eliminates the need to repeatedly query the database for the same data, which can be resource-intensive and slow down the loading speed, especially on large websites like e-commerce stores.
The default object cache in WordPress is non-persistent, meaning it is temporary and exists only for the duration of a single page load (stored in PHP memory). As you can imagine, this makes it quite useless if you want to reuse the same data across multiple page loads.
Therefore, the “persistent” nature of this caching refers to its ability to store cached data beyond a single page load. Persistent object caching relies on external systems like Redis or Memcached to store cached data. These systems keep the cache in memory even after the request ends, making it available for subsequent page requests. For simplicity, we’ll focus on Redis and Memcached as they are the most popular, although there are other options available.
Like we said, persistent object caching is particularly beneficial for large or high-traffic WordPress websites, as it reduces many repetitive database queries and computational overhead. However, for smaller websites, such as typical small static business sites, persistent object caching might not be ideal; in some cases, retrieving data from the cache can take longer than querying the database directly.
Setting up Redis or Memcached
Before using one of these systems, you need to configure your server. Most hosting providers offer Redis or Memcached as part of their services, often free of charge. You have two options for setting this up:
- If you manage your own server, you can install and configure a Redis or Memcached server. Note that if you use Memcached, the PHP Memcache extension is also required. Since every server environment is a different world, this article will not cover the self-installation process for Redis or Memcached.
- If you don’t manage your server (e.g., shared hosting, managed hosting, or a managed VPS), ask your hosting provider if Redis or Memcached can be enabled for your site. Be careful—some hosts charge extra for this feature, such as Kinsta.
Once your server is set up, you’ll need to install and configure an additional WordPress plugin:
- For Redis, use Redis Object Cache.
- For Memcached, you can use Memcached Object Cache. Important: Read the installation instructions; this is not a plugin to keep installed on WordPress.
- If you’re using LiteSpeed Cache, you can configure its built-in object caching settings instead of relying on the above plugins.
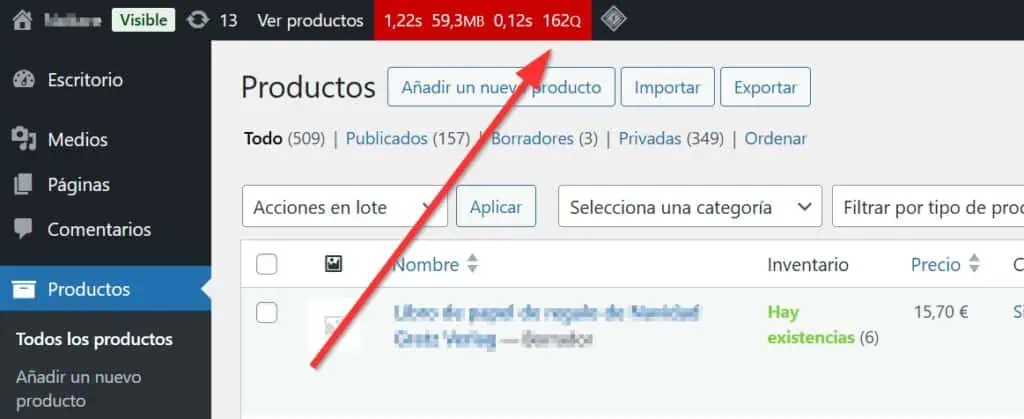
Here’s a comparison to demonstrate the impact of persistent object caching. Below is the number of SQL queries made when accessing the Products backend page of a live e-commerce site without Redis enabled:
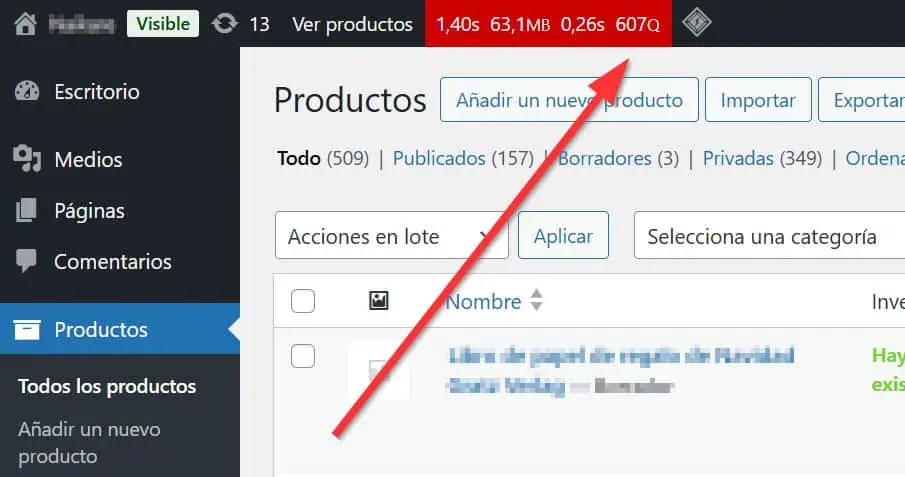
Now, here’s the same page with persistent object caching enabled via Redis:
9) Optimize images for web
If your website contains images, it is almost certain that they make up the heaviest part of the website. Typically, images account for more than 90% of the size of your website. So it makes sense to optimize them as much as possible.
Image compression
A normal picture taken with a cell phone or camera is usually a few MB in size. That’s just too big. We should make sure that our full-size images are 200-300 KB at most, and the images above the fold should be even smaller: 100 KB at most, but the smaller the better. To compress the images, we recommend ShortPixel. They offer two plugins for compressing the images: ShortPixel Image Optimizer (SPIO) and ShortPixel Adaptive Images (SPAI).
ShortPixel Image Optimizer (SPIO)

ShortPixel Image Optimizer is a user-friendly and lightweight plugin that lets you compress all your images and PDF documents with a single click from your WordPress dashboard.
Let us take a random image from Unsplash as an example. The image we are linking to weighs 4.45 MB and has a resolution of 5184×3456. It looks like an image you would take with a regular camera. This is what it looks like when processed by ShortPixel Image Optimizer:
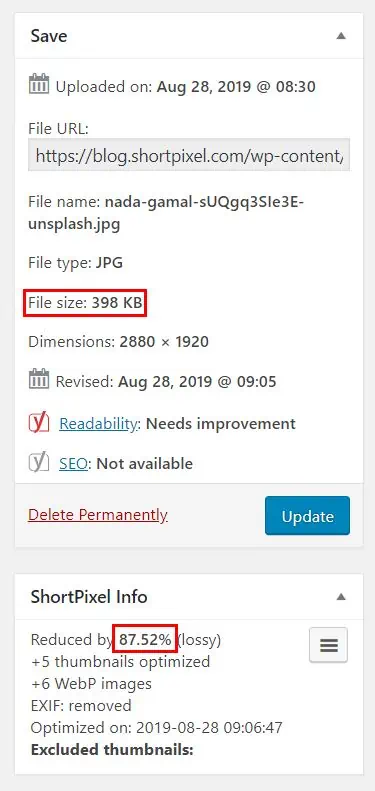
After setting a Lossy compression and a maximum size of 1920px, we reduced the size by 87.52%! Now it weighs only 398 KB. Impressive. And the quality of the image is almost the same.
If you want to check how ShortPixel’s image optimization service works with your images, you can test it with their web tool first.
ShortPixel Adaptive Images (SPAI)

The ShortPixel Adaptive Images plugin optimizes your images with the same algorithms as SPIO, but offers 2 additional services: a CDN and an adaptive images service, very useful to solve the “Properly size images” message in PageSpeed Insights. It works as follows:
- A user visits a page with images.
- While the page is loading, SPAI retrieves all image URLs in the code of the page.
- SPAI then replaces the URLs with new ones that point to ShortPixel’s CDN, which contains the compressed and resized versions of the images. When resizing, the visitor’s device is taken into account so that for example a small device does not have to request a large image.
All of this happens while a page is loading, on-the-fly. SPAI does not touch any of the original physical image files.
Take the following website for example. This is a GTmetrix report prior to the installation of ShortPixel Adaptive Images:
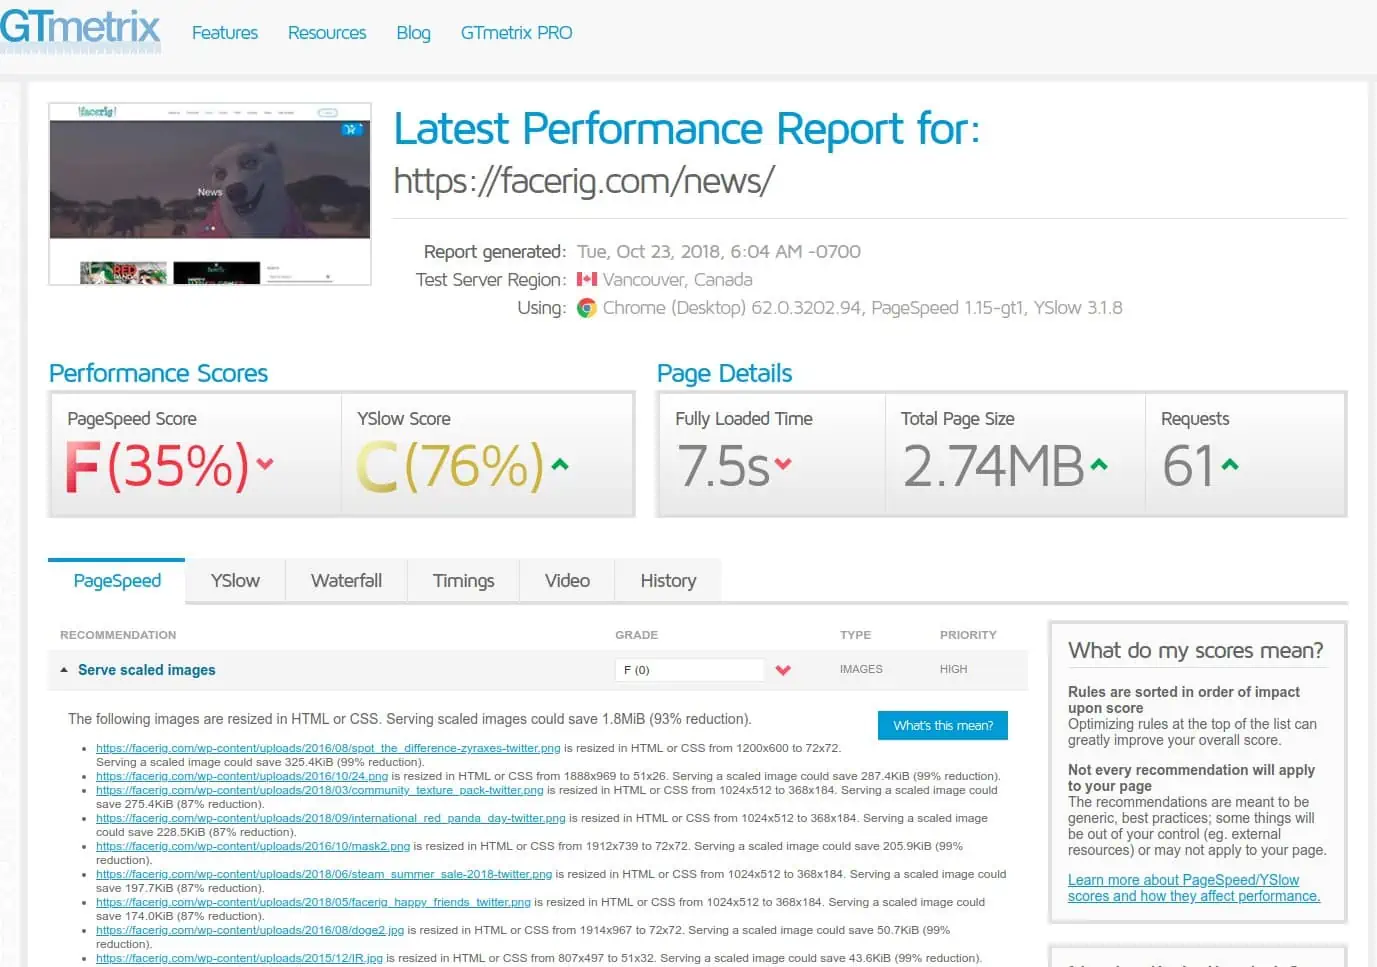
And this is after installing ShortPixel Adaptive Images:
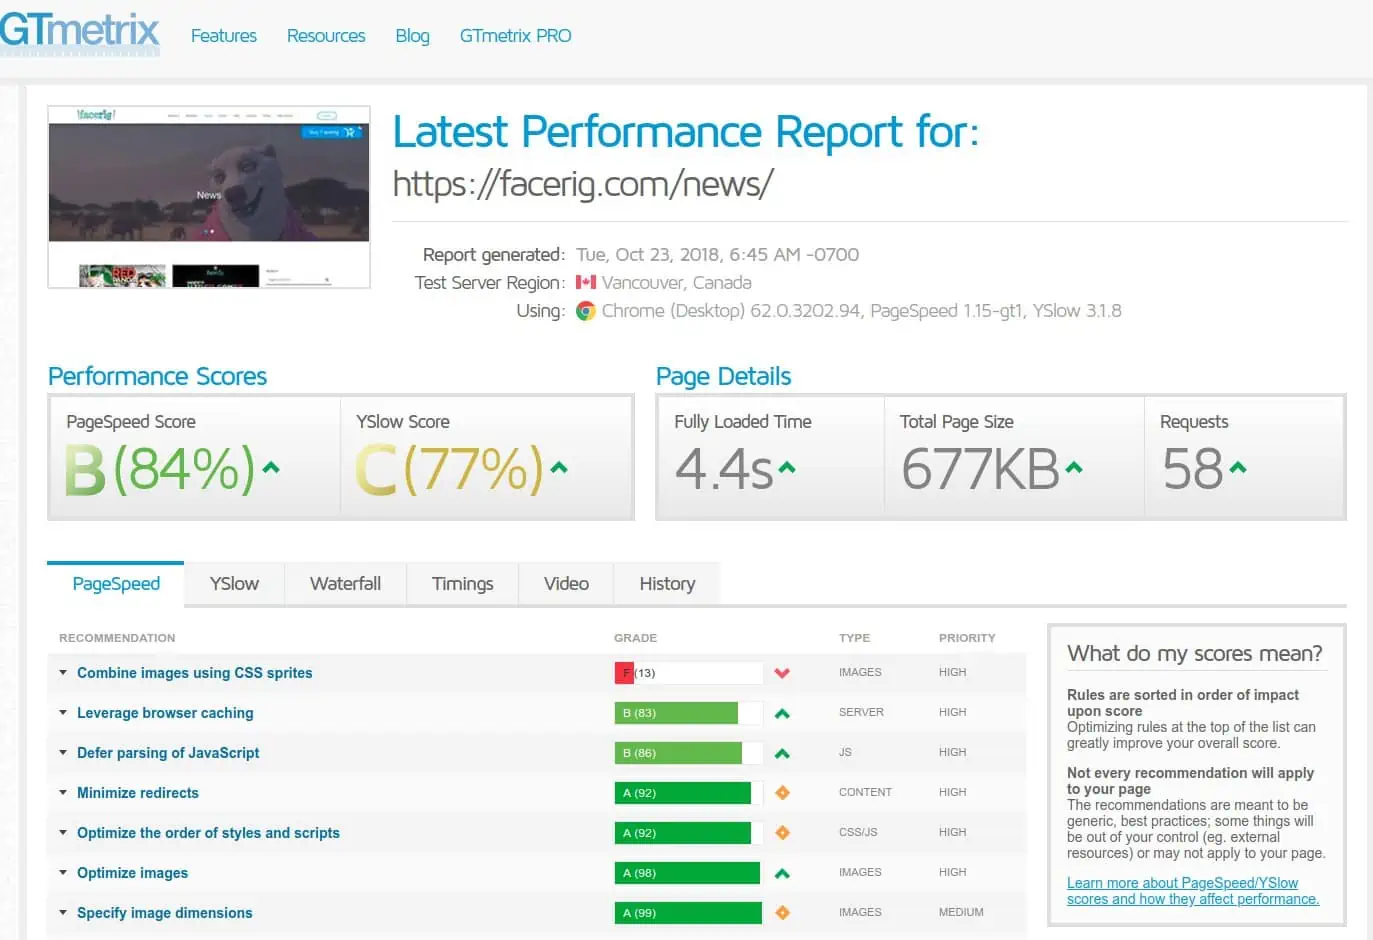
And installing and configuring SPAI is even easier than SPIO! This is literally an image optimization plugin that you can install and forget, as you can read from this step-by-step guide to install and use ShortPixel Adaptive Images (SPAI).
SPIO vs SPAI
SPAI is easier to use and configure, but in some cases it can also a little worse in terms of raw performance because it has to execute JavaScript code for all on-the-fly processing. Since any JavaScript execution is more expensive than no execution at all, some websites may benefit more from SPIO than SPAI. In this case, you can do the following to replace SPAI’s main advantages:
- Use another CDN like Cloudflare or QUIC.cloud.
- Let WordPress handle the resizing of images. WordPress does this by default, although it’s not as accurate as SPAI, because SPAI resizes images to exactly match the placeholder size of the image. For instance, if a placeholder is 356px wide, SPAI will deliver a 356px image. In contrast, WordPress uses predefined thumbnails, selecting the closest size within a range, which may not always be an exact fit. However, you don’t always need this precision and it’s worth displaying an image a few pixels larger if we save ourselves all the JavaScript processing.
Although we prefer SPIO and that’s what we use on this site, we recommend you compare the two and choose the best option for your needs.
If you want to learn more about the differences between the two plugins, take a look at these documents:
- How does ShortPixel Adaptive Images compare to ShortPixel Image Optimizer?
- How does ShortPixel Adaptive Images work?
- How does ShortPixel Image Optimizer work?
Serve images in next-gen formats
Next-gen image formats, like WebP and AVIF, are modern alternatives to traditional formats like JPEG and PNG. These formats are designed to provide better compression, meaning they reduce the file size of images without sacrificing quality. WebP, for example, can produce images that are up to 30% smaller than their JPEG counterparts, while AVIF offers even better compression rates. And as you can imagine, smaller image files load faster, which improves your site’s speed and enhances user experience.
We recommend you using ShortPixel Image Optimizer to convert your images to WebP or AVIF and then serve them to your visitors. Check out their instructions on this video:
If you decided to use ShortPixel Adaptive Images instead, all you need to do is enable the WebP/AVIF option on the plugin settings.
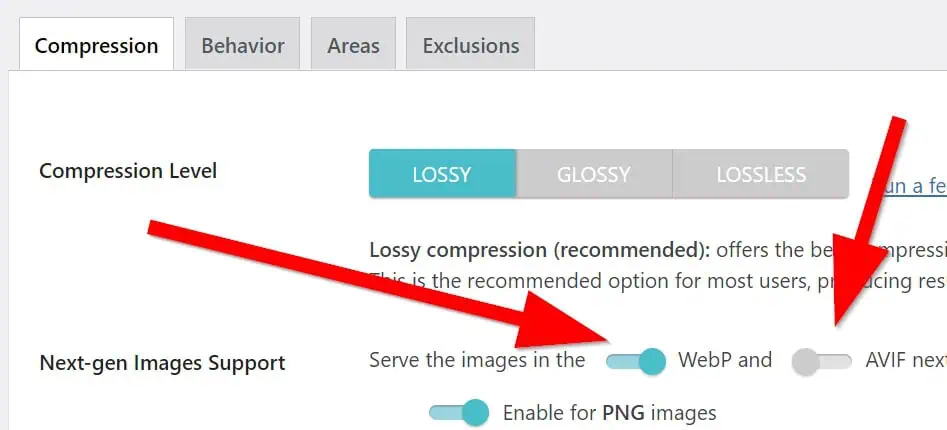
To learn more about how to deliver WebP or AVIF images to your visitors, check out our dedicated post: How to serve images in next-gen formats on WordPress
Image lazy loading
Lazy loading is a technique used to delay the loading of certain elements on a webpage, especially images, until they are needed. Specifically, image lazy loading means that images are only loaded when they enter the viewport, i.e., when they become visible to the user as they scroll down the page. This can significantly reduce the initial load time of your site, as it prevents the browser from loading all images at once.
WordPress comes with a built-in lazy loading feature, known as “native lazy loading,” which leverages the browser’s ability to delay image loading. This is done using the loading="lazy" HTML attribute, which WordPress automatically adds to every image with a width or height attribute. While this is a great feature, it has its limitations, the most important being:
- Lack of control: You can’t selectively exclude specific images from lazy loading.
- No background image support: Native lazy loading only works with
<img>tags, which means that it doesn’t work with background images, which are often crucial for the design and appearance of your site.
To get more control over lazy loading, here are some of the best plugins for lazy loading your images on WordPress:
- Perfmatters or Autoptimize: They not only handle lazy loading but are the best optimization plugins for WordPress, helping you fine-tune your site’s performance.
- WP Rocket, LiteSpeed Cache and FlyingPress: These plugins serve also as page caching solutions and include lazy loading features.
Excluding images above the fold
One important aspect of lazy loading is ensuring that images above the fold—the images visible to users when they first load your page—are not lazy loaded. Delaying these images can cause a poor user experience, as the top of the page may appear blank or incomplete while waiting for the images to load. Moreover, your LCP will increase considerably if you lazy load them!
All of the previous options we mention allow you to exclude these images from lazy loading.
10) JavaScript optimization
The vast majority of websites are basically a mix of:
- HTML
- CSS
- JavaScript
While HTML and CSS add content to your website, structure and design it, JavaScript is responsible for (but not limited to) making it interactive. JavaScript controls the behavior of the various elements of your website. Among the capabilities you have with JavaScript are:
- Live searches
- Analytics
- Element animations, such as images or sliders
- Pop-ups
- Data dynamic handling
- Chatboxes
- etc.
As you may be able to see from the list, what JavaScript provides hardly ever has to take precedence when the page loads. Our goal should be to present the user with a beautiful website as quickly as possible, and load the additional features later to reduce the initial load time.
Defer JavaScript execution
There are two main ways to defer the execution of JavaScript:
- Adding the “async” attribute to your JS scripts
- Adding the “defer” attribute to your JS scripts
This visual explanation from Growing with the Web is a great way to understand the differences.
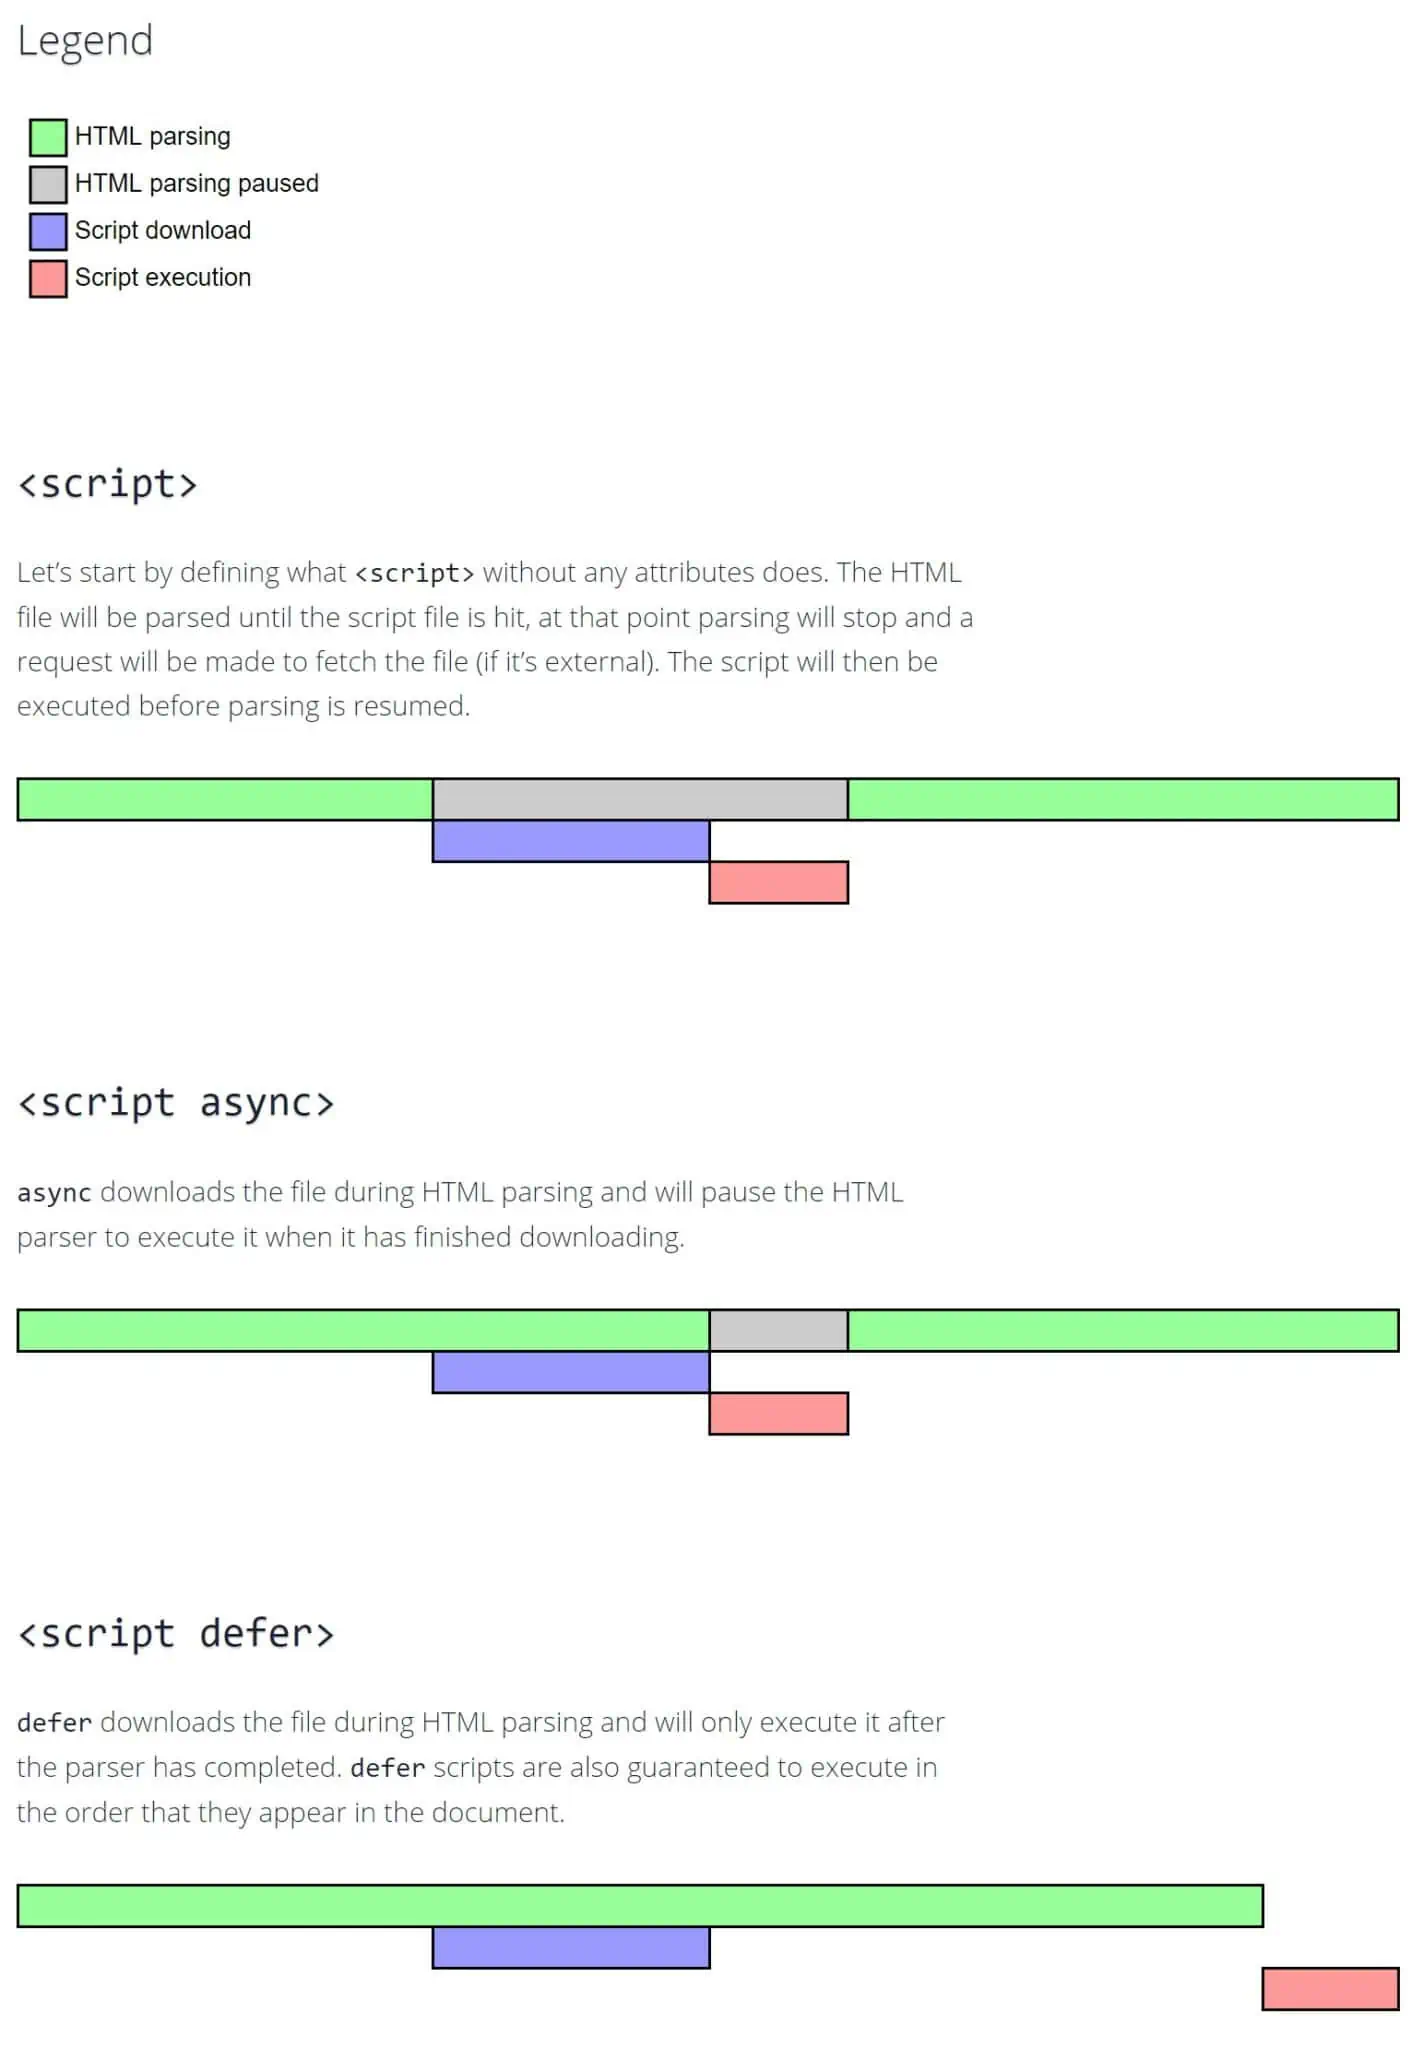
Some important points to keep in mind:
- Do not defer anything that affects the content above the fold.
- Deferring may give you better initial load time, but can break more things than “async”.
- “Async” is safer.
- If you don’t know what you are doing, do not async or defer the “jquery.js” file.
- Test your site extensively!
Async JavaScript
A free and probably the best option is the plugin Async JavaScript, which comes from the same person who developed Autoptimize. Just install it, go to Settings > Async JavaScript, and at the top you can enable or disable “defer” or “async”.
If you scroll down, you will see some more fields if you want more detailed control, in case you want to include or exclude some scripts, plugins or themes (you will need that).
Cache/Optimization plugins
Another option is to use your favorite caching plugin, like WP Rocket, LiteSpeed Cache or again Autoptimize or Perfmatters. These usually include an option to do so.
Perfmatters can help you, for example, to defer the execution of JavaScript in the JavaScript settings. Search for the option “Defer Javascript”.
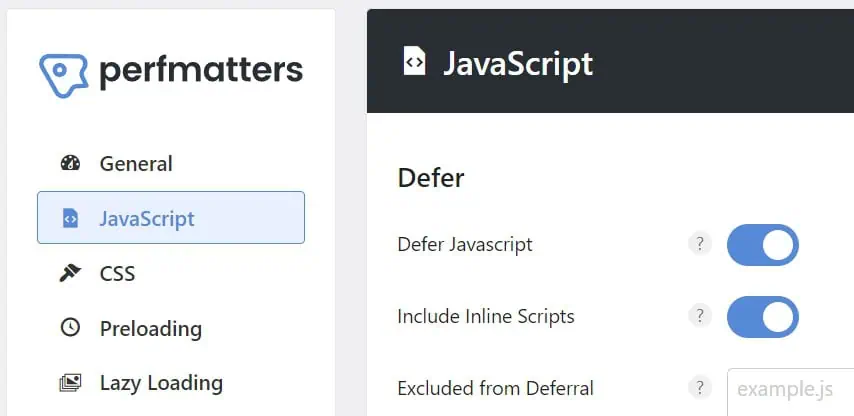
Add a code snippet in functions.php
There’s always a way to get things done via the functions.php file, right? Here too. Add the following code to your functions.php file:
function defer_parsing_of_js( $url ) {
    if ( is_user_logged_in() ) return $url; //don't break WP Admin
    if ( FALSE === strpos( $url, '.js' ) ) return $url;
    if ( strpos( $url, 'jquery.min.js' ) ) return $url;
    return str_replace( ' src', ' defer src', $url );
}
add_filter( 'script_loader_tag', 'defer_parsing_of_js', 10 );
This basically tells WordPress to add the defer attribute to all your JavaScript files except jquery.min.js. Of course, this is not as flexible as Async JavaScript or other plugins, but it is more efficient in terms of performance. Try it out!
Delay JavaScript execution
Delaying JavaScript execution is more aggressive than simply deferring it. While deferring JavaScript instructs the browser to wait until the HTML is fully parsed before executing the JS, delaying takes it a step further: it tells the browser to wait until there is user interaction before downloading and executing the JavaScript files. What counts as user interaction? Key presses, scrolling, or mouse movements. This approach allows the browser to focus solely on parsing the HTML and rendering the page.
This optimization technique can produce impressive results on tools like PageSpeed Insights or other loading speed tests, primarily because these tools simulate visits without user interaction, resulting in virtually no JavaScript being downloaded. Although we should remember that scores alone are not significant to Google, this method is still effective in improving perceived loading time and enhancing some Core Web Vitals, particularly Largest Contentful Paint (LCP).
Flying Scripts
The simplest plugin to achieve this is Flying Scripts. It’s a small, focused plugin that does exactly what you need—no fancy options, no bloat. After installation, just go to its settings page and enter the keywords that identify the scripts to load upon user interaction. The script’s filename should suffice. For example, entering “youtube” will delay all scripts coming from youtube.com, and “gtm” will delay the gtm.js script from Google Tag Manager.
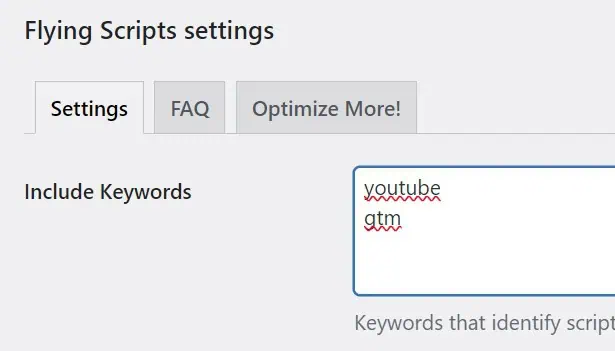
Cache/Optimization plugins
Another way to delay JavaScript execution is by using one of the previously mentioned plugins: Perfmatters, WP Rocket, LiteSpeed Cache, or FlyingPress. All of these allow you to do this easily. For instance, in Perfmatters, you simply go to the JavaScript section and enable the delay setting.
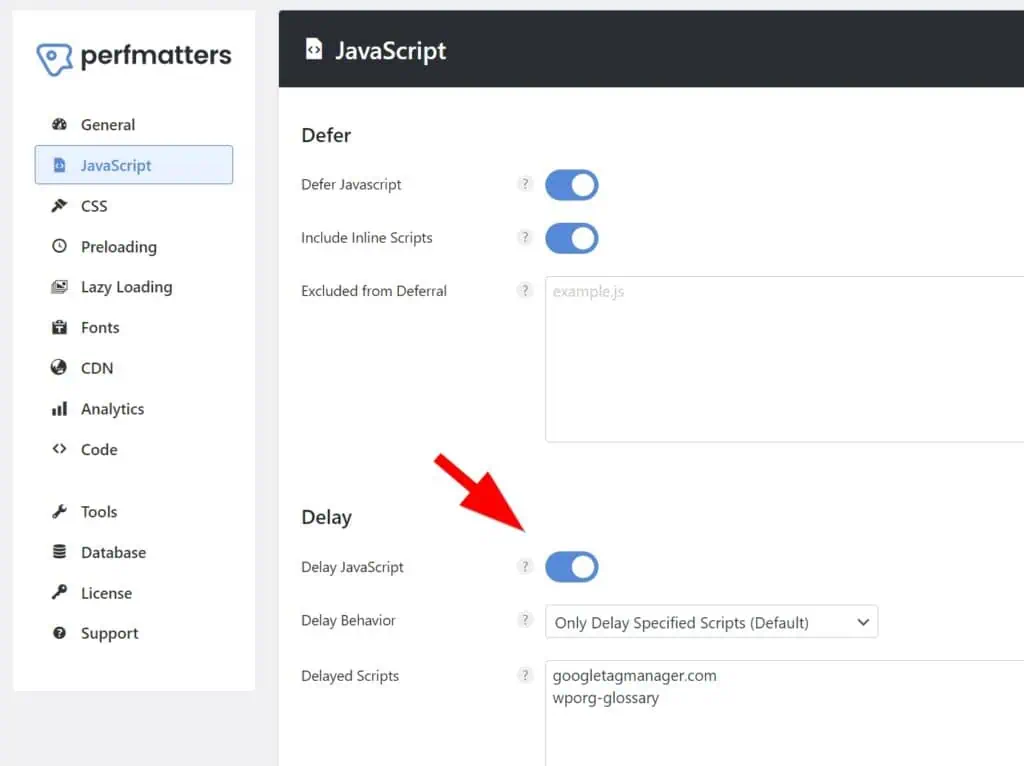
These plugins offer more flexibility. In addition to fine-tuning options, unlike Flying Scripts, where you manually input each keyword, you can choose to delay absolutely all JavaScript. This allows you to exclude specific files from the delay—a necessity in many cases.
Caveats when delaying JS
The more aggressive the optimization, the higher the risk of something going wrong, and this is also true for delaying JavaScript. Keep the following in mind:
- Do not delay any JavaScript file that is necessary for above-the-fold content. For example, if you have a slider at the top of the page, do not delay the related JavaScript files; you want to load it as soon as possible.
- Test everything extensively: search boxes, comment sections, mobile menus, etc. There’s a good chance some scripts will need to be excluded from the delay to function correctly.
- Make sure there is no first-click delay. A good way to test this is on your phone (or using developer tools with a phone emulator). Refresh the page and make sure the first tap you make triggers an interaction, like the menu button. See the example below, where the first click has an unwanted delay; it indicates over-optimization, and you would need to exclude from delay the JS file responsible for processing the click. If you don’t do anything to fix the first-click delay, it could result in a poor Interaction to Next Paint (INP).
- Browse all your site’s pages and check the browser console for errors.
- First-party scripts (anything under
/wp-includesand/wp-contenthosted on your website) are more likely to cause issues when delayed compared to third-party scripts (Google Analytics, Tag Manager, Facebook Pixel, Google Ads, etc.). - Some plugins offer the option to automatically load the scripts after a certain time. We recommend enabling this in some cases. For example, you may want to track a user in your analytics even without interaction, or display your Google Ads regardless of user activity.
- When delaying your analytics scripts, you might notice slightly lower numbers in your analytics reports. This happens because the scripts only load upon user interaction, meaning they won’t fire when a bot visits your site. This can actually lead to more accurate results.
Minify JavaScript files
What does minify mean? Basically, removing all unnecessary characters from your HTML, CSS or Javascript files. What are unnecessary characters?
- New line characters
- White space characters
- Comments
A minified code will usually look like this:

As you can see, there are no new lines, comments or unnecessary spaces.
On WordPress, you can do this with almost every caching or optimization plugin: Autoptimize, Perfmatters, WP Rocket, FlyingPress and LiteSpeed Cache all allow you to do this through their settings.
11) CSS optimization
CSS is a bit more complicated to optimize than JavaScript files, because all we have to do with JavaScript is basically free the browser from the task of processing it while the page is loading. CSS is a different story: if you simply stop or delay loading it, the page will look unstyled for a while, and we definitely can’t do that.
Critical CSS
When a visitor lands on your website, their browser starts loading all the resources needed to display the page. This includes HTML, images, JavaScript, and CSS files. CSS is responsible for styling your site, controlling how everything looks. But not all CSS is needed right away. Some CSS is essential for what’s visible on the screen (above the fold), while the rest is for content further down the page.
Critical CSS refers to the CSS that’s needed to render the visible portion of the page immediately. By isolating and loading only this essential CSS first, your users can start interacting with the visible parts of the page without waiting for the entire stylesheets to load, which can be large and slow to process. The critical CSS is inlined directly into the HTML of your page, while the rest of the CSS files are loaded in the background.
ShortPixel Critical CSS
Note: This option is no longer available to use due to the plugin being closed.
One of the simplest plugins you can find for this is ShortPixel Critical CSS. It requires an API Key from the ShortPixel website, but once you have it, just enter it in the appropriate field; the default settings should be fine for almost anyone.
This is what Critical CSS looks like in the source code when you use ShortPixel Critical CSS.

Cache/Optimization plugins
Almost all of our favourite cache/optimization plugins offer the ability to generate the critical CSS: Autoptimize and its integration with criticalcss.com, WP Rocket, LiteSpeed Cache and FlyingPress. Keep in mind that WP Rocket and LiteSpeed Cache call this “Load CSS asynchronously”.
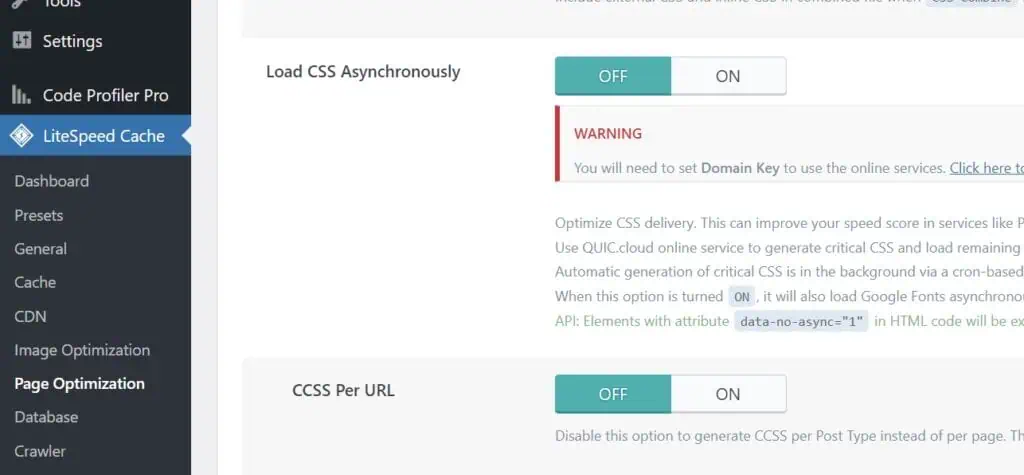
Manual implementation
If you don’t feel like installing a plugin, even though it will make your life much easier, you can always generate the critical CSS yourself using online tools. There are many options, like this one and this one. You’ll need to enter the URL you want, and the result will be a CSS code that you’ll have to manually insert into the relevant page. For example, for the homepage, you would need to add the following code to the functions.php file:
function add_custom_critical_css() {
    if ( is_front_page() ) {
        echo '<style id="customcriticalcss">here_goes_all_the_critical_CSS</style>';
    }
}
add_action( 'wp_head', 'add_custom_critical_css' );
You’ll have to do this for each page type (page, post, category, tag…), with the corresponding new code in the functions.php file.
Additionally, you’ll also need to force all CSS files to load asynchronously; otherwise, the effect of the critical CSS will be nullified. The goal is to load the critical CSS first and then the CSS files without them blocking the page’s rendering.
That’s why we say that manual critical CSS generation is not worth it. Having so many automated tools, it’s almost always better to rely on them. You’ll save time and effort.
Themes and Critical CSS
Some themes offer the option to enable Critical CSS in their settings. For example, Divi has this feature:
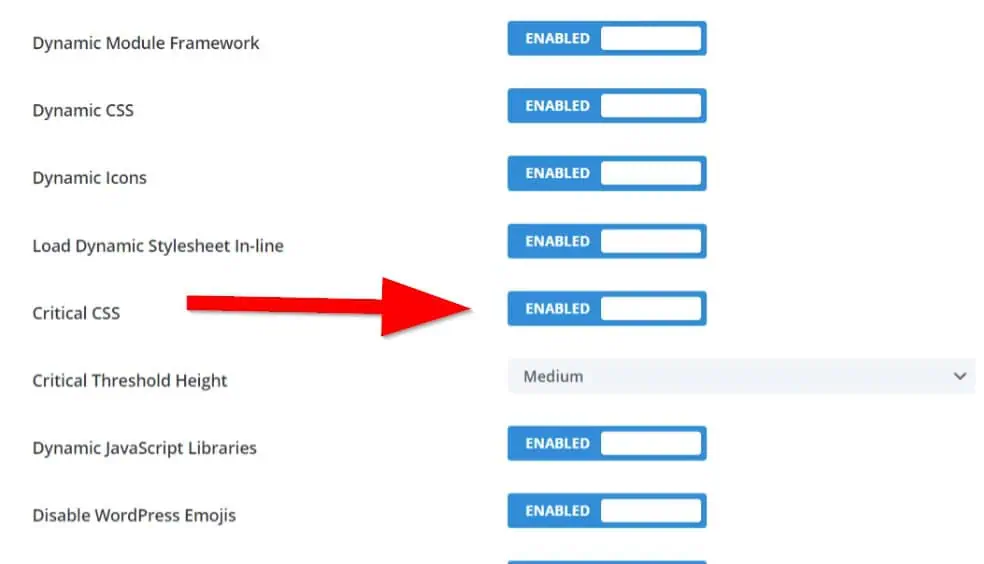
We recommend activating it as long as you don’t have any other plugin handling Critical CSS, to avoid conflicts.
Caveats when using Critical CSS
The implementation of this technique is effective if done well, but can also be harmful if not done correctly. Tools for automatic critical CSS generation are unfortunately anything but perfect. They analyze your website in the background and then insert the appropriate CSS into the source code. However, they very often fail to recognize many styles, which can lead to FOUC or CLS issues when the real CSS files are loaded in the background and the browser recalculates the style of the page. Not tackling these issues is a very bad idea because your users will have a poor user experience and because the Core Web Vitals (especially the CLS) will be affected.
Therefore, you will have to get familiar with inspecting, understanding and manipulating CSS code and be able to use the “Exclude CSS classes/files” fields or similar to tell the plugin in question to always include a specific style in the critical CSS.
Remove unused CSS
CSS files often contain styles that aren’t actually used on a given page. If your CSS files are large because they contain unnecessary styles, this process can take longer than it should. Removing unused CSS files reduces the load on the browser, resulting in faster rendering and a shorter loading time.
The actual technical process behind removing unused CSS is quite similar to Critical CSS, but there are a few differences:
- When creating Critical CSS, the CSS needed to render the visible part of the page is inserted inline into the source code so that the browser can render it immediately. The remaining CSS files and code are then loaded asynchronously.
- When removing unused CSS, the used CSS of all the entire page (not just the visible part) is inserted inline into the source code and the remaining CSS code is removed (hence the name) and no longer loaded.
Cache/optimization plugins
All of our favorite cache/optimization plugins, with the exception of Autoptimize, include a function to remove the unused CSS: WP Rocket, LiteSpeed Cache, FlyingPress and Perfmatters. This is the setting for LiteSpeed Cache, for example:
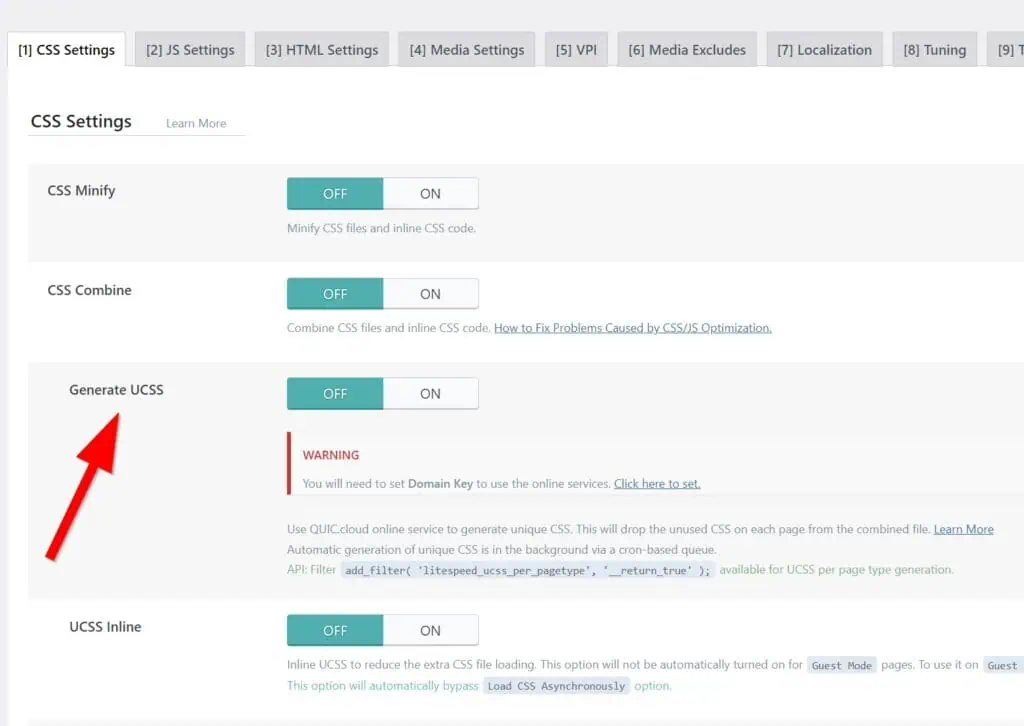
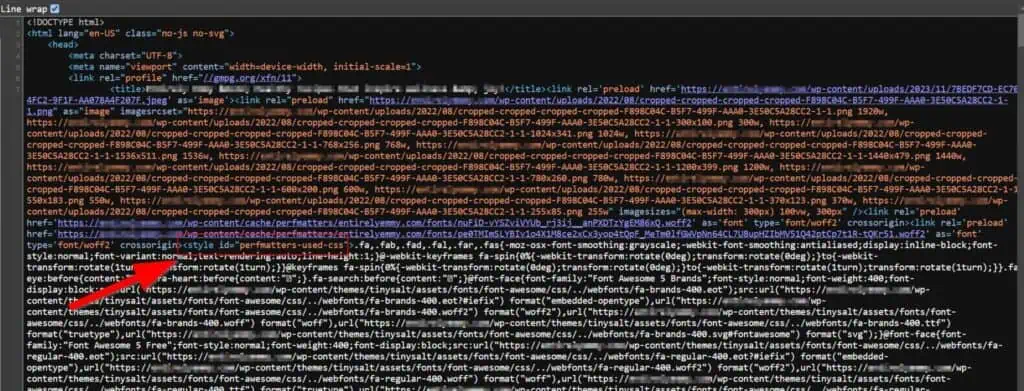
And this is how Perfmatters inserts the used CSS into the source code:
Manual implementation
If you prefer a more hands-on approach, you can manually remove unused CSS. Tools like PurgeCSS or UnCSS can analyze your HTML files and remove any CSS rules that are not used on your pages. However, this method requires a deeper understanding of CSS and your site’s structure.
Here’s a basic example of how you might use PurgeCSS with a WordPress theme:
- Run PurgeCSS on your theme files. You’ll need to provide the HTML and CSS files for it to analyze.
- PurgeCSS will output a new CSS file with only the necessary styles.
- Replace your existing CSS file with the one generated by PurgeCSS.
Be aware that manual removal can be time-consuming and risky if you accidentally remove styles that are needed for dynamic content. That’s why we always prefer going with the more automatic option, with one of our plugins of choice.
Caveats when removing unused CSS
- As with Critical CSS, while removing unused CSS is beneficial, it’s important to be cautious. Automated tools can sometimes remove styles that are used by JavaScript or dynamic elements on your site such as menus that appear on hover or form error messages, leading to broken layouts or functionality. To avoid this, always test your site thoroughly after implementing any unused CSS removal strategy. Also, consider using the “Exclude CSS classes/files” options provided by the tools to prevent essential styles from being removed.
- While the recommended plugins don’t allow you to have Critical CSS and Remove Unused CSS active at the same time, if you have the option, you shouldn’t have both features active in order to avoid conflicts.
- The same CLS and FOUC problems can occur here as with Critical CSS. When playing with the style of the website, it’s very likely that you’ll encounter layout shifts and missing styles, so it’s important that you’re well versed in CSS.
More information
If you want to learn more about how to reduce unused CSS on WordPress, feel free to check out our dedicated post here: How to reduce unused CSS in WordPress
Minify CSS files
Refer to the equivalent JavaScript minifying section.
12) Fonts optimization
Fonts might seem like small and inoffensive assets, but they often range from 10KB to 50KB per font file, or even more. So when multiple fonts, weights, and styles are loaded, the combined font size can significantly impact your site’s loading time and introduce FOUT (Flash of Unstyled Text) issues. These occur when system fonts load first while waiting for third-party fonts to load, leading to layout shifts and contributing to Cumulative Layout Shift (CLS).
Most websites today use Google Fonts, so, like it or not, many optimization techniques are tailored for them. However, Font Awesome is also particularly notorious. Many websites load large files containing hundreds of icons but end up using only one or two. This inefficiency can significantly bloat sites unnecessarily.
The ideal solution: system fonts
In an ideal world, system fonts would be the best choice since they are pre-installed on users’ devices, loading instantly without requiring additional requests. This very website uses system fonts, which is one of the reasons it’s so fast. 😊 However, design trends and user expectations often call for custom fonts to achieve better aesthetics and branding alignment.
To use system fonts, you just need to not use any additional fonts. Don’t choose a Google Font or any other font in your theme or plugin settings. The visitor’s browser will handle the rest, using the OS’s default fonts.
Hosting fonts locally
The next best approach is to host fonts locally on your server. Instead of loading fonts from Google’s servers on every page load (assuming you’re using Google Fonts), you download the font files to your own server and serve them directly. This minimizes external requests, reduces latency, and gives you greater control over font loading behavior.
The automatic way
Many modern themes, like Blocksy, already include an option to host fonts locally, making this process simple and efficient. But our recommendation will be to use plugins like Perfmatters and OMGF, which offer advanced customization options. For example, Perfmatters allows you to limit the subsets downloaded locally—there’s no need to download Japanese, Chinese, or Hebrew characters if your website is in plain English.
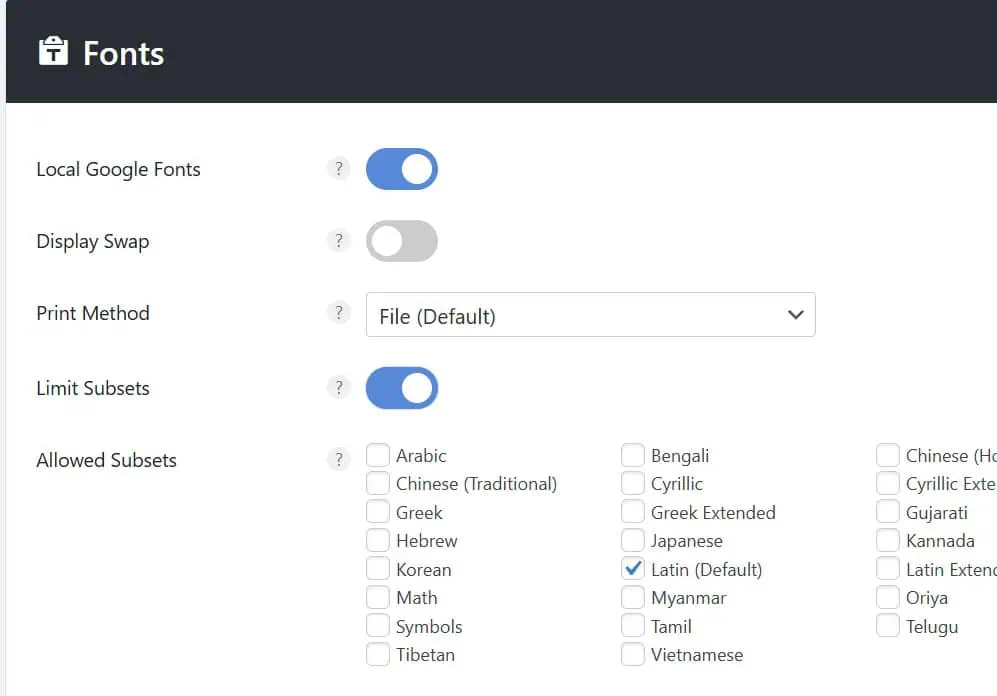
You can also achieve the same local fonts effect with Cloudflare APO, a $5/month add-on designed to cache your entire WordPress website on the edge (on every Cloudflare PoP). As a bonus, it hosts Google Fonts on their servers, making sure they always load from Cloudflare’s servers (as long as your page is cached), which is much faster.
The manual way
You can also do this process manually. Elementor (which you should not use) offers an option to upload your own font files, as do other themes or builders. Remember to upload the fonts in WOFF2 format, which produces the smallest files and offers the widest browser and OS compatibility.
If you choose the manual route, make sure to upload only the font weights and styles you need (refer to the next section) and the required subsets. How do you do font subsetting? Just process the WOFF2 files in the Font Subsetter by Everything Fonts.
Select specific weights and styles
Avoid loading unnecessary font weights and styles. Themes that allow you to select Google Fonts usually provide options to choose specific weights (e.g., 300, 400, 500) and styles (e.g., italic, bold). Remember, each additional weight or style often requires downloading larger font files or multiple files, so it’s best to limit these to what you actually need.
The problem here is that some themes or plugins may automatically load more weights and styles than necessary. If your theme lacks settings to prevent this, the OMGF plugin can help. On its settings page, you’ll find a table that lets you deselect unwanted weights and styles.

Of course, you need to be careful when making changes, as some weights may still be in use. To determine which fonts, weights, and styles your site uses, we recommend the Chrome extension Fonts Ninja.
Icons
In WordPress, you’ll often encounter Font Awesome when you need icons. While they have a huge library of cool icons, it can be both a blessing and a curse. For pages with just one or two icons, many plugins and themes still load the entire font library—sometimes exceeding 100 KB and including thousands of unused icons—all for just a few icons.
Here are a few solutions to avoid loading large icon libraries like Font Awesome:
- Use SVG files: Websites like SVG Repo offer thousands of free SVG icons. To upload SVG files to your site, you’ll need the WP SVG Images plugin.
- Use The Icon Block: Amazing little plugin for the Gutenberg block editor, made by Nick Diego, known for his top-notch plugins.
- Use Dashicons: Dashicons are WordPress’s native icon fonts. However, this is a last resort, as it still requires loading a large CSS file (~40 KB).
Preload fonts
See the next section 🙂
13) Preload resources
Preloading is a web performance optimization technique that allows you to tell browsers to fetch certain resources early in the page load process. This is especially useful for critical resources needed to render above-the-fold content.
What does a preload look like in the source code? It’s a simple <link> tag in the <head> of a page with the rel="preload" attribute. For example, our homepage includes this:
<link rel="preload" href="https://accelerawp.com/wp-content/uploads/2024/06/decorative_darkblue.svg" as="image">A preload always needs two additional attributes, as shown above:
- An
href: This is the link to the resource. - And an
as: This can have several values. Note that forfontandfetch, you must also include thecrossoriginattribute.fetch: Resource to be accessed by a fetch or XHR request.font: Font file.image: Image file.script: JavaScript file.style: CSS stylesheet.track: WebVTT file.
When a browser encounters a <link rel="preload"> tag, it starts a high priority download for the resource, so that by the time it’s actually needed it’s either already fetched or partly there. Think of rel=preload as a way to control when the browser discovers a resource, such as background images or other assets that require scripts to load first, which aren’t immediately visible to the parser. Take into account that images by default start at “Low” priority, so you may also want to include the fetchpriority="high" attribute to the preload (and that’s also the reason why images are by default taking a tall on the LCP).
While preloading can significantly improve performance, overusing it can backfire. Adding too many preload directives can:
- Overwhelm the browser’s loading queue.
- Delay fetching other critical resources.
- Increase page load times instead of reducing them.
Always evaluate which resources are truly critical and limit preloading to those. We recommend preloading the LCP element (if it’s an image) and any font that causes CLS issues.
Preload fonts to fix CLS issues
A high Cumulative Layout Shift (CLS) often occurs when web fonts load after content rendering. Preloading fonts ensures they are available when the page starts rendering, preventing shifts caused by font swapping.
<link rel="preload" href="/fonts/custom-font.woff2" as="font" type="font/woff2" crossorigin="anonymous">If you want to see a bad case of high CLS caused by fonts, check NitroPack’s own website. You can see how as soon as the web fonts are loaded, the content jumps down, increasing the CLS:
Preload images to improve LCP
Critical images, especially those above the fold, can be preloaded to improve the LCP. For example:
<link rel="preload" href="/images/hero-banner.jpg" as="image">This guarantees that the hero image loads early, preventing visual disruptions. Here’s a schematic image created by GTmetrix that clearly shows how preloading an image can help the LCP.
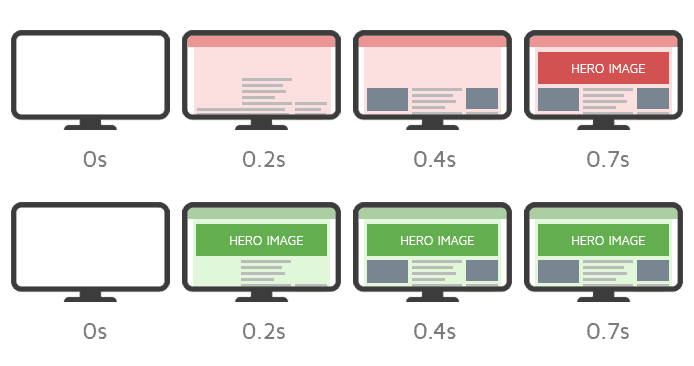
Bottom – with preload
How to preload resources with Perfmatters
Perfmatters makes preloading easy by providing a user-friendly interface:
- Log into your WordPress dashboard and navigate to Settings > Perfmatters > Preloading.
- Add the URL of the resource you want to preload. Specify the resource type (e.g., font, image, script). You can also optionally choose the device type and page ID.

- Additionally, you can adjust the Preload Critical Images setting, which automatically preloads the first X images you specify. Note that this setting only applies to images in
<img>tags, so background images must still be manually preloaded as explained above. - Save your changes, and Perfmatters will insert the appropriate
<link rel="preload">tags into your site’s<head>.
We also recommend you taking a look at the filters to customize the preloading feature. Chances are you will need them if you want to preload the correct image on every single page of your site: Filters to further customize Perfmatters plugin options
14) WordPress general optimization
These are other improvements you can make that will not have a big impact, but will add to the overall results.
Control the Heartbeat API
The WordPress Heartbeat API is a built-in feature that allows real-time communication between the browser and the server. It powers features like auto-saving posts, showing when someone else is editing a post, and managing session expirations. It works by sending AJAX requests (admin-ajax.php) at frequent intervals; every 15 to 120 seconds depending on the context (e.g., post editor, dashboard, or front-end).
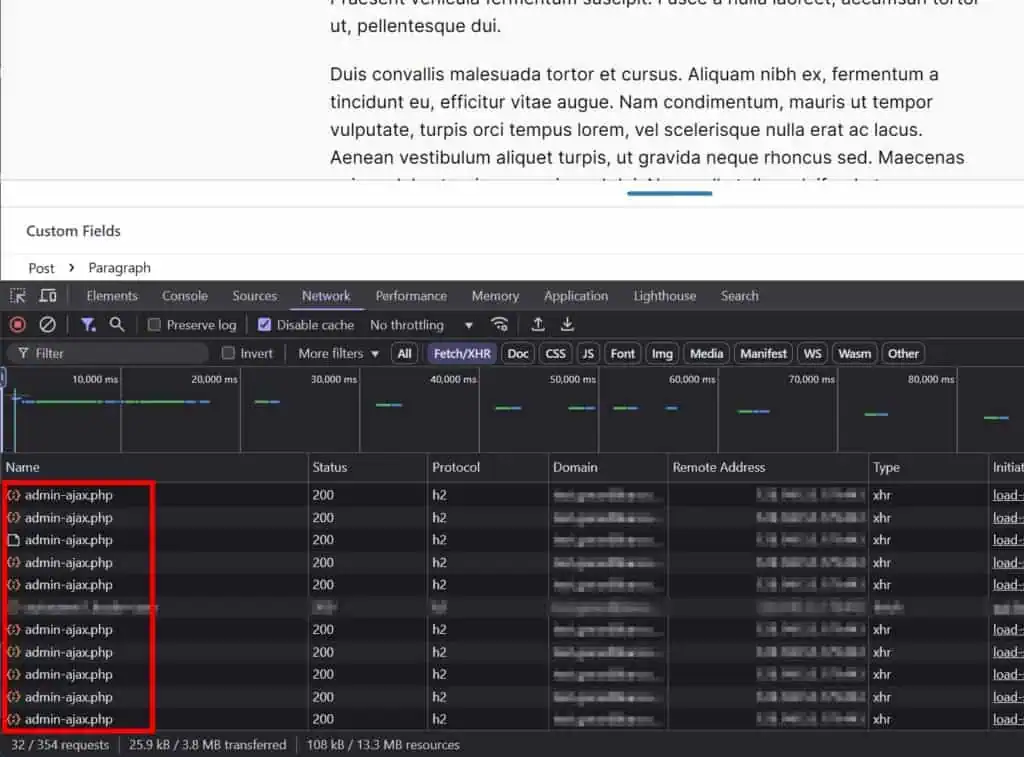
As you can imagine, this can put unnecessary strain on your server—especially on shared hosting or high-traffic websites, for the following reasons:
- Increased CPU usage on the server.
- Higher resource consumption.
- Excessive AJAX requests when there are many logged-in users.
There are two main ways to control the Heartbeat API: using a plugin or adding custom code to your functions.php file.
Using a plugin
Several plugins make it easy to modify or disable the Heartbeat API. Perfmatters is our favorite, but many caching plugins (like WP Rocket) also include Heartbeat API control settings. If you prefer a dedicated plugin for this, check out Heartbeat Control.
In Perfmatters, you can find the Heartbeat API settings under Settings → Perfmatters → General. You can:
- Keep the default behavior (Heartbeat frequency is 10 seconds)
- Disable Heartbeat completely (for minimal resource usage).
- Allow it only when editing posts or pages, which is what most users need and what we recommend and use here at Accelera.
For any option (except when completely disabled), you can also adjust the Heartbeat API frequency. Here at Accelera, we set it to 60 seconds.
Control the Heartbeat API with code
If you prefer a code-based solution, you can add this snippet to your functions.php file or a custom plugin:
function disable_heartbeat_completely() {
    wp_deregister_script('heartbeat');
}
add_action('init', 'disable_heartbeat_completely', 1);
This will fully disable the Heartbeat API. If you want to reduce its frequency instead of disabling it, use the following snippet, where you can edit the frequency yourself:
function modify_heartbeat_frequency($settings) {
    $settings['minimalInterval'] = 60; // Set to 60 seconds (default is often 10)
    return $settings;
}
add_filter('heartbeat_settings', 'modify_heartbeat_frequency');
Clean the head of your pages
As you probably know, every HTML document has two parts: the head and the body. The body contains the actual content of the page, such as text and images, while the head provides general information (metadata) about the document, including its title and links to scripts and styles.
However, the head also contains a lot of unnecessary elements—extra lines of code that the browser must download and parse. Here’s how you can clean it up.
Remove the Capital P Dangit filter
We bet you didn’t know that WordPress has a feature that auto-corrects every instance of “Wordpress” to “WordPress” by capitalizing the ‘p’. If you believe you don’t need WordPress to do this for you and would also like to not waste server processing power (while the intention is praiseworthy, this still requires the execution of PHP code), we have a solution for you. Here’s how to remove the Capital P Dangit filter.
Disable the self-pingbacks
Pingbacks in WordPress are a type of notification that lets other websites know when you’ve linked to their content. If another WordPress site links to your post, your site can receive a pingback, which appears in the comments section (if approved). For pingbacks to work, a few conditions must be met:
- The “Allow link notifications from other blogs (pingbacks and trackbacks) on new posts” option must be enabled—this is only relevant if you want to notify other websites. This option is located under Settings > Discussion.
- The “Attempt to notify any blogs linked to from the post” option must be enabled—this is only relevant if you want to be notified by other websites. This option is located under Settings > Discussion.
- You need to have an Update Service configured under Settings > Writing. By default, WordPress includes http://rpc.pingomatic.com/.
Pingbacks work automatically between WordPress sites that have them enabled. However, pingbacks are often disabled because they can be misused for spam. That’s why we recommend disabling the pingback options above altogether.
But let’s say you do want pingbacks enabled. Then we need to talk about self-pingbacks, which occur when you link to one of your own posts from another post on the same WordPress site. They are generally useless because:
- They clutter the comments section – They appear as comments on your post, making the comments section messy.
- They don’t have any real SEO benefit – Internal links help SEO, but self-pingbacks don’t add any extra value.
- They create annoying notifications – Every time you internally link, you get an unnecessary notification in WordPress.
- They consume server resources – While not resource-intensive, they still require processing, and in extreme cases, they can cause minor performance hiccups.
How can you disable self-pingbacks? Simply add this code snippet to your functions.php file:
function no_self_ping( &$links ) {
    $home = get_option( 'home' );
    foreach ( $links as $l => $link )
        if ( 0 === strpos( $link, $home ) )
            unset($links[$l]);
}
add_action( 'pre_ping', 'no_self_ping' );
If you prefer to go the plugin way, you can just install No Self Ping or Perfmatters if you are already using it.
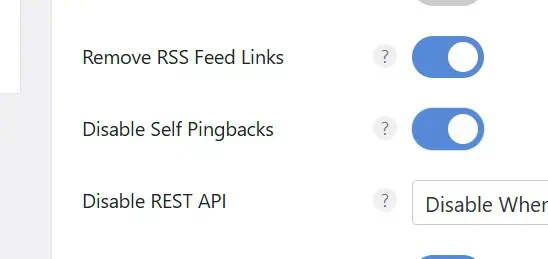
Preconnect to external sites
Preconnecting allows your site to establish early connections to external domains, reducing delays caused by DNS lookups, TCP handshakes, and SSL negotiations. By doing this for key external resources like fonts, payment gateways, or CDNs, you can improve your site’s loading speed. However, preconnecting everything isn’t a good idea—overusing it can actually slow down performance.
Want to know the best way to implement preconnect efficiently? Here’s the detailed guide: How to use preconnect.
Apply DNS-Prefetch
DNS prefetching helps speed up page loads by resolving domain names in the background before external resources are needed. It’s like preconnect, but only for the DNS lookups. This reduces latency when fetching assets from third-party domains like social media scripts, analytics tools, or CDNs, and unlike preconnect you cannot possibly overuse it. While it’s a simple optimization, applying it strategically ensures maximum performance gains without unnecessary lookups.
Want to learn how to implement DNS prefetch correctly? Check out our full guide: How to Use DNS Prefetch.
Disable the WP-Cron
WP-Cron is WordPress’ built-in task scheduler, responsible for running scheduled tasks like publishing scheduled posts, checking for updates, and handling plugin tasks. However, it relies on site traffic to trigger, which can cause performance issues, especially on high-traffic sites or those with low visits, leading to missed or delayed tasks.
Learn more about how you can disable WP-Cron and replace it with a real server cron here.
15) Update your PHP version

If you use PHP, and you do if you use WordPress, make sure you use the latest version of it. You will definitely notice an increase in loading speed, especially if you are upgrading from a quite old version. Kinsta has run some benchmarks and the results are clear. The latest version of PHP is the clear winner.
However, updating the PHP version instead of increasing your WordPress performance could cause problems on your website as it is a sensitive part. Make sure you extensively test all parts of your website after updating PHP version and have an easy way to rollback. To help you with this, you can try a sandbox WordPress system where you can test plugins and/or themes without fear of breaking anything. You probably will not have the latest PHP version, but at least an “almost latest” one. Here is a free sandbox system you can use: Quick WordPress Testing & Staging Sites – TasteWP
16) WordPress database optimization
Optimizing your database is also important. You may not notice it if it’s a small site, but if you have been running it for a while and/or have a large site, you’ll probably see and feel a difference when you clean up your database.
Every environment and setup is different, so there’s no “magic code” that will do this for you. However, we can give you some tips.
- Delete orphaned and duplicated metadata from your database. WordPress has a variety of entries that contain additional information. For example, your users have an email address, a website, a bio; your posts have a content, a title, an excerpt; comments have an author, an email field, and so on. This information can sometimes be duplicated or orphaned (not belonging to anything). In such cases, this data is simply worthless and takes up unnecessary space in the database. To clean up all this data, you can use a plugin like WP-Sweep.
- Optimize your database tables. The word “optimize” has a different meaning here: This section is called “Optimize your database” in the sense of cleaning it up, but the database tables can actually be optimized, much like defragmenting a computer. For this, again, you can use a plugin like WP-Sweep. Or, if you are adventurous, you can do this manually with a database management tool like phpMyAdmin. See this article for more detailed information on how to do this.
- The MySQL Tuner script is a script written in Perl that helps you configure your MySQL database and gives recommendations for better performance and stability. Note that you must have very good technical knowledge and access as root to your server to use it.
- Clean up autoloaded data from the
wp_optionstable. Thewp_optionstable in your WordPress database stores various data for your website, like site URLs, plugin settings, and theme settings. Some of this data is “autoloaded,” meaning it loads on every page of your site. The problem? WordPress often retains data from deleted themes and plugins, especially because many developers set autoload to “yes” by default and don’t offer an easy way to remove it. So, how do you get rid of this outdated autoloaded data? You have two options:- Get your hands dirty and log into your database management software. Here is how you can remove the autoloaded data manually.
- Use AAA Option Optimizer to remove this data from your WordPress dashboard.
Want to optimize your database even further?
We have written a full article on what you can do to make your database run faster. Read it here: How to clean up the WordPress database
17) External resources optimization
Almost all websites need to connect to external sites to complete page loading: Google Fonts, Google Analytics, chat popups, comment services, videos, and more. Believe it or not, these can also be optimized, although there are limitations, of course, since they are third-party services.
We have written an article that talks about these services and what you can do to optimize your external resources. It’s constantly being updated, so check it out here: How to optimize your external resources in WordPress | Accelera
We hope this article helps you improve your WordPress’ performance so it gets the boost it deserves!

